Thursday, March 08, 2018

Slow cooker Coq Au Vin

I have always wanted to cook with red wine but the few times that I've tried it with beef didn't taste so great. Eventually I found out that I had been missing a key step - I need to boil off the alcohol otherwise it leaves a bitter taste! Decided to re-try coq au vin which surprisingly, pairs chicken with red wine. I'd always been taught that red wine goes with red meats and white wine goes with white meats but I guess chicken is poultry which is 'neutral'.

Here's a great writeup of Julia Child (the doyen of American cooking) with her interpretation of the recipe and it works quite well!

https://leitesculinaria.com/5399/recipes-julia-child-coq-au-vin.html

I've tweaked it for our tastes so I cannot claim this to be either authentic Julia Childs or French. Original recipe includes tomato paste, thyme, and bacon which I didn't have on hand.

Ingredients
1.2 kg of chicken drumsticks
3 bay leaves
2 glasses of red wine
1l of chicken stock
1 tbsp onion chutney
2 large potatoes, peeled and cubed
3 large carrots, peeled and cubed

Method
1) Marinate the chicken in the red wine for at least 4 hours or best, overnight.
2) Drain the chicken. In the slow cooker pot, brown the chicken drumsticks.
3) Add the onion chutney and bay leaves. Pour back the red wine marinade. Bring to a boil so that the red wine evaporates.
4) Add in the chicken stock and ensure that the chicken is immersed. Add the potatoes and carrots.
5) Slow cook for 6 to 8 hours. Let it rest for ½ hour in the residual heat before serving. If you wish, add a tbsp of flour to thicken the sauce at the end.
6) Goes best with buttered bread or buttered brioche to mop up the juices.

Friday, February 16, 2018

Bak kwa (take 2)

I attempted to make BW couple of years ago but it just didn't taste right. Tried this time but with 1kg of minced pork. Not quite there but it will do.

Adapted from:
http://www.malaysianchinesekitchen.com/bak-kwa-chinese-pork-jerky/ (ingredients)
http://mykitchen101en.com/homemade-bak-kwa-chinese-pork-jerky/ (method)

Ingredients
1 kg of minced pork (makes about 32 big 'regular' bak kwa rectangles, which I further cut into 4)
⅔ cup sugar + 1 tbsp
2 tbsp cooking wine
1 tbsp dark soya sauce
1 tbsp light soya sauce
½ tsp five spice powder

Method
1) Mix the ingredients. Using your hand or a stiff cooking implement (e.g. wooden spatula), mix well in 1 direction until it comes together and is slightly gluey and paler in colour.
2) Leave to marinade in the fridge for at least 4 hrs or overnight.
3) Take out a baking sheet or sheet pan (mine was 17" by 12".) Line with foil followed by parchment.
4) Place the meat and using a offset spatula, distribute it. Cover the top with cling film and using a rolling pin, press as flat as possible, at least 3mm thin or thinner if you can. My sheet pan was not large enough so I might need to transfer say 200g to another third sheet.
5) Bake at 120 deg C for 15 minutes. It would have shrunk and oozed oil. Slice up and flip over. Increase the temp to 220 deg C and bake on one side for 8 minutes before flipping and repeating.
6) Prior to serving, grill it for best effect.

Recipe feedback
Compared to the previous recipe, this one tastes ok but there's a strong piggy smell. It really helps to microwave 30s on each side before serving which makes it seem more like the caramelised taste of bak kwa and it has to be consumed hot. Texture however seems wrong, as the minced meat texture is quite obvious (lumpy) but it does make the bak kwa more tender. On balance, I think next time I'll use this recipe but the old method of baking at 150 deg C for 1 hour which dries it out better instead of having 2 sets of temperatures.

Monday, February 12, 2018

Hot water dumpling dough

I have been making bao dough and also dumpling dough but never thought twice about using cold versus boiling or hot water, until I read omnivorescookbook. https://omnivorescookbook.com/steamed-dumplings/

She's given a very compelling reason about the temperature of water and the effect on the different types of dough, so I thought I'd give it a try. And it really does work! My dough as so stretchy and easy to work with. I could roll it super transparent thin at the edges and it crimped beautifully and still didn't break!

Ingredients (for about 700g of meat with 300g of veg filling - I used only 2.5 cups which allows for about 500g meat + 200g veg filling.)
3 cups of flour
1 cup boiling water
¼ cup room temp water
1 tsbp of oil

Method
1) Create a well in the flour. Using chopsticks, stir to incorporate the flour from the sides of the well as your pour the boiling water into the centre of the well. Gather as much dough as possible.
2) Pour in the oil and continue to mix (she didn't do this but I find that oil really helps the elasticity and workability of the dough)
2) Pour the room temp water slowly along the sides of the bowl until the dough comes together in a shaggy mess. You may not need to use all the water or you might need more. The aim is to get all the dry bits of flour moistened and the dough should leave the bowl clean.
3) Invert onto a work surface lightly dusted with flour and give it a good kneading for 10 to 15 minutes until smooth. Form a ball.
Steamed
4) Oil the bowl and place the dough inside to rest. Cover the bowl with a damp cloth or cling film and leave to rest for 30 to 60 mins while you dice the vegs and combine with the marinated meat filling.
Pan fried with crispy bottoms
5) Roll out with thinner edges and for 4" discs, use about 1.5 tbsp filling; 3" discs need about slightly under 1 tbsp of filling. Crimp.
6) Follow the recipe as you would when making steamed or gyoza dumplings.

The leftover dough was rolled into spring onion pancake which uses the same hot water dough
Leftover dough becomes spring onion pancake

Thursday, February 08, 2018

Oven 'fried' har cheong gai

Try 2
Decided to try a different recipe.
Recipe adapted from here: https://spicenpans.com/prawn-paste-wings/
- Key thing about this method is the use of corn flour and baking powder in the marinade.
- Coated in flour and left there to rest for 15 minutes.
- Air fry on a wire rack 15 minutes at 160 deg C to cook then flip and air fry further 5 minutes at 200 deg C.

Seeing some of my observations from Try 1, I decided to coat with tapioca starch. This recipe is also different to the DWG recipe which I tried here which used baking power and soda in the coating rather than the chicken marinade. I must say that it made no difference to the crunch factor whether it's used in the coating or in the marinade as the main differentiator was the tapioca flour.
Still pastey looking because of the dry flour but very tasty!

Ingredients (for 1.2 kg chicken wings, jointed)
2 tbsp prawn paste
0.5 tbsp oyster sauce
2 tbsp cooking wine
2.5 tsp sugar
1 tbsp sesame seed oil
2.5 tbsp corn flour
1 tsp baking powder
1/2 cup tapioca starch

Method
1) Marinade with all the ingredients except the tapioca starch. Marinate for minute 20 minutes but best overnight.
2) Meanwhile, prepare the cookie sheet by lining with alum foil. Generously coat with oil.
3) Coat lightly with tapioca starch and place bone side up on the lined cookie sheet.
4) Leave to rest for 15 minutes. Spritz with oil.
5) Bake at 160 deg C for 15 minutes. Turn over to skin side and spritz chicken with oil. Turn up to 200 deg C and bake for a further 5 minutes.
6) Dislodge from alum foil and serve immediately.

Recipe feedback
- The original recipe was for 1 kg but I used 1.2kg of chicken and it was still a bit on the salty side! I wouldn't reduce anything though because the proportions are just right.
- This recipe has everything: rice wine, oyster sauce, sugar, and sesame seed oil and it tastes the best amongst all the recipes.
- 1 future try might be corn instead of tapioca flour with the baking powder and baking soda inside.

Try 1
I have tried tweaking this recipe and the oven baked chicken technique several times in the past: panko version which worked but course isn't traditional enough, and the original recipe which was modified from air frying technique. In terms of taste, neither recipe tasted authentic enough for my liking. I didn't know if it was the oyster sauce or the cooking wine or the proportions of either which were wrong.

After experimenting several different techniques and recipes and doing a side-by-side test, I think this recipe works the best. The key elements are:
1) Use egg wash to coat. I used to omit this step as I didn't bother blotting the chicken so I thought it would be wet enough but it turns out that the egg's protein is needed to set the starch and 'glue' it onto the chicken.
2) Must coat with tapioca starch and nothing else. Flour is too dense and produces a dense uncooked batter.
3) The wire rack doesn't help. It helps with even baking and airflow but because the oil drains away, it doesn't 'fry' in its own oil. It become air dried rather than 'fried'.
4) Cooking in a metal cookie sheet or flat pan and not a deeper dish or pyrex.
5) Lining with aluminium foil and lots of oil rather than non-stick baking paper. This affects the heat transfer and causes the heat to reflect back onto the chicken to fry it. I didn't even have to turn the chicken halfway!
6) Spritzing the surface of the chicken with oil.
7) 2 different oven temperatures: one for searing and one for cooking.


Ingredients
1.2 kg chicken wings, jointed
1 tbsp level prawn paste
1 tsp sugar
1 tbsp sesame seed oil
dash of pepper
3 eggs
1 cup tapioca starch

Method
1) Marinate the chicken for at least and hour or even overnight.
2) Prepare a sheet pan by lining with aluminium oil. Spray generously with oil. If you can, send this into the oven as it is preheating.
3) Beat the eggs and dump the chicken (drain away as much marinade as possible) into the egg. Coat well.
4) In a ziplock bag, empty half the tapioca starch. Working with 2 to 3 chicken pieces at a time, shake the bag and dredge them to ensure even coating. Place on the oven tray (if the oil was heated, be very careful as it might splatter!). Repeat with the leftover starch until you run out of chicken pieces.
5) Carefully spray the surface of the chicken with oil. Try to ensure that all the areas are coated or you end up with baked flour that is white! Edible but not pretty.
6) Bake at 220 deg C for 10 minutes to cook, crisp and set the batter. Turn down to 180 deg C to cook for a further 15 to 20 minutes until done. You can turn the tray (not the chicken pieces) if you want to ensure more even browning but I didn't bother.
7) Serve immediately. At least dislodge the chicken while the fat is still hot otherwise the batter will stick to the foil and you end up bald chicken and sad bits of crispy batter and skin on the foil that are wasted.


Sunday, January 07, 2018

Buttermilk banana hotcakes

I have tried so many different pancake, crepe, hotcake recipes. Sometimes they come out undercooked because they're too thick, or overcooked and rubbery. This is the best happy medium that's fluffy enough without being rubbery but doesn't take an age to cook which means that outside gets burnt in the mean time.

Banana makes the hotcake darker than the the sans banana version would be
Source: http://www.joyofbaking.com/breakfast/ButtermilkPancakes.html
This recipe was first tried almost a year ago but this present post includes the addition of banana.

Ingredients (makes 8)
1 cup flour
¼ tsp salt
¼ tsp baking soda
1 tsp baking powder
1 egg, beaten
2 bananas, mashed
1 cup (240ml) buttermilk (or 1 cup milk + 1 tsp acid e.g. lemon juice or white vinegar)
3 tbsp (40g) melted butter

Method
1) Mix the wet ingredients. Mix the dry ingredients in a separate bowl.
2) Create a well in the dry ingredients and pour in the wet ingredients. Slowly incorporate the dry into the wet with a whisk. Whisk until just incorporated but do not over beat. Note that the batter must be cooked almost immediately after mixing, do not allow to rest. The baking soda will react immediately with the acid to produce the 'lift' that makes the batter fluffy.
3) Warm up a non-stick pan and pour in a bit of oil. Wipe off excess with kitchen paper.
4)  Using a scoop, pour on the batter from a height of 10cm above the pan. This creates a nice round shape.
5) Flip in one swift stroke when you see bubbles on around ¾ of the surface. Do not press down. Cook on the second side for another 30s to 1 minute and check for doneness. The banana may make the surface appear more golden brown than the non-banana version. This is normal due to the sugars in the banana. However, it has to be quite brown in order to ensure that it's cooked through.

Thursday, November 30, 2017

Jiggly cheesecake experiments (7 eggs)

Try 7: https://simmetra.blogspot.com/2020/04/black-sesame-goma-cheesecake.html
This blogger says that after baking, run a knife around the rim of the cake to dislodge it so that it doesn't form a waist. Perhaps similar to why bloggers drop the cake once the oven is switched off and also remove the water bath. Could these tips be the solution to all my woes? I would have to do them just after turning off the oven but before letting the cake sit inside the closed oven.
https://www.anncoojournal.com/recipe/cranberry-cheesecake/

Try 6 - Zebra cheesecake
Tried new timings and added chocolate.
https://simmetra.blogspot.com/2018/11/chocolate-zebra-cheesecake.html

Try 5 - New temps
Came across a new recipe so I thought I'd try to vary the temps to see if I can get it cooked through but without forming a waist or cracking.
https://japan.recipetineats.com/japanese-cheesecake-cotton-cheesecake/

Method (abbreviated)
1) Melt cheese in bain marie with butter.
2) Remove bowl and add (in turn) sugar, yolks, milk, lemon juice, zest, flour + cornflour.
3) Add whites in batches that have been beaten until soft peaks.
4) She only butters and lines the bottom but not side of the tin to avoid cracks and creases.
Every thing else remains the same.

Her recipe only contained 3 eggs and she advises that for a 8 to 9" tin, to increase the ingredients by a quarter or third, which ends up awkward in terms of the cream cheese inclusion. However, her advice on timing is important. So after incorporating her advice, here are my adjustments for 7 eggs but using my original recipe: Bake 30 min at 160 deg C, 40 mins at 140 deg C, leave with door closed for 30 mins. Remove from water bath, then back into oven with door open for 20 mins. Remove from oven and run a spatula around the edge of the cake to prevent cracking when the cake shrinks.

Small crack developing but nice rise
Cracked! :( But minimal shrinkage
Crack disappearing as it shrinks slightly. No waist and nice browning.
Very slightly eggy centre but cake is more fluffy (hence crumbly) than cooking at higher temp
Recipe feedback: Cracked but no waist and minimal shrinkage, hooray! But the crack may be due to my poor control of the oven temps. It was very hard trying to maintain 160 and 140 as my oven seemed to resist those temps and either went above 160 or below 140. The crack was less obvious when I turned off the heat but obvious after the 30 minutes with a closed door, probably after compounded by the shrinkage. In terms of total cooking time however, it seems correct. I was thinking of reducing the time when the door was closed to 25 minutes but it looks like I cannot do so otherwise the cake comes out undercooked.

Try 4 - Finalising temps
Not much different from the previous attempt except the temps were:
1) 180 deg C for 8 minutes
2) Turn down to 150 deg for 56 mins (my oven refused to stay at 155 deg C but did spend some time at 160 deg C, so I guess it averages out at 155 deg C)
3) Turn off for 30 mins but oven door closed
4) Open oven door for 25 minutes before bringing to the counter top to cool
No eggy centre at all!

Rising tall

Recipe feedback: The results were that there wasn't ANY eggy spots left! Hooray! But it did develop a waist. I noticed that after the 30th minute, I had rotated the cake tin slightly in the baking tray as far as it would go in the baking tray before catching on the cloth placed under the cake pan. The cake rise more evenly on that side. The side that wasn't rotated however, it didn't rise and developed a waist! There was just a tiny crack on top but that's ok. The top was particularly brown and the heat seemed to have concentrated on the side that rose. Next time, I might try to remove the water bath after the oven is switched off. I'm hoping this will even out the temp and not cause the top to shrink compared to the bottom.
Rising on the left but not the right

Didn't get to rotate this side (right). Waist. Not as brown.

Browner on this side (left) which I rotated and it rose. Minimal waist
Slight crack
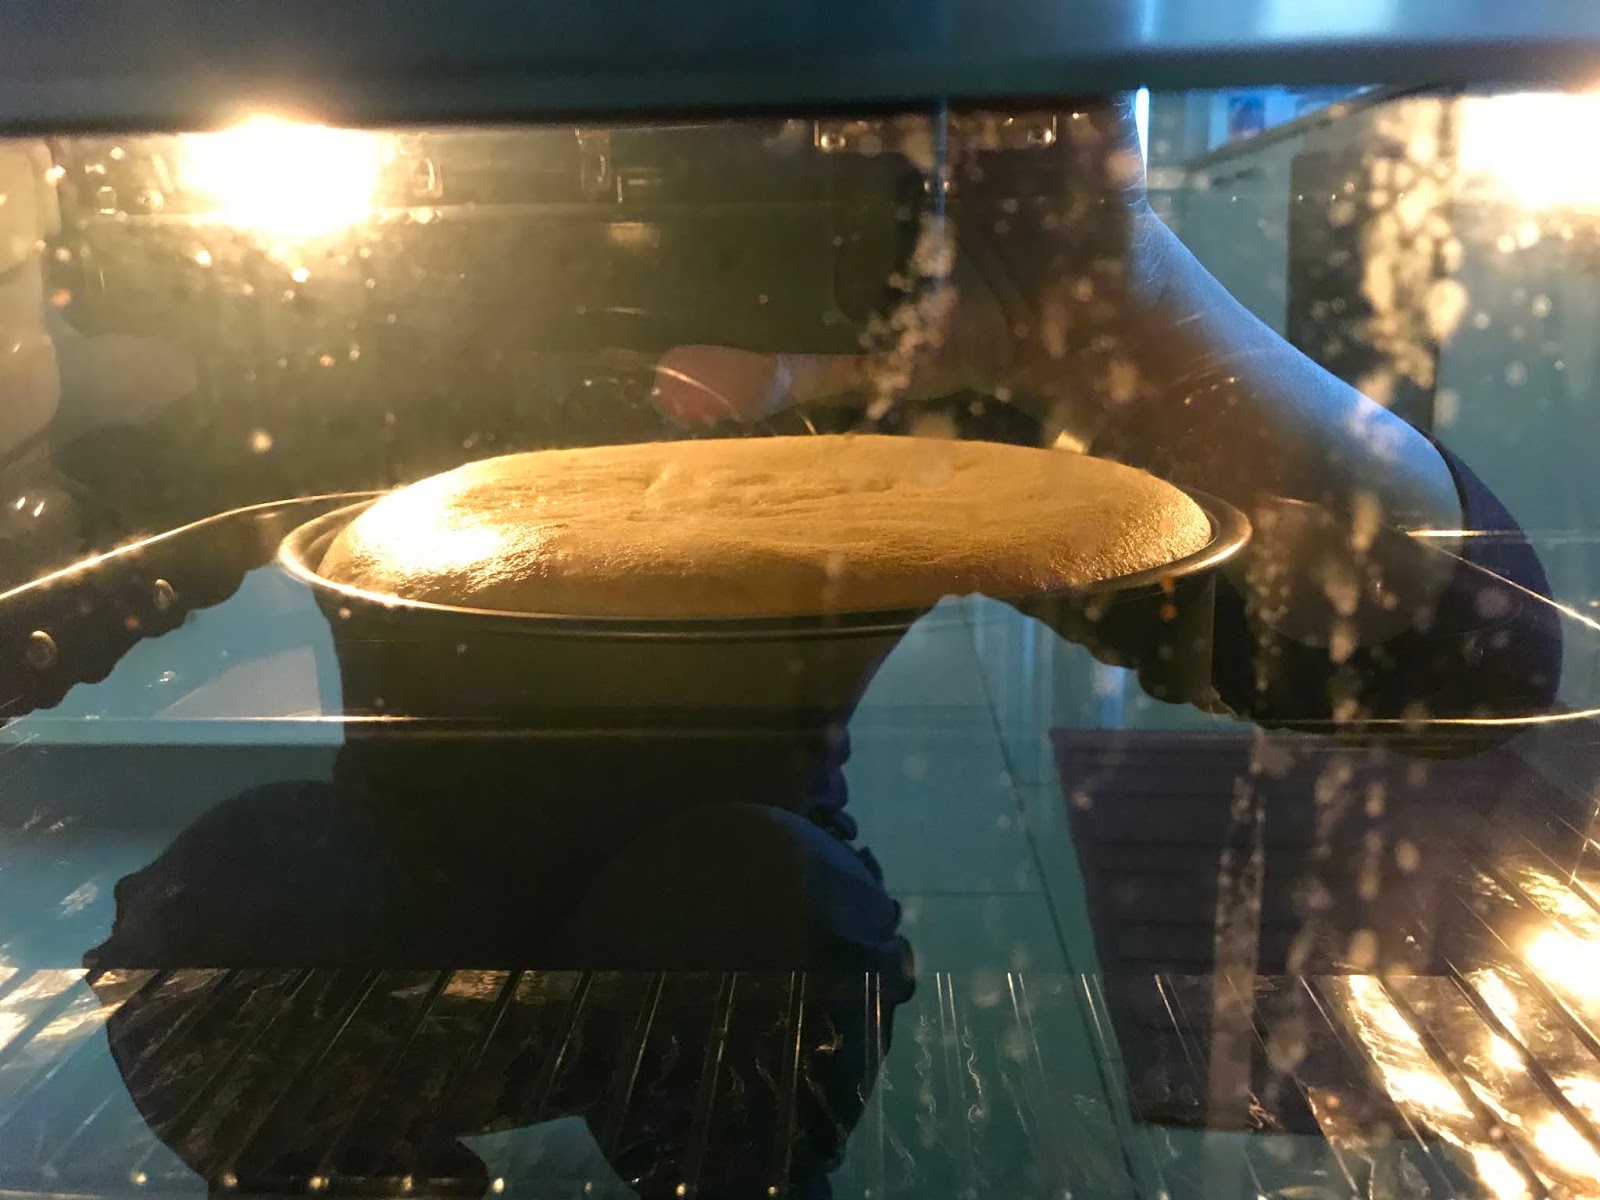
Try 3 - 4 different temps
No change to the ingredients, just a change in technique and especially the temperatures.
Ingredients
250ml milk
250g cream cheese, room temp
65g butter, room temp
7 eggs, separated
58g cake flour
23g corn flour
133g sugar
1 tsp lemon juice
1 tsp vanilla
¼ tsp salt

Method
1) Prepare: a) Preheat the oven to 180 deg C. b) Heat the milk till hot to the touch. c) Prepare the tin by buttering the sides and place a disc of parchment at the bottom.  d) Sift the corn flour and cake flour twice with the salt until well combined.
2) In a pot on very low heat, melt the cubed cream cheese and butter until well combined. Slowly add milk and incorporate until no lumps remain.
3) Whisk the egg yolks with ½ of the sugar until well combined.
4) Pour in the cream cheese mixture and vanilla and whisk until smooth.
5) Sift in the flour in 3 batches and fold, be careful to avoid lumps. If necessary, sieve the batter into a new bowl.
6) In a very clean bowl, beat the egg whites until frothy and opaque. Add the sugar in 3 batches. Add the lemon juice. Continue beating until near stiff peaks.
7) Add ⅓ of the meringue into the batter. Use a whisk to stir it in until no white streaks remain. Add in the second third of meringue and do the same but this time more carefully. Finally, invert the batter into the remaining meringue. Carefully fold in until no white streaks remain. Drop the tin containing the cake batter from a height of 10cm onto the table to dispel big bubbles.
8) Pour the batter into the cake tin. Using zig zag motions, slash the batter to dispel big bubbles. Smooth the top of the batter. Drop the cake tin again if required.
9) Place the oven tray in the bottom third slot rather than at the bottom-most slot of the oven. Place into a water bath such that the water comes up 1.5 inches up the side of the cake tin (by the end of the whole process, almost all the water was gone!).

Rising nicely before it cracked

Crack visible

10) Bake at 180 deg C for 10 minutes until the top is brown. Turn down to 155 deg C and bake for a further 50 minutes (total 60 minutes baking time). Turn off the oven but leave the door closed for 30 minutes until the oven's internal temp drops to 110 deg C. Open the door and leave ajar a further 25 minutes to cool before removing the cake from the oven to cool fully on the counter top.
11) To unmould, run a spatula around the rim to ensure that the cake has fully shrunk away and detached from the tin. This will prevent the tin from tearing the cake when removing the cake tin side.
No waist on this side. Note the waterline.
Waist visible from this side
12) Best served cold by leaving it overnight in the fridge.

Recipe feedback: The top cracked again even though the temperature was mostly only 150 deg C (instead of 155 deg C which my oven stubbornly did not want to maintain) in a water bath. Perhaps I should whisk until just past soft peaks rather than just before stiff peaks so that there's less air inside and it won't rise and dome as much? After it deflated, the top wrinkled but sadly, the crack didn't close.

Sadly too, a slight 'waist' formed on one side, probably from letting to stay in the closed oven after turning off the heat. But it's a tough balance - if I don't do leave it to cook in residual heat then more of the inside remains eggy, but if I do, it forms a waist. How? Luckily, the eggy centre was very minimal (about lowest 1cm and mostly in the centre of the cake) and the top of the cake was moist and not overly cooked, although you can see the waterline from the picture. However, nice brown top so 180 deg C for browning is the correct temperature.
Centre wasn't too eggy. Top layer of cake was moist!
Next time, I will maintain 180 deg C for 7 minutes (because it takes very long for my oven to lose heat), turn down to between 150 (for 56 mins) to 155 deg C (for 53 minutes). Switch off the oven and leave it inside for 30 minutes to reach 110 deg C, and then open the door for 25 minutes. Remove to counter to completely cool.

Try 2 - no water bath
Decided to try with 7 eggs again, but with slight changes in ingredients and method. Crucially, I decided not to use a water bath after seeing some recipes online, put back the corn flour as heavier cheesecake recipes have, and varied the temp 3x.

Ingredients
250ml milk
250g cream cheese, room temp
65g butter, room temp
7 eggs, separated
58g cake flour
23g corn flour
133g sugar
1 tsp lemon juice
1 tsp vanilla
¼ tsp salt

Method
1) Prepare: a) Preheat the oven to 180 deg C. b) Heat the milk till hot to the touch. c) Prepare the tin by buttering the sides and place a disc of parchment at the bottom. d) Fill 4 ramekins nearly to the brim with water and each at a corner of the oven on the same shelf. e) Sift the corn flour and cake flour twice until well combined.
2) Whisk the butter and egg yolks until well combined.
3) Cube the cream cheese and whisk the cream cheese in until the batter is smooth.
4) Add the salt, vanilla, and milk and whisk until smooth.
5) Sift in the flour in 3 batches and fold, be careful to avoid lumps. If necessary, sieve the batter into a new bowl.
6) In a very clean bowl, beat the egg whites until frothy and opaque. Add the sugar in 3 batches. Continue beating until near stiff peaks.
7) Add ⅓ of the meringue into the batter. Use a whisk to stir it in until no white streaks remain. Add in the second third of meringue and do the same but this time more carefully. Finally, invert the batter into the remaining meringue. Carefully fold in until no white streaks remain. Drop the tin containing the cake batter from a height of 10cm onto the table to dispel big bubbles.
8) Pour the batter into the cake tin. Using zig zag motions, slash the batter to dispel big bubbles. Smooth the top of the batter. Drop the cake tin again if required.


Rising nicely
Cracked!

9) Bake for 7 minutes. Reduce the heat to 155 deg C and bake for 43 mins (ie remainder of 50 minutes). Rotate the cake tin at 35 minutes (and no earlier because you don't want the cake to collapse) to ensure even browning. [The centre did not wobble but a tester came out crumbly.] Reduce to 130 deg C and bake for another 10 mins (ie total 60 minute baking time)
Fresh out of oven. Deflated a bit after leaving door open
Didn't sink any further in the middle. Had a waist on half of the cake
10) Turn off the oven but leave the tin inside for 15 to 20 minutes with the door ajar to let the cake cool slowly to prevent sudden changes in temp that may cause cracks.

⅓ gummy at the bottom 

11) Take out the cake tin and drop it onto the table from a height of 10cm. This will prevent further shrinkage of the cake. Use a knife to run around the edge of the tin so that when it shrinks, it won't stick to the side and tear the cake, leaving a huge crack across the top of the cake. Leave it to cool completely in the tin on a wire rack, preferably chill in tin for at least 2 hrs before unmoulding.

Recipe feedback: Cracked! Sank a bit in the middle! These are new problems that I've never had before, but probably have to do with the lack of a water bath. Bottom ⅓ of cake was eggy but the top layer seemed to have dried out. However, no waist and the side of the cake was a beautiful even shade of brown. Seems like even 155 deg C is too high if there is no water bath and temp of 180 deg C is too high which causes the top layer of the cake to dry out. However, this cake had a lot more browning which significantly improved the taste (Milliard reaction?)

So next time I will reintroduce the water bath. Bake at 180 deg C for 10 minutes for colouring, reduce to 155 deg C for 50 mins (total 60 min baking time), switch off oven for 25 minutes without opening door, and finally, open door for 15 to 20 minutes to cool down. I also would not drop the cake the next time because I think it caused the cake to sink.
=================================================================
Try 1 - no corn flour
Adapted from my last successful attempt where the recipe was based on Diana's desserts, I decided to add an egg because otherwise the cheesecake is too short. The original recipe was for a 8" pan but mine is actually a 9" pan. Therefore, everything else has to be tweaked. Most importantly, I decided to use all cake flour instead of mixed with corn flour as the previous successful attempt turned out to be too soft unless you let it set overnight in the fridge. (Updated with technique tips from JOC)

Ingredients
250ml milk
250g cream cheese, room temp
65g butter, room temp
7 eggs, separated
70g cake flour
133g sugar
1 tsp lemon juice
1 tsp vanilla
¼ tsp salt

Method
1) Prepare: a) Preheat the oven to 180 deg C. b) Heat the milk till hot to the touch. c) Prepare the tin by buttering the sides and place a disc of parchment at the bottom. If you don't have a one-piece cake tin or a Pushpan like me, triple wrap the bottom of the two-piece cake tin with foil to prevent seepage. (d) Place a pan with 2 inches deep of water in the oven, ideally at the base.
2) Whisk the butter and ¼ of the sugar until pale and smooth.
3) Cube the cream cheese and whisk the cream cheese until the batter is smooth.
4) Add the egg yolks one at a time and whisk after each addition.
5) Add the salt, vanilla, and milk and whisk until smooth.
6) Sift in the flour in 3 batches and fold. Using the whisk, fold to ensure no lumps remain. If necessary, sieve the batter into a new bowl.
7) In a very clean bowl, beat the egg whites until frothy and opaque. Add the sugar in 3 batches. Continue beating until near stiff peaks. Add 1 tsp lemon juice to stabilise.
Not very smooth, 'mo bing' top but at least no cracks

8) Add ⅓ of the meringue into the batter. Use a whisk to stir it in until no white streaks remain. Add in the second third of meringue and do the same but this time more carefully. Finally, invert the batter into the remaining meringue. Carefully fold in until no white streaks remain. Drop the tin containing the cake batter from a height of 10cm onto the table to dispel big bubbles.
9) Pour the batter into the cake tin. Using zig zag motions, slash the batter to dispel big bubbles. Smooth the top of the batter. Drop the cake tin again if required.
10) Bake for 7 minutes. Reduce the heat to 155 deg C and bake for remainder of the 55 to 60 minutes. Rotate the cake tin at 35 minutes (and no earlier because you don't want the cake to collapse) to ensure even browning. The centre of the cake should still have a bit of wobble.
Shrank a bit but taste is ok.

12) Turn off the oven but leave the tin inside for 15 to 20 minutes with the door ajar to let the cake come up to prevent sudden changes in temp that may cause cracks.
13) Take out the cake tin and drop it onto the table from a height of 10cm. This will prevent further shrinkage of the cake. Use a knife to run around the edge of the tin so that when it shrinks, it won't stick to the side and tear the cake, leaving a huge crack across the top of the cake. Leave it to cool completely in the tin on a wire rack, preferably chill in tin for at least 2 hrs before unmoulding.
½ eggy bottom. Why?


Recipe feedback: Yay no 'waist'! It deflated a bit, which is ok but it still has the eggy thick bottom. I don't think that adding only cake flour made any difference but more and more I'm becoming convinced that the water bath is the issue. The depth of the eggy part in this attempt and previous all seem to coincide with the water bath. Maybe I really have to wrap the bottom of the tin in order to disperse the effect of the water bath OR bake without a water bath but perhaps put a tin of water in the oven somewhere near the floor just to create a humid atmosphere.

Saturday, October 21, 2017

Malay cake (马来糕)

Adapted from http://mykitchen101en.com/dark-brown-sugar-ma-lai-koh-with-yeast/

The problem isn't with the recipe, it's with me. I misread the instructions. It didn't come out as fluffy as expected but not too bad. The cake tastes a bit soapy but could be because I didn't follow the steps. I've transcribed the original recipe and my steps.

Ingredients
3 eggs
⅔ C evaporated milk
3 tbsp water (or pandan juice if available)
180g plain flour
1 tsp yeast
1 tsp baking powder
1 tsp baking soda
¼ tsp salt
50g (3½ tbsp oil)

Method
1) In a bowl, sift the flour and salt. Add the dark sugar, salt, yeast and mix well.
2) In a separate bowl, beat the eggs. Add the evaporated milk and water (or pandan juice) and whisk well.
3) Add the wet to the dry slowly until a batter forms. Do not over beat. If desired, sieve the batter into another bowl to ensure that you don't have lumps of dark sugar.
4) Cover the bowl and proof for 2 hours.
5) Bring the water to a rolling boil. Wrap a cloth around the cover so that the condensation doesn't drip onto the cake during steaming.
6) Ensure enough water to steam for 40 minutes. Take a small bowl and add 4 to 5 tsp of the batter into it. Sift in the baking soda and baking powder. Add the oil and mix everything well. Return this batter back to the main batter and mix well.
7) Pour into a lined cake tin (mine was 28" rather than 29" stated in the recipe).
8) Steam for 40 minutes until a skewer comes out clean. Do not lift the lid to peek until at least after the first 30 minutes otherwise the cake will collapse. Switch off the flame and let the cake rest for 10 minutes to stabilise.
9) Remove the cake tin onto a wire rack and unmould to cool.
10) Serve warm if possible.

Less well rise compared to the blogger

This is my wrong method. I think perhaps the yeast deactivated the baking soda or vice versa. But it still comes out moist and light, perhaps due to the steaming rather than baking.
1) Whisk the eggs and oil until pale. 
2) In another bowl, sift the flour, baking soda, and baking powder. Add the dark sugar, yeast and salt and mix well.
3) Add the dry to the wet gradually and fold in. Do not overmix. Cover and proof for 2 hours in a warm place.
4) Give the batter a stir and pour it into a cake tin. It will be very runny. 

The rest of the steps are the same. This recipe will be updated eventually with a new picture when I do it correctly.

Update: This version also uses brown sugar but uses baking powder and steams. It is more similar to steamed egg cake.

Monday, October 16, 2017

Portuguese egg tart

To me, this is the cheat's version of the HK or Cantonese egg tart because it's 'hardier' and the egg custard isn't soft and quivering like the Cantonese one. This also uses puff pastry, which in my case, has already been ready made. Therefore, this recipe is like the introduction to baking egg custard and if I get this right, I can move on to the pale HK egg tarts.

Recipe adapted from https://www.littlesweetbaker.com/2016/01/29/chinese-egg-tarts/
She used 2 eggs and 1 yolk but as I can never figure out what to do with the extra white so I added it in. Maybe that puffed it up more than normal.


Ingredients (makes 16 to 20 tarts)
2 sheets puff pastry, thawed
3 eggs, beaten
⅓ C + 1 tbsp (80g) sugar
⅔ C warm milk
⅓ C evaporated milk
½ tsp vanilla essence

Method
1) Warm up the milk and melt the sugar. Let it come to room temp. Preheat oven to 200 deg C and place the oven shelf at the lowest third of the oven.
2) Beat the eggs with evaporated milk and vanilla. Add the sugary milk. Strain into a pouring jug.
3) Unfold the pastry sheet and lay it over a lightly floured surface.
4) Using a round cookie cutter (9cm for tart tin and 10cm for muffin tin), cut out as many rounds as you can squeeze in. Place them into the oiled tart or muffin tins. Trim off any excess.
5) Pour the egg mixture into the pastry case but leave a rim. Do not fill to the brim or over fill or else the mixture will overflow during baking and stick the tart to the tin.
6) Bake the tarts at 200 deg C for 15 minutes. In the last 5 minutes, watch out for when they start to puff up. Open the oven to let out the hot air escape. If not, they will deflate after removal from the oven. Reduce the temp to 175 deg C and then bake for a further 14 minutes (tart tin) to 16 minutes (muffin tin). Check for readiness by inserting a toothpick which will stand upright unaided.
7) Remove from oven and leave to cool in the tins. Once the tins are cool enough to handle, remove from the tin. Once fully cooled, store in an airtight container.

Monday, October 09, 2017

Matcha chiffon

This is probably the worst chiffon that I've made. It didn't rise properly and the top seemed to stick. I knew something was up when I stirred the batter. It was so sticky that it made it hard for the meringue to give it enough lift, despite the ½ tsp of baking powder inside. I also wonder if it could be because I 'played' more with the meringue this time compared to previously in an attempt to incorporate it, to spread it out in the tin more evenly, and finally, to dispell the big air bubbles. The latter didn't seem to have work though. Not likely to try this recipe again soon because to begin with, match is such an expensive ingredient. I paid $4 for 20g of culinary grade matcha (the cheapest brand available) and the entire 20g is needed in the recipe.

Adapted from http://thedomesticgoddesswannabe.com/2016/04/matcha-chiffon-cake/ to increase the liquid in an attempt to make the batter less sticky and added more baking powder for 'lift'

Ingredients
7 eggs, separated
160ml milk (from 149)
100ml oil (from 93)
35 + 135 g sugar (no change as the sweetness is needed to counter the bitterness)
½ tsp salt
21g matcha powder
1 tsp baking powder (from ½ baking powder)
½ tsp cream of tartar

Method
1) In a medium bowl, mix the dry ingredients. Sift the ingredients twice so that the matcha is well incorporated with the flour.
2) In another bowl, whisk the yolks and 35g of sugar until pale. Add the oil and beat until pale. Add the milk and mix well.
3) Sift in the dry ingredients in 2 batches and carefully fold in.
4) In a very clean bowl, beat the egg whites. Add cream to tartar to stabilise. Beat until stiff peaks.

Oddly shaped and cracked

5) Add the meringue in 3 batches to the batter. The first addition is to lighten the mixture so you can be less careful but carefully fold the second batch and then tip the entire batter into the left over third of meringue. Fold in until no streaks remain.
6) Pour into the ungreased chiffon tin and take care to spread more batter at the outer edges. Use a spatula to make zigzag slashes to dispel the bigger air bubbles. Drop the tin 10cm onto the countertop several times to dispel more air bubbles.
7) Bake at 170 deg C for 65 minutes. Remove and immediately invert the tin so that the cake 'hangs' to cool.
8) Once completely cool, carve out the cake from the tin.
Hardly rose and very big air pockets


Saturday, September 09, 2017

Banana chiffon

This recipe was again taken off my favourite chiffon goddess but for the first time ever, I'm disappointed. The cake came out so short! I think it has to do with the fact that she uses 6 rather than 7 eggs because her pan is 25" and she put in baking soda (not powder) As you can see from the picture, the cake rose to about 1 inch away from the top of my tin but when I initially poured in the batter, it came to less than half of my tin! I was quite shocked and disappointed. I think even if I put in 7 eggs, my tin will be able to handle it because it's 26" not 25" like hers. I looked at her other chiffons which used only 6 eggs for the 25" tin and realised that those had a lot more liquid e.g. milk added in. So the recipe below is proportionately adjusted for an additional egg in a 26" tin and should still work. Oh and another thing - it looks like 160 deg C is really the ideal temp for chiffons. No cracks and no overly brown top and edges! But this is a relatively drier recipe with less liquid in it so it may not work for recipes with more liquid e.g. milk or tea in them, and expanding the baking time would simply dry out the cake too much.

Also, I usually omit the cream of tartar because I realised that the meringue works just as well without but in this instance, since baking soda (not powder) was used, you need an acid to balance out and activate the alkali otherwise there will be a soapy taste. I didn't have cream of tartar but I read elsewhere that any acid e.g. lemon juice or white vinegar works just as well, so here, I substituted with an equal amount of apple cider vinegar.

No cracks!
Perfect flat cake! The middle dome sank just a little.
Source: http://thedomesticgoddesswannabe.com/2015/05/banana-chiffon-cake/

Ingredients
7 eggs, separated
30g (for yolk) + 105g (for whites) sugar - this is the full proportionate recipe amount but can be reduced depending on the sweetness of the bananas
70ml oil
210g banana, mashed
½ tsp vanilla
128g cake flour
¼ tsp baking soda
¼ tsp salt
¼ tsp apple cider vinegar

Method
1) In a very clean bowl, separate out the fridge cold eggs: the yolks from the whites. Set aside to come to room temp. Mash the banana with the salt.
2) Whisk the yolks with the sugar till paler, then add the oil and continue to whisk until paler yellow.
3) Add the mashed banana and vanilla and whisk until well incorporated. It might be a bit lumpy due to the mashed banana.
4) Sift in the baking powder and cake flour and fold carefully. Try not to over beat.
5) Whisk the egg whites and add in the sugar in 3 additions and the apple cider vinegar. Whisk until stiff peaks.
6) Dollop a third of the meringue into the yolk mixture and using the whisk, stir gently to incorporate. Repeat with a second third of the meringue but with more care. Lastly tip everything back into the bowl with the remaining third of meringue. This time, very carefully fold in using the whisk, rotating the bowl as you go. There should be no white streaks remaining.
7) Pour into the ungreased tin. Using a spatula, slash the batter to remove the big air bubbles, taking care to trace around the rim of the tin and also the one. At this point, I also push more batter outwards towards the rim to get a flatter cake as I notice it always tend to dome higher along the cone.
8) Bake at 160 deg C for 60 minutes.
9) Remove tin from the oven and immediately invert onto a tin can or something to elevate. Let it cool completely before carving out of the tin to unmould.


Black vinegar pig trotters