Showing posts with label chiffon. Show all posts

Friday, August 11, 2023

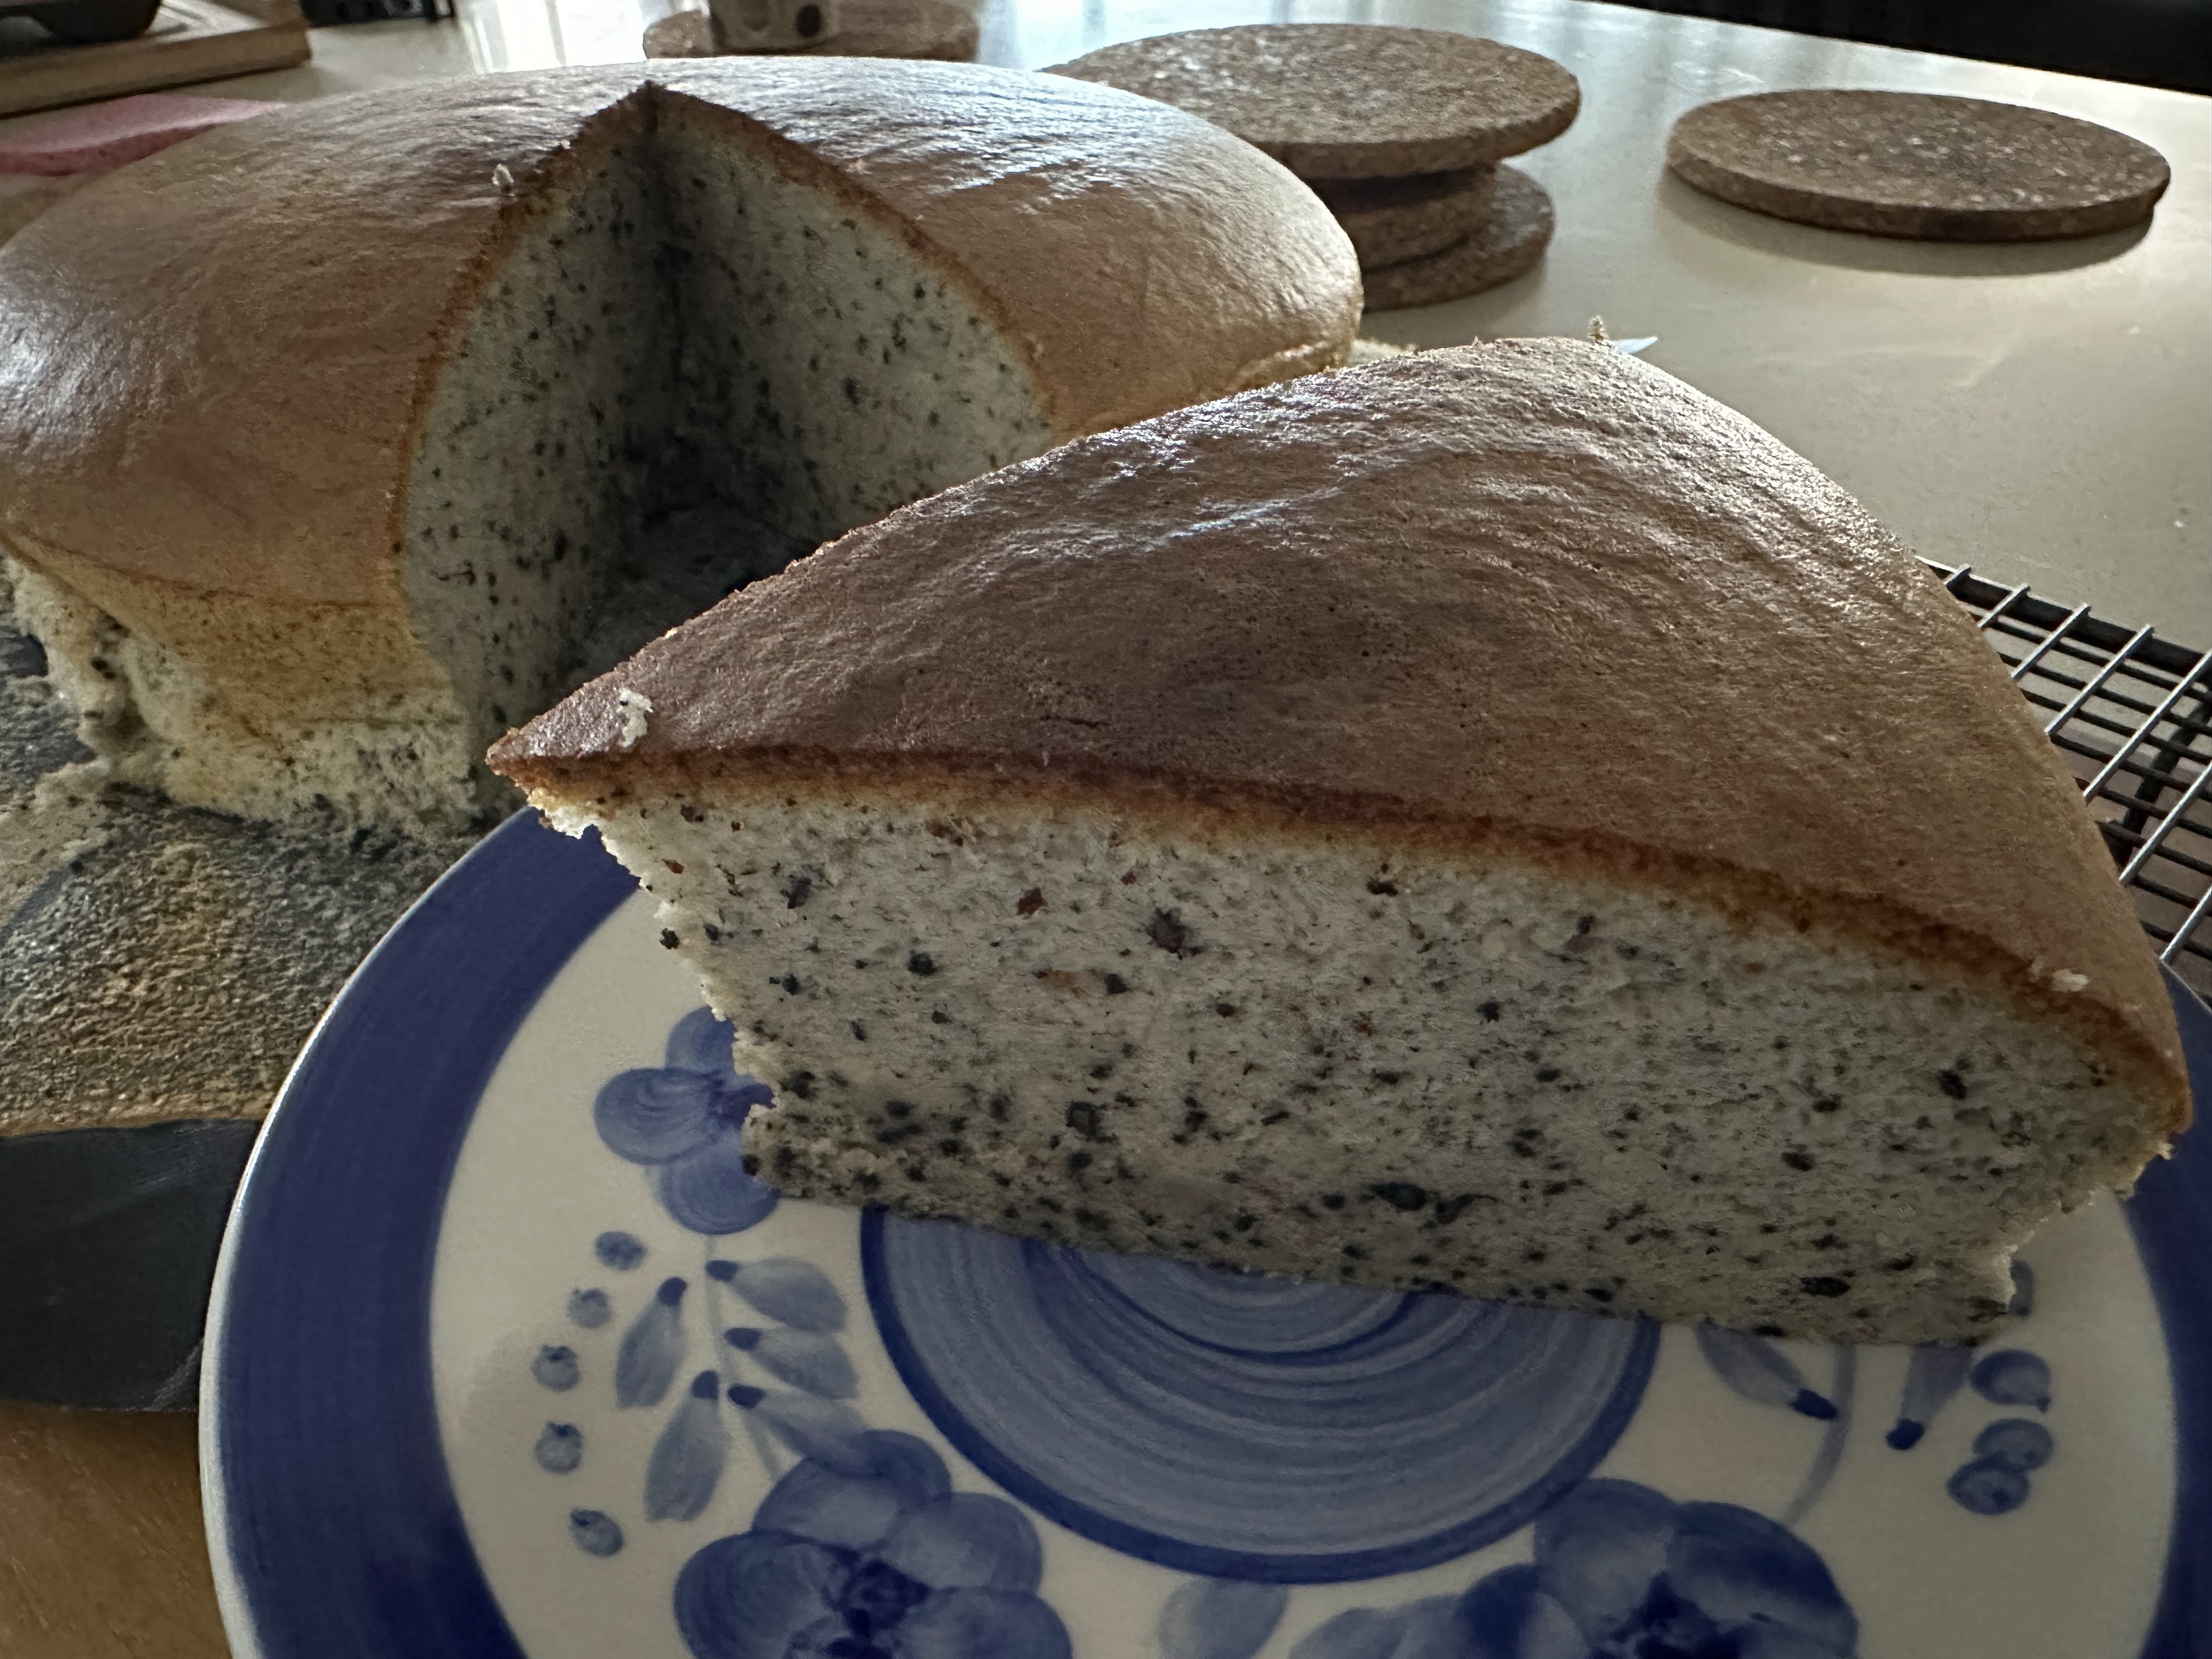
Black sesame cotton cheesecake

By Kat Kwa. Other flavours of hers are Choc cotton cheesecake and Earl Grey cotton cheesecake which have all been made using 8 inch round tin with removable base and 5 eggs using chiffon method. I am adapting using 6 eggs in 29 inch round removable base pan.

Ingredients

250g cream cheese

60g butter

192ml milk

60g plain flour (or 80g cake flour - I used cake flour because I was very thorough with the whisking to take out the lumps)

48g ground black sesame

6 eggs, separated

⅛ tsp of salt

140g caster sugar

Method

1. Place the cheese, butter, and milk in a bain marie. Gently whisk to melt. Remove from heat.

2. Sift the flour into the bowl and mix with whisk. 

3. Add the black sesame and mix with whisk.

4. Add the yolks. Whisk to incorporate.

5. Whisk the 5 egg whites until opaque. Add salt.

6. Continue to while adding sugar in 3 batches. Beat until soft peaks.

7. Add ⅓ of meringue into black sesame mixture. Use whisk to incorporate.

8. Pour back the mixture into the remaining meringue. Fold in using whisk then spatula to ensure no white streaks.

9. Pour into prepared 9 inch tin with removable base and lined with parchment. Tap on the counter to dispel big bubbles.

10. Place tin into a larger tin and pour in room temp water 1 inch up the side.

11. Bake at 150 deg C water bath for 90 - 95 minutes (depending on temp control).

12. Once done, remove immediately from oven. Drop on counter and unmold, including removing parchment. Allow to cool completely before cutting.

Rose beyond the tin in the oven
Sides started to deflate after cooling.
Recipe feedback
- Sides deflated as it cooled. I wonder if using flour instead of cake flour would have prevented that.
- Middle top was slightly burnt but middle inside was still a bit wet but JUST cooked. I can't turn up the heat or keep it another minute otherwise top will burn. This seemed to solve itself next day once it had set overnight in the fridge.
- Not sweet at all, could add another 20g of sugar. (added to recipe above)
- As usual, this formed a waist when it started to deflate. The instructions said to remove it immediately out of the oven and drop on the counter and then unmould and remove parchment unlike most other cotton cheesecake recipes which ask for leaving the cake in the oven with it off to slowly cool down. 
- This cotton cheesecake recipe by Rice&Flour suggests possible reasons and solutions including improper beating (beat until soft peaks, which I did), baking in a water bath with boiling water straight from the kettle and water going up to ⅓ or ½ way up (which I didn't because I set the cake on a grill in my water bath to elevate it out of the water). I'm not convinced because Kat Kwa's cake sits in a tin to keep it out of the water and then the baking tray. 
- The third and most interestingly, having too small an oven for the cake tin because the tin needs to sit in the middle of the oven. Specially forming a waist, sinking in the middle or deflating is attributed to oven i.e., wrong baking temp or insufficient baking time, or too large pan in too small oven. She bakes at 150-160 deg C using 6 eggs with 20cm pan for 70 to 90 minutes. She advises overbaking is better than underbaking so better to leave it in oven turned off for additional 15-20 mins. She also says that big pan in small oven often leads to uncooked middle so better to turn down temp and bake for longer. She also talks about understanding your oven. Tips include not letting the batter of beaten eggs rest for too long (which weakens rising), place baking pan at centre of oven and use top and bottom heat. Top heat too high causes rapid rise and then collapse/deflate once out of the oven yet top burned and tough but centre heavy and undercooked. If temp is too low, crust will be hard and pale in colour yet interior is dense and wet so cake also sinks when out of oven.

Saturday, July 29, 2023

Walnut coffee chiffon

Adapted from Kat Kwa because I'm using 6 instead of 5 eggs. She also used coffee essence and evaporated milk which I don't have on hand but I wanted to bake chiffon to use up my cake flour.

Ingredients

100g walnuts, toasted and chopped

3 tsp instant coffee

4 tbsp hot tbsp water

100 ml milk

7 eggs, separated

160g sugar

100g corn oil

170g cake flour

1 tsp baking powder

½ tsp lemon juice


Method

1. Toast the walnuts at 180 deg C for 5 mins. Set aside to cool and then chop.

2. Separate the eggs and set aside.

3. Mix the instant coffee. Add the milk and stir. Let it cool.

4. Separate the eggs and set aside.

5. Add ⅓ of the sugar to the yolks. Lightly whisk.

6. Add oil to the yolk mixture and lightly whisk till pale.

7. Add coffee mixture. Mix well. 

8. Sift in the flour and blend well with whisk to remove lumps.

9. Beat egg whites until opaque. Add lemon juice. 

10. Add sugar in three batches and continue to beat until stiff peaks.

11. Add one third of the meringue to the yolk mixture and blend.

12. Return the mixture to the meringue and gently fold in with a whisk until no more white streaks. Once mostly folded, use spatula to gently fold in ensuring no more streaks.

13. Add 40g of chopped walnuts and fold in.

14. Pour mixture into the tin. Use a spatula to push the batter away from the centre funnel to the rim. Tap the tin on the counter to dispel big air bubbles. Use a skewer to trace around to remove smaller bubbles.

14. Sprinkle the remaining chopped walnuts on the top.

15. Bake at 160 to 165 deg C for 70 to 75 minutes. (160 for 70 mins sld work) 

16. Once removed from the oven, turn upside down to let the chiffon 'hang' until totally cooled.

17. Unmold the cake but cutting it out. Serve the cake upside down.

Recipe feedback

- Despite my agar-ation of ingredients through comparing ingredients and baking times with previous chiffon recipes, I deviated quite far from Kat Kwa's original recipe but still did very well.

- Baking at the lower temp for longer worked. It was JUST cooked so still very moist and the sides were not charred.

- As expected, coffee taste was not strong and could hardly taste it. Looks like coffee essence is a must.

- It was just sweet enough so cannot reduce the sugar.

- Roasting the walnuts beforehand made a difference to the taste. The baking temp for the chiffon cannot be 170 deg C which is the temp I usually use for chiffons because the walnuts which have already been roasted once would just burn and turn bitter.

Monday, September 20, 2021

Pandan juice and paste chiffon

I have tried real pandan juice chiffon  and the colour was always a bit anemic yellow and not entirely fragrant. I decided to top up with paste and also make this a taller 7 egg cake rather than 6 eggs.


Ingredients

7 eggs, separated

150g sugar (120 for whites, 30g for yolks)

58ml coconut oil or corn/sunflower/canola oil

105ml coconut milk

77ml pandan juice

4 to 5 drops of pandan paste

168g cake flour

½ tsp salt

Method

Follow standard instructions for making chiffon cake (refer to recipe link above).


Sunday, July 12, 2020

HK/Macau paper-wrapped cupcakes

I have wanted to try this recipe for some time but never found the time to. It looks like a simpler and more delicious version of the steamed 鸡蛋糕. Here are the recipe comparisons:

Chiffon method
1. Nasilemaklover
- makes 7 in speciality mould
- Uses 4 eggs, separated
- Uses self-raising flour
- Uses beater for chiffon method
- Uses oil

2. Christine's recipes
- Original recipe with speciality tin: makes 6
- Pandan paper wrapped with speciality tin: makes 8
- Uses 5 eggs and cake flour
- Uses beater for chiffon method
- Regular flavour uses melted butter but pandan flavour uses oil

Creaming method
1. Rasa Malaysia
- makes 16 mini ones
- Uses 4 large eggs and normal flour
- Uses beater for creaming method
- Uses oil

2. Ancoo - Tried below
- Makes 15 mini cakes
- Uses 4 egg yolks and 3 egg whites (what am I going to do with an extra white?)
- Uses cake flour and corn starch
- Uses beater for creaming method
- Uses melted butter


Ingredients - makes 12
4 egg yolks
3 egg whites
1 tsp vanilla
70g sugar
70g cake flour
10g (1.5 tbsp) corn starch
Muffin cases in the egg tart tins
½ tsp baking powder
75g melted butter

Method
1. In a bowl, cream the 4 egg yolks and 3 whites with the sugar at high speed for 5 minutes until pale yellow and thick. Lower to low speed and beat for 1 more minute.
2. Sift the flours and baking powder.
3. Add the flours batter in two batches, and fold in.
4. Take a bit of the batter and add in the melted butter. Combine well. Return this to the main batter and fold in.
5. Pour into prepared tins. Traditionally, the flower shaped tins with parchment paper inserted are used. I only had muffin cases which I inserted into egg tart tins.
6. Pour ⅔ full. It will be quite liquidy. Tap gently on the counter to remove the air.
7. Bake at 180 deg C for 15 minutes until a toothpick inserted comes out clean. I turned it at the 15th minute because the browning was uneven.
8. Remove the muffin cases to a wire rack to cool. Serve warm.

Saturday, July 04, 2020

Banana pandan chiffon

Breville Smart Oven
My Kitchenaid is finally here! I bought my Breville oven (another post) at the David Jones' EOFY sale and thought about buying a Breville handmixer to replace my cheap UK handmixer that had long given up the ghost. I have been making chiffons for a few years now but have so far relied on my Sunbeam all in one stick blender which includes a whisk. It's always taken me about 20 to 30 minutes to attain stiff peaks, and that's after multiple stops to let the motor cool. Last week after a particularly disastrous pandan chiffon, I decided it was time. The COVID pause was ending and I wouldn't have much chance to bake in the future once I return to campus. Weekends would just be too packed.


To return to the story of my Kitchenaid, the reviews of the handheld Breville weren't good and then I spied the handheld Kitchenaid. After more investigation, I decided that I had finally reached my 40s and deserved a stand mixer, just like my mom had her Moulinex all those years ago. Growing up, I helped her growing up in the kitchen as she made butter cakes and have fond memories. I felt it was finally my turn. I had earned it and I would never have children to watch me in my kitchen with my stand mixer.

My beautiful Kitchenaid in Metallic Nickle
I decided to buy the KSm117. The cheapest price at Myer was for a colour I didn't mind (Medallion Silver). It read "low stock". Later, when I finally paid up (because I had taken too long dawdling and trying to read review after review to convince myself) , I momentarily saw "out of stock." Myer took 4 days to tell me that it was indeed OOS and cancelled my order and refunded me. By then it was July 1st and the EOFY sale was over! I was so upset. I rang Myer and they agreed to honour the price when stocks returned in a month or so but I would have to watch out for it.

I considered buying the lower end model KSM160 where the difference is only the extra scraper beater, which I could buy separately. Depending on the colour chosen, I would actually save money! I found a few potential sites and submitted queries because all were on pre-order. I was about to buy when BK found a  silver colour at Harvey Norman and would get them to price match. I didn't think HN would take it up. I found out that Medallion Silver was a special edition and would never come back. It couldn't be found on the Kitchenaid website either but instead the closest silver was Metallic Nickle, which was a premium colour on the Myer website. HN must have been so desperate they they didn't do their research. They were willing to sell me this colour at Myer's price (and even discounted a further $4 because BK gave them the wrong price!) without checking my Myer invoice! I am so pleased because I didn't have to wait for delivery. By the time I re-checked out my alternate plan, the sites I visited had removed their sales too.

Back to the business at hand. I wanted to re-do my pandan chiffon but also needed to use up my bananas which I had saved to make banana break. I used DGW's banana chiffon recipe. Pandan banana IS a thing, as BananaWithPaws and other bloggers say as they cite Linda Teh as the originator. As I read somewhere that pandan is the Asian vanilla, I swapped the vanilla for pandan paste. I amended DGW's recipe as it came out too dry for some reason (maybe because I was too lazy to mash the banana but let my machine do it). With my extensive chiffon experience, I knew it would be a problem so I had to add more oil. I've also changed the method slightly where I add sugar to the egg white only after beating to soft peaks as DWG's recipe says. I've never really read that properly!

Very slightly deflated top (too moist inside?) but a good rise and shape. No cracks.
Ingredients
6 eggs
25g (for yolks) + 90g (for whites) sugar
180g smashed bananas (about 2 bananas)
60ml oil (increased to 70ml)
½ tsp pandan paste
110g cake flour, sifted
¼ tsp salt
¼ tsp baking powder
¼ tsp cream of tartar (cannot omit, needed to neutralise the baking soda; I used lime juice)

Method
1. Beat eggs and sugar in the smaller bowl at Speed 2, increasing to 4 until paler in colour.
2. Add the oil and beat at Speed 6 until paler in colour.
3. Add in the mashed banana and pandan paste. Stir at Speed 1 or 2 to just combine.
4. Sift in the dry ingredients (sifted cake flour, baking soda, and salt) in 3 batches and use Speed 1 to combine. I did turn it up to Speed 2 to beat the banana slightly.
5. In a very clean big bowl, beat the egg whites increasing from Speed 2 to 4 until opaque. Add the lime juice. Turn up to Speed 6 to beat until soft peaks.
6. Add the sugar in a stream down the side of the bowl, beating at Speed 4. Once combined, return to Speed 6 then 8. (I even turned it up to Speed 10 and the whole process took all of 5 to 7 minutes, AMAZING!)
Rising nicely
7. Watch very carefully as it goes from soft to stiff to over-beaten dry stiff peaks within a space of 10 seconds! I had to stop several times to test and even then, over-beat by 10 seconds (I counted!) and it became lumpy. I now realise I've always over-beaten it. Folding in the meringue, I realised that a dry meringue made it very difficult to fold in.
8. Using the whisk, dollop a third of the meringue into the yolk mixture. Use the whisk to fold in. Follow with the second third of meringue.
9. Finally, return the mixture to the bowl with the remaining third of meringue and use a spatula to carefully fold in and disperse the egg white.
10. Pour into the chiffon tin (no greasing!) and smooth the top. Pour more batter at the edge of the run rather than nearer the centre chimney. Drop the tin on the table top to dispel the big bubbles. Use a spatula to slash the mixture to dispel the smaller bubbles. Finally, smoothen the top slightly.
11. Bake at 160 deg C for 60 minutes, tenting if the top becomes too brown.
12. Once removing from the oven, immediately turn it over so that it doesn't deflate. Let it cool down completely.
13. Remove from the tin by cutting (sorry, there's no other way) out of the tin.

Recipe feedback
- I couldn't really taste the pandan at all but I am wary of putting more otherwise I can noticeably taste the chemical. The green colouring actually made the banana cake look more yellow, so that was a good outcome
- Couldn't taste the baking soda either so I must have sufficiently offset with lime juice
- Cake was very very moist from the addition of the banana and the extra oil. I didn't really mash the banana (left the machine to do it) so it might led to a drier dough (hence my 20ml top up of oil).
- I had to tent halfway as it was turning very born, probably because of the additional sugars in the banana
Thursday, February 07, 2019

Real pandan juice chiffon

For this recipe, I relied on my usual favourite, DMG. She has two recipes - one that uses pandan paste which I find hard to procure, and the natural method using pandan juice. I decided to use the latter recipe. She uses coconut oil and it gives the cake a lovely fragrance.
http://thedomesticgoddesswannabe.com/2017/08/pandan-chiffon-cake-pandan-juice-method/

This is another recipe by one of my favourite bloggers and very carefully explains his method. It's also for a 25cm chiffon
http://ieatishootipost.sg/how-to-make-a-pandan-chiffon-cake/
The difference is that he uses baking powder and also paste but not real pandan juice, and there is a lot more liquid in his recipe. In terms of baking tips, I didn't follow all his advice as I find that it doesn't really all work in my experience. Interestingly, he only bakes for 55 minutes at the same temp even though there's more liquid, whereas DMG bakes for 65 minutes. I have found that her cakes tended to be a bit burnt on the top and I've always needed to tent it in the last 15 minutes. I might try his recipe next time.

Ingredients
6 eggs, separated
138g sugar
70ml of pandan juice
90ml coconut milk
50ml coconut oil (or replace with a neutral tasting oil)
145g cake flour
½ tsp vanilla
pinch salt
⅛ tsp vinegar

Quite flat
Method
1. To make the juice, snip the leaves into a blender. Add just enough water to blend. Sieve into an airtight container to store overnight. The denser juice will settle at the bottom. The next day, carefully pour off the top watery layer.
2. Separate the eggs straight from the fridge.
3. In the yolks, add 30g of sugar and beat until pale. Add the coconut oil and beat until pale.
4. Add the coconut milk and salt, and combine with a whisk.
5. Sift in the flour and fold in. Set aside.
6. In a very clean bowl, beat the egg whites until opaque on low speed. Add the sugar in 3 batches and beat in between. Once all the sugar has been added, add the vinegar. Turn up the speed and beat until stiff peaks.
7. Add ⅓ of the meringue to the batter and gently combine with a whisk. Add the second third and even more gently combine to avoid knocking out the air.
8. Finally, pour all the batter into the remaining third of meringue and this time with a spatula, very carefully fold in by rotating the bowl in 1 direction only.
9. Drop the bowl on the table top to knock out the bigger bubbles. Pour into the pan from one side. the batter should spread.
10. Using the spatula, spread the batter evenly away from centre funnel. Run the spatula in a zigzag manner around the batter and especially around the sides of the pan and funnel. This breaks up the smaller bubbles. Drop the tin from a height several times to knock out more air bubbles.
11. Bake at 170 deg C for 65 minutes. Tent with foil in the last 15 minutes if the cake gets too brown.
12. Invert the tin over a pan so that it hangs upside down so that the cake doesn't deflate.
13. Once totally cooled, cut out the cake from the tin. Store in an airtight box.

No green color, no pandan smell or taste
Recipe feedback
- This has no taste or smell of pandan at all. I was pretty disappointed because it tasted like vanilla chiffon cake. Thank goodness I had added the coconut oil and vanilla, otherwise there would be no taste whatsoever! It also has no green colour. I think the use of pandan paste or essence is inevitable.
- This cake was a tad denser than the normal chiffon I am used to. I wonder if this had to do with the coconut oil and coconut milk. But still very very moist.

Update 11 July 20: Because the first pandan juice chiffon was so anemic, I decided to try making the pandan juice again. Snipped up 10 pandan leaves, put them in the food processor with 70ml of water, then poured it into muslin and squeezed it. I did drop in 3 drops of pandan essence just to give it a better colour.

Updated 20 Sep 20: Updated recipe here: https://simmetra.blogspot.com/2021/09/pandan-juice-and-paste-chiffon.html
Slight crack
Prettier!


Monday, October 09, 2017

Matcha chiffon

This is probably the worst chiffon that I've made. It didn't rise properly and the top seemed to stick. I knew something was up when I stirred the batter. It was so sticky that it made it hard for the meringue to give it enough lift, despite the ½ tsp of baking powder inside. I also wonder if it could be because I 'played' more with the meringue this time compared to previously in an attempt to incorporate it, to spread it out in the tin more evenly, and finally, to dispell the big air bubbles. The latter didn't seem to have work though. Not likely to try this recipe again soon because to begin with, match is such an expensive ingredient. I paid $4 for 20g of culinary grade matcha (the cheapest brand available) and the entire 20g is needed in the recipe.

Adapted from http://thedomesticgoddesswannabe.com/2016/04/matcha-chiffon-cake/ to increase the liquid in an attempt to make the batter less sticky and added more baking powder for 'lift'

Ingredients
7 eggs, separated
160ml milk (from 149)
100ml oil (from 93)
35 + 135 g sugar (no change as the sweetness is needed to counter the bitterness)
½ tsp salt
21g matcha powder
1 tsp baking powder (from ½ baking powder)
½ tsp cream of tartar

Method
1) In a medium bowl, mix the dry ingredients. Sift the ingredients twice so that the matcha is well incorporated with the flour.
2) In another bowl, whisk the yolks and 35g of sugar until pale. Add the oil and beat until pale. Add the milk and mix well.
3) Sift in the dry ingredients in 2 batches and carefully fold in.
4) In a very clean bowl, beat the egg whites. Add cream to tartar to stabilise. Beat until stiff peaks.

Oddly shaped and cracked

5) Add the meringue in 3 batches to the batter. The first addition is to lighten the mixture so you can be less careful but carefully fold the second batch and then tip the entire batter into the left over third of meringue. Fold in until no streaks remain.
6) Pour into the ungreased chiffon tin and take care to spread more batter at the outer edges. Use a spatula to make zigzag slashes to dispel the bigger air bubbles. Drop the tin 10cm onto the countertop several times to dispel more air bubbles.
7) Bake at 170 deg C for 65 minutes. Remove and immediately invert the tin so that the cake 'hangs' to cool.
8) Once completely cool, carve out the cake from the tin.
Hardly rose and very big air pockets


Saturday, September 09, 2017

Banana chiffon

This recipe was again taken off my favourite chiffon goddess but for the first time ever, I'm disappointed. The cake came out so short! I think it has to do with the fact that she uses 6 rather than 7 eggs because her pan is 25" and she put in baking soda (not powder) As you can see from the picture, the cake rose to about 1 inch away from the top of my tin but when I initially poured in the batter, it came to less than half of my tin! I was quite shocked and disappointed. I think even if I put in 7 eggs, my tin will be able to handle it because it's 26" not 25" like hers. I looked at her other chiffons which used only 6 eggs for the 25" tin and realised that those had a lot more liquid e.g. milk added in. So the recipe below is proportionately adjusted for an additional egg in a 26" tin and should still work. Oh and another thing - it looks like 160 deg C is really the ideal temp for chiffons. No cracks and no overly brown top and edges! But this is a relatively drier recipe with less liquid in it so it may not work for recipes with more liquid e.g. milk or tea in them, and expanding the baking time would simply dry out the cake too much.

Also, I usually omit the cream of tartar because I realised that the meringue works just as well without but in this instance, since baking soda (not powder) was used, you need an acid to balance out and activate the alkali otherwise there will be a soapy taste. I didn't have cream of tartar but I read elsewhere that any acid e.g. lemon juice or white vinegar works just as well, so here, I substituted with an equal amount of apple cider vinegar.

No cracks!
Perfect flat cake! The middle dome sank just a little.
Source: http://thedomesticgoddesswannabe.com/2015/05/banana-chiffon-cake/

Ingredients
7 eggs, separated
30g (for yolk) + 105g (for whites) sugar - this is the full proportionate recipe amount but can be reduced depending on the sweetness of the bananas
70ml oil
210g banana, mashed
½ tsp vanilla
128g cake flour
¼ tsp baking soda
¼ tsp salt
¼ tsp apple cider vinegar

Method
1) In a very clean bowl, separate out the fridge cold eggs: the yolks from the whites. Set aside to come to room temp. Mash the banana with the salt.
2) Whisk the yolks with the sugar till paler, then add the oil and continue to whisk until paler yellow.
3) Add the mashed banana and vanilla and whisk until well incorporated. It might be a bit lumpy due to the mashed banana.
4) Sift in the baking powder and cake flour and fold carefully. Try not to over beat.
5) Whisk the egg whites and add in the sugar in 3 additions and the apple cider vinegar. Whisk until stiff peaks.
6) Dollop a third of the meringue into the yolk mixture and using the whisk, stir gently to incorporate. Repeat with a second third of the meringue but with more care. Lastly tip everything back into the bowl with the remaining third of meringue. This time, very carefully fold in using the whisk, rotating the bowl as you go. There should be no white streaks remaining.
7) Pour into the ungreased tin. Using a spatula, slash the batter to remove the big air bubbles, taking care to trace around the rim of the tin and also the one. At this point, I also push more batter outwards towards the rim to get a flatter cake as I notice it always tend to dome higher along the cone.
8) Bake at 160 deg C for 60 minutes.
9) Remove tin from the oven and immediately invert onto a tin can or something to elevate. Let it cool completely before carving out of the tin to unmould.


Friday, August 25, 2017

Azuki and coconut milk chiffon

I still have a lot of cake flour which I try to use up before summer comes. Decided to use my frozen tsubuan which I made quite some back as well. Based on the density of the tsubuan, decided to adapt the recipe for chocolate milk and cocoa chips because this recipe has more flour which will give it the density to 'hold' up the tsubuan. 
http://thedomesticgoddesswannabe.com/2016/02/chocolate-milk-chiffon-cake-with-chocolate-chips/

I substituted the milk for coconut milk and choc chips for tsubuan and some other changes e.g. sugar and milk volume. Didn't turn out too bad. Surprisingly seems a bit undercooked compared to when I usually bake this which comes out really brown. Really moist though. At first I thought the temp may be too high (170 deg C usually is) but as you can see, the top has already cracked.
Ingredients
7 eggs, separated
210 ml coconut milk
120 ml oil
35 (for yolks) + 135g (for whites) sugar
225g cake flour
¾ tsp baking powder
½ tsp salt
140g tsubuan or koshian

Method
1) Add the 35g of sugar to the yolks and beat till the sugar has mostly dissolved. 
2) Add the oil and beat until paler in colour. 
3) Add in the coconut milk and salt. Whisk until combined.
4) In 2 batches, sift in the cake flour and baking powder and fold using a whisk. Try not to over beat or you will develop gluten. Set aside.
5) In a very clean bowl (no oil, water, or detergent), beat the egg whites on low speed until foamy and opaque. Add sugar in 3 batches. After all the sugar has been added, turn up the speed to max and beat until stiff peaks.
6) Add the meringue to the yolk mixture in 3 batches. The first batch: incorporate till no streaks remain. You don't have to be too gentle. The second batch: This time, fold in gently so as not to knock out the air. The third batch: This time, return the yolk mixture to the left over third of meringue. Very gently fold in with a whisk (my preferred) or spatula until just combined.
7) In the ungreased 26 to 26" cake tin, pour in ⅓ of the mixture. Top with ½ of the tsubuan, trying to distribute evenly. Top with the next ⅓ of the cake mixture and another ½ of the tsubuan. Finally, cover with the remaining batter.
8) Using a spatula, run around batter in a zig zag manner and pay attention to the edges of the tin and around the centre funnel. This will disperse the bigger air bubbles and also swirl the tsubuan. (The original recipe recommends dropping the cake tin on the counter to dispel more air bubbles but I don't do this if the recipe has a very dense filling which will tend to sink to the bottom anyway as you can see from the picture)
9) Bake at 170 deg C for 65 minutes. Tent in the last 20 minutes or adjust to 165 deg C for up to 70 minutes, checking at 65 mins. Remove and immediately invert and allow to cool completely in the tin.
10) Unmould by running a knife or spatula around the edges and invert onto a plate. The bottom should be the top of the cake because that's where it's flattest.

Recipe feedback
The cake came out very slightly undercooked inside although the outside was quite brown. I have adjusted the recipe to bring down the temp from 170 to 165 deg C and to increase from 65 to 70 minutes. Alternatively, to tent the cake.

Sunday, July 30, 2017

Black sesame chiffon

I have wanted to bake this since about 2 years ago but never got down to it because I could not find a recipe for it. All the recipes I came across were for small pans but nothing suited the 25-26" pan I had. I had come across this recipe: http://greencilantro.blogspot.com.au/2013/07/black-sesame-chiffon-cake.html. It claimed that it was for a 10" pan. However, the ingredients only used 4 eggs, which didn't seem plausible for such a big pan unless it was going to come out really flat. I multiplied the proportions to 7 eggs (which my favourite blogger seems to recommend for 25"pans) and it came to something quite ridiculous e.g. way too much liquid, and way too much sesame seed powder.

As such, I decided to adapt from my favourite and most successful chiffon blogger and used this recipe for cocoa chiffon http://thedomesticgoddesswannabe.com/2014/11/chocolate-chiffon-cake/
I initially thought of reducing the cake flour because from past experience with this recipe, it was very dense. But after the flour went in, the resulting batter seemed too thin to hold up the sesame seed powder. In the end, I more or less followed the recipe but with a few tweaks.

Rising tall with a few cracks
Ingredients (for 26 inch pan)
7 eggs, separated
190g sugar
42g black sesame powder
224g cake flour
¾ tsp baking powder
½ tsp salt
120 ml oil (½ cup)
192ml fresh milk
Beautiful! Pardon the air pockets.
Method
1) Prepare the black sesame seeds. Toast in a pan until lightly roasted. Let cool and pulverize in a food processor. 
2) In a small bowl, combine the following dry ingredients: cake flour, salt, baking powder, and black sesame powder.
3) In a big bowl, beat the egg yolks with half the sugar until the sugar has mostly dissolved. Add the oil and beat until paler in colour. Pour in the milk and whisk to incorporate.
4) In three batches, sift in the dry ingredients and fold in gently. Ensure no lumps.
5) In a very clean bowl, beat the egg whites until foamy. Add the sugar in three additions and beat till stiff peaks.
6) Add ⅓ of the meringue into the yolk batter to loosen. With the next third, fold it in until no streaks of white remain. Finally, pour the batter into the remaining ⅓ meringue and this time, fold very carefully until no streaks remain.
7) Pour into the chiffon tin, making sure to distribute the batter throughout the tin. Concentrate on the sides rather than the centre. For some reason, the cake seems to rise more in the middle centre funnel than along the sides. Using a spatula, making slashes in the batter to dispel the air bubbles and especially run the spatular along the rim (as you can see in the picture, I wasn't totally successful in this area). Drop the cake tin onto the countertop from a 10 cm height. Repeat a few times to dispel the big air bubbles. 
8) Bake at 170 deg C for 65 minutes. After about 45 minutes, you can tent with foil if it gets too brown, or turn down the temp to between 160 to 165 deg C.
9) Remove from the oven and immediately invert over a can to keep the cake elevated. When completely cool (about 3 hours in winter!), unmould by literally carving out the cake from the tin. 
10) Serve with the top inverted onto a plate - the flat bottom has now become the top. This hides the cracked top.

Thursday, March 23, 2017

Yuzu 유자 chiffon

The weather has finally cooled down and out comes the chiffons again. I wanted to finish my leftover cake flour and found the perfect recipe that utilises all the leftover flour. There was a bit of tweaking because my yuzu was really thick so I had to add an extra splash of warm water into the batter otherwise it still had dry flour spots!

As usual, I used my favourite chiffon blogger whose recipes are always spot on
http://thedomesticgoddesswannabe.com/2014/12/yuzu-유자-chiffon-cake/

Ingredients
8 eggs, separated
40g sugar (reduced from 48g; for the yolks)
184g cake flour
1 tsp baking powder
½ tsp salt
96ml oil
5 tbsp yuzu + warm water = 144ml liquid in total
1 ½ tsp vanilla extract
70g sugar (reduced from 80g; for whites)

Method
1) Make the yuzu liquid.
2) Add the sugar to the eggs and whisk till the yolks are pale.
3) Add in the oil and continue whisking till pale.
4) Add the yuzu liquid and combine.
5) Sift the cake flour, salt, and baking powder. Sift into the yolk mixture and use the whisk to mix until just combined. Set aside.
6) In a separate very clean bowl, beat the egg whites on low until opaque. Add the sugar in 3 batches. The first batch should be added after the egg whites have just turned opaque and then in another 2 further additions. Once all the sugar has been added, beat at high speed until just before stiff peaks.
7) Add the meringue in 3 additions. Add the first third of the meringue to the yolks and mix. You don't have to be too gentle.
8) For the second batch, carefully fold the meringue into the yolk mixture using a whisk and rotating motion.
9) For the final batch, pour the yolk mixture into the remaining meringue and very carefully fold in using the whisk, rotating the bowl as you go along.
10) Pour into the tin, making sure to keep the batter on the outer edge. I rotated the tin to ensure more even distribution.
11) Using a spatula, slash the batter and especially trace around the outer and inner rims to break up the big bubbles.
12) Bake at 160 deg C for 80 minutes.
My most perfect chiffon 'top': no cracks because the temp remained stable!
Yuzu specks not noticeable
13) Invert the tin onto an elevated surface e.g. I placed the tin on top of a tin of canned food. Let it cool completely. 
14) Once cool, use a butter knife or offset spatula and trace around the rims to loosen the cake.
15) Serve immediately and store in an airtight box for up to 3 days.

Friday, January 27, 2017

Lemon chiffon

I had a lemon leftover and had no idea what to do with it. Since the orange chiffon was so successful, I decided to adapt it for the lemon recipe. The only difference I made was to increase the sugar.

Ingredients (for 26cm pan)
8 eggs
77g sugar (increased by 20g or 1 tbsp; for yolks)
68.5 ml (¼ C or approx ½ lemon) freshly squeezed lemon juice
2 tbsp grated lemon rind (approx 1 lemon)
68.5 ml (¼ C) oil
½ tsp salt
126g cake flour
140g sugar (no change from orange chiffon recipe; for whites)

Method
1) In a medium bowl, beat the yolks and sugar until pale yellow. Add oil and beat till pale.
2) Add the rind and salt. Whisk till distributed.
3) Add the juice and whisk. Add the flour in 2 batches and fold in gently. Set aside.
4) In a very clean big bowl, whisk the eggs till stiff peaks.
5) Add the meringue in 3 batches. The first batch, it is used to loosen the yolk mixture so you don't have to worry about knocking out the air. Ensure no white streaks remain. With the second batch, fold in carefully with the whisk. For the final batch, pour the yolk mixture back into the leftover third of meringue. This time, very carefully fold in using the whisk. Ensure no white streaks remain.
6) Pour from a 10cm height into the prepared pan. Use the spatula to trace around the inner and outer rims to dispel air bubbles. Smooth the top. (Do not drop on the counter top)
7) Bake in 180 deg C oven for 80 minutes. I reduced to 175 deg C after 30 minutes and still tented with foil for the last 20 minutes as it was still browning too fast, maybe because of the extra sugar?
8) Invert out of the oven to cool completely. Unmould once completely cool.

Recipe feedback
- It wasn't unduly sweet with the extra 20g of sugar but neither was the lemony taste very distinct.
- This is the fifth chiffon I've done. This and the orange seemed to brown much faster, probably because I was using a much higher heat than all other chiffons - 180 deg C. I think 175 might be a more appropriate temperature for both recipes but still 80 mins.

Pouring and shape
I've learnt that in all my chiffons, the centre around the chimney seemed to rise much faster than the outside, leading to a dome shape (see the chocolate chiffon which has the most pronounced dome). This means that after turning it over, the cake slants at an odd angle. Also, one website said not to rotate the pan but I've had one other lop-sided (see the coffee chiffon) chiffon with right side higher than the left. 

To combat this, I've learnt to
a) concentrate pouring my batter at the outer rim and let it flow inwards naturally. 
b) rotate the pan halfway through the batter and start pouring from the opposite edge and let the batter meet in the middle.
c) Smooth out the top. Any little peaks/lumps will burn.

Sunday, January 22, 2017

Orange chiffon

Been some time since I've baked chiffons because the weather has just been crazy. However, to celebrate dad's birthday, I decided to bake one albeit 1 day late. When I started on his actual birthday, some of the yolk got into the egg white and had to be discarded. I didn't have enough eggs left to restart, so it had to be postponed to an afternoon later after a trip to the supermarket last evening.

I went back to the recipe by my favourite fail proof chiffon blogger. This is the most number of eggs used - 8 eggs (hence I ran out of eggs) but interestingly, she used 8 egg yolks and 7 egg whites and I hate leftover one or the other, what am I supposed do with a leftover yolk? The rest of her recipe sizes for small cake pans used equal number of yolks and whites, so I surmised that 7 whites was all her largest pan (25cm) could take. Since mine was 26 cm, I decided to go all the way and it proved to be a good decision. This is the fullest and biggest chiffon I've ever made!
Notice how tall it has risen compared to previous chiffon attempts
Also baked at the highest temp amongst all the past chiffons, 180 deg C. Hence the big crack?
The offset spatula leaves a shaggy finish but my knife was scraping OFF aluminium shavings from the side of the pan! :O

Recipe adapted from http://thedomesticgoddesswannabe.com/2014/11/orange-chiffon-cake/
to reduce sugar and increase the egg whites.

Ingredients
8 eggs
57g sugar (for the yolks)
68.5 ml freshly squeezed orange juice (about 1 orange; ¼ C)
½ tsp salt
68.5 ml oil (¼ C)
1.5 tbsp grated orange rind (about 3 oranges; I reduced from 2 tbsp as 1.5 was really good enough)
126g cake flour
140g sugar (for the whites; reduced from 148.5g)

Method
1) In a smaller bowl, whisk the eggs and sugar until pale and creamy.
2) Add the oil and whisk till pale. 
3) Add the salt and orange juice and whisk to incorporate. Add in the orange rind and whisk to incorporate.
4) Sift in the flour and carefully use the whisk to stir in until no lumps remain. Set aside.
5) In a big clean bowl, whisk the egg whites on low speed until foamy and opaque.
6) Add the sugar in 3 additions. Once all the sugar has been added, increase to high speed. Whisk till stiff peaks, stopping periodically after soft peaks to ensure that you don't over beat.
7) Add the meringue to the yolk mixture in 3 batches. The first batch, use it to loosen the yolk mixture. The second batch, carefully fold it in. For the final batch, pour back into the bowl with meringue and very carefully fold in until no white streaks remain.
8) From a height of 10cm, pour into the cake pan. Carefully flatten the top of the cake batter otherwise there will be burnt spots. Ensure that there is more of the batter on the outer than inner edge.
9) Use a spatula to trace around the outer and inner rims. This will burst big bubbles.
10) Bake at 180 deg C for 80 minutes (no grill). I reduced to 175 deg C after 30 minutes as it was browning too fast.
11) Around the 75 minute mark, use the skewer to check for doneness. It should come out clean. If ready, remove immediately and invert it onto a can for the cake to cool.
12) When it has completely cooled (I draped damp towels on it to speed up the cooling process. It still took 1 hour even with constant change of towels on an ambient 30 deg C day!) unmould by running an offset spatula around the edge. Remove the side of the pan and run the spatula under the bottom of the cake. Invert onto a plate (the bottom becomes the top of the cake).

Saturday, December 24, 2016

Double chocolate chiffon

I've tried two chiffons so far and they've all come from Domestic Goddess Wannabe as her recipes are pretty foolproof for beginners but more importantly, tailored for the 25cm pan which is the closest to the 26cm I have. However, they aren't the lightest as they have a higher proportion of flour to liquid and this is a case in point. This recipe is an adaptation of her chocolate milk with chocolate chip chiffon and cocoa chiffon except the latter seems proportionately to have a lot less liquid, sugar, and flour but a lot more chips. This recipe follows the cocoa chiffon but I reduced the sugar to compensate for the very sweet choc chips. It came out like a light choc chip cake rather than a chiffon per se, which is not to say that it's bad because it was quite moist. Next time I might just try the chocolate milk with chips recipe directly ... except if the batter is less thick, I don't see how it can suspend the chips in the batter and not sink?

Ingredients (for 26 cm pan)
7 eggs, separated
160g sugar (for the yolks; reduced from 168g)
119 canola oil
182ml milk (room temp)
42g cocoa powder
224g cake flour (mine was self-raising, if not add ¾ baking powder)
½ tsp salt
120g sugar (for the egg whites: reduced from 126g)
100g chocolate chips (reduced from 140g) I mixed dark and milk chips)

Method
1) Beat the yolks with the sugar until creamy and pale yellow.
2) Add the oil and beat until pale. Add the milk and beat.
3) Sift the cake flour, salt, and baking powder.
4) Using a whisk, carefully stair into the yolk mixture. (This was very thick compared to my other chiffon recipes.)
5) In a really clean bowl, whisk the egg whites. Add the sugar in three additions, the first time after the whites have just turned opaque. Whisk to just before stiff peaks and be careful near the end.
6) Take ⅓ of the meringue and whisk into the yolk mixture. You don't have to be too careful but this time but ensure that no whites remain. Take the next ⅓ and repeat but be more careful time times.
7) Tip the yolk mixture into the remaining ⅓ meringue. This time, carefully fold in until no whites remain.
8) Pour ⅓ of the batter into the cake tin. Sprinkle ⅓ of the chocolate chips on top. Pour the next ⅓ and repeat. Finally, pour in the last ⅓ of the batter and sprinkle on the chocolate chips for that 'professional' finish.
9) Using a skewer, draw zig zag lines to dispel the air bubbles. (Do not drop on the counter top! I made that mistake and all my choc chips sank to the bottom)
10) Bake at 170 deg C for 65 mins (no grill). I turned down to 165 deg C after 30 minutes and when the remaining 35 mins was up, I switched off the heat and left it inside for another 5 minutes.
My beauty at 20 mins
Too hot at 170 deg C, it started to crack
All the choc chips sank

Recipe feedback: As mentioned, not as light as previous chiffons, probably because of the milk. 
Also, I've learnt not to drop the chiffon if there is 'filling' otherwise it all sinks. Using a skewer is the way but I was lazy to wash up another item 😰

Saturday, November 26, 2016

Coffee chiffon

I had 166g of cake flour which I want to finish up before the end of Spring. Summer and autumn will be too hot to bake and I don't want the flour to lie around and get stale. So I found this recipe which uses 163g of flour! Wonderful! Although I won't get to bake the black sesame seed chiffon that I was looking forward to, it's not so bad because I couldn't find a recipe particularly for a 25cm pan without adapting. And I'm petrified of adapting baking recipes. Interestingly, I noticed that this baking temp is lower than the previous tea chiffon, perhaps because there's less liquid.

Source:
http://thedomesticgoddesswannabe.com/2015/11/coffee-chiffon-cake/

Ingredients
7 eggs
117ml milk
3 tbsp instant coffee powder (reduced from 3.5 tbsp)
105ml oil
45g sugar (for the yolk; reduced from original 47g)
163g cake flour
2 tsp baking powder
110 sugar (for meringue; reduced from 117g)

Method
1) Prepare the milk coffee. Heat up the coffee to just before boiling point (small bubbles), and add the instant coffee power. Dissolve and let the coffee cool.
2) In a bowl, whisk the egg whites with the sugar until creamy.
3) Add the oil and whisk until pale, about 2 minutes.
4) Add the coffee and stir to incorporate.
5) Sift the cake flour and baking powder and add it to the yolk mixture. Beat gently just to break up the pockets of flour.
6) In a big bowl, beat the egg whites until foamy and opaque at low speed. Add the sugar in 3 additions. Turn up the speed to max and beat till just before stiff peaks.
7) Add the meringue to the yolk batter in 3 batches. The first batch is just to loose the yolk mixture so don't worry about breaking up the foam. Be more careful with the second batch and fold it in and ensure no white meringue streaks remain.
8) Finally, return the mixed batter back to the final batch of meringue. This batch, very carefully fold in the meringue, drawing the meringue from the bottom and lift to the top. Rotate the bowl as you go.
9) Pour into an ungreased pan from 10cm height. Drop the pan sharply on the counter top several times, and use a skewer to slash near the sides of the pan, or use a zig zag action. This will release the bubbles.
9) Bake at 160 deg C (no grill) for 65 minutes.
10) Once out of the oven, invert carefully onto a tin. Make sure the cake doesn't fall out (if it's undercooked. I took a risk and didn't test with a skewer)


11) This time, to speed up the cooling, I draped 2 damp towels over the pan. That cut down the cooling time by half, ie 1.5 hours.
13) Run the offset spatula around the sides of the pan and and cut as close as possible to the sides of the pan. Try to do it in one swift motion and avoid sawing. I managed to save some of the 'skin' but otherwise the cake was quite moist, which leads to its crumbly appearance.

Also, my cake didn't turn out as prettily because in my haste and excitement at having achieved the optimum oven temp, I forgot to drop the cake tin and slash the cake batter! As you can see from the pictures, there are big bubbles.
Recipe feedback: 
1) The coffee powder is important. I didn't quite like the taste but other than instant coffee which tasted a bit burnt, I doubt that brewed coffee would been strong enough. Hmm, maybe coffee essence is needed. 
2) The cake was very very moist though, altho heavier than the tea cake. This could be because I wasn't as conscientious with extract as much egg white as possible, or because there was 3g more cake flour than the recipe required, or because it used milk rather than water.
3) Compared to the tea cake, this recipe uses the same number of eggs and almost the same amounts of oil and flour. The major difference is that this one uses less milk by volume compared to the water that the tea cake uses.