Showing posts with label rice. Show all posts

Thursday, August 06, 2020

IP Cantonese scallop and chicken porridge

Method taken from Burning Kitchen's pork ball porridge. The main trick here is in putting oil and salt into the rice and freezing it for a few hours. This makes the porridge really silk as the rice grains break down very easily. The capacity of the IP is really small. I used to cook the chicken and rice together and it either took forever, or the porridge came out really stogy as I couldn't add that much water. So now I cook them separately and it works well because the chicken will not be over-cooked.

Ingredients
2 tbsp of dried scallops
7 - 8 chicken drumsticks or thighs
1 tbsp salted radish, washed and drained 3x to get rid of excess salt
1 thumb sized piece of ginger, sliced
1 cup rice
¼ tsp salt
2 tsp oil
2 tsp soya sauce, 1 tsp sesame seed oil
Salt and pepper to taste
3.5l water or chicken broth
2 chopped spring onions, optional
Eggs (room temperature), optional


Method
1. Prepare the rice by washing it. Add the oil and salt and stir through. Leave in the freezer for several hours before the start of cooking. Soak the scallop in hot water for at least 10 minutes.
2. Add the chicken pieces, scallop and scallop soaking water to the IP pot. Add the water and ginger slices. Lock and seal and cook using the Soup function for 20 minutes. 
3. Allow to depressurise for 5 minutes. It will squirt everywhere with an oil residue so you may want to put a dish cloth on top of the spout before depressurising.
4. Remove the chicken pieces and set aside. 
5. Add the frozen rice to the broth. Lock and seal and cook using the Porridge function for 20 minutes.
6. Once cool enough to handle, remove the meat from the bones. Marinade with the 1 tsp of soya sauce and 1 tsp of sesame seed oil.
6. Allow the porridge to depressurize for 10 to 20 minutes. It will squirt porridge everywhere because the rice grains swell, so best to throw a dish cloth on top of the spout before depressurising. Stir very well to break up the grains.
7. Add the salted radish and stir through. Add salt and pepper to taste.
8. In each serving bowl, crack the egg at the bottom. Top up with the hot porridge and then top up with shredded chicken. Garnish with spring onions if using.

Updated:
1. Here is a stove top recipe for Chicken Congee which uses a similar method of marinading the rice with oil and salt for 2 hours, except no freezing is involved. The chicken is poached.
- 3/4C rice, 1lb pork shank, 1lb pork bones, and 6.5C water all go into the pot together for 35 mins and 20mins natural release. Pork shank is shredded and then returned with century egg on saute function with constant stirring until the grains break down.

Sunday, September 08, 2019

Sik hye 식혜

Sources
1. https://mykoreankitchen.com/sikhye/ : Most comprehensive recipe, describes using the course malt barley, the powder, and the teabag
2. https://www.maangchi.com/recipe/sikhye: I mostly used this method but it also describes making it a slushie

Generally, the recipes are pretty aligned. The difference between these two and other recipes is whether they use the course malt barley or the powdered type. While Maangchi uses the powder, Korean Kitchen thinks that the powdered type doesn't help the rice grains to float to the surface. However, I used the powder and didn't have a problem so I think it's because Korean Kitchen left the powder in a cheesecloth.

Ingredients
1 cup malted barley
18 cups of water
1 cup of cooked rice (short grain or glutinous rice)
1 cup sugar
pine nuts and red dates for garnishing (optional)

Method
1. Add the water to the malted barley and stir well. Soak the malted barley 2 to 3 hours in a large bowl and let the sediment settle. The clear water should have separated to the top.
2. Meanwhile, cook the rice with slightly less water so that it's a bit undercooked.
3. Once the rice is cooked, carefully strain the malted barley water with the help of a cheesecloth, into the rice. The sediment should have settled at the bottom. Be careful not to stir up the sediment at the bottom.
4. With the sediment, pour in the remaining 4 cups of water and leave to steep.
5. Leave to ferment in the rice cooker using the Keep Warm function at between 55 to 60 deg C. After 4 hours, check to see if a dozen or so rice grains have floated to the top. If they have, sik hye is ready. It only took me 3 hours. If grains haven't, leave it to ferment for another hour.
6. Once the grains has floated, again carefully pour the malted barley water into the pot, once again, with the help of the cheesecloth. Throw away the sediment.
7. Bring the sik hye to a boil and add the 1 cup of sugar to dissolve. Skim off the foam and boil for 10 minutes.
8. Once finished boiling, leave to cool. Strain off the rice grains and wash it in cold water to wash off the starch. Keep the rice grains in a separate air tight container with some cold water. If the grains are left in the sik hye, the whole liquid turns grey.
10. Strain off the sik hye into a glass bottle.
11. Serve hot or chilled in a bowl, topped with red date and pine nuts if using, and about two tablespoons of rice grains.
12. Keep the rice grains and sik hye refrigerated for up to a week. Once it goes sour, it's time to throw it away.

Malted barley soaking
Floating rice grains!
Sik hye with rice grains and topped with red date
Recipe feedback
The grains delighted me because they felt so light on the tongue. I was expecting porridge-type of stodgey rice but the grains here were light and fluffy!

Thursday, January 03, 2019

IP Nasi Chicken Biryani

Easy recipe last posted here: https://simmetra.blogspot.com/2018/11/ip-nasi-biranyi.html

Found another recipe which seems to have more flavour than the Ministry of Curry because it also fries the dry spices for the rice but I still prefer the method from MoC. The marinade is mostly the same but the difference is in the rice and dry spices. (quantities have been adapted for 1.2 to 1.5 kg of chicken)

https://www.indianhealthyrecipes.com/chicken-biryani-in-pressure-cooker/

Ingredients
8 to 12 pieces of chicken drumstick

Marinade
1 tbsp ginger grated
1 tbsp garlic grated
2 tbsp lemon juice (optional)
2 tsp garam masala
1 tbsp red chilli powder
¾ cup yoghurt (or about 6 tbsp)
2 tsp salt (if required)

Whole dry spices
1 bay leaf
4 cardamom
4 to 6 cloves
1 inch cinnamon
1 star anise
¾ caraway seeds

Pot
3 cups basmati
3 cups of water or thin coconut milk
3 tbsp ghee or oil
1 large onion, sliced
½ cup mint, chopped
1 green chilli, slit
6 tbsp yoghurt
¾ salt to sprinkle in water
1.5 tsp garam masala
2 tbsp fried onion (optional)
Served with tomato raita
Method
1) Marinade chicken for at least 1 hour. Soak rice for 30 minutes.
2) Heat the oil and fry whatever dry spices you have. Fry the onion until light brown.
3) Add the chicken and fry for 5 minutes. Evaporate excess water.
4) Add the additional ingredients into the pot (mint, chilli, yoghurt, garam masala). Deglaze the pot with 1C of water to prevent burning later on.
5) Layer. Ensure the chicken is at the bottom. Spread rice over the chicken (and avoid letting the rice fall to the bottom of the pan where it will burn)
6) Pour 2 cups down the sides of the pot. Pour the remaining cup on top of the rice. Level if necessary.
7) Sprinkle on the mint and fried onions.
8) Set on manual for 10 minutes, natural release for 5 minutes.
9) Fluff up the rice. Serve from the bottom layer. Serve with raita and flat breads.

Recipe feedback
This is much more tasty than the previous recipe and I learnt a very important lesson: that c cup of water per cup of rice is sufficient as far as this recipe goes. In a pressure cooker and also with the addition of chicken, a lot less water is needed to cook the rice than it would in a normal rice cooker or even microwave rice cooker. I know the writer of this recipe did say that basmati esp old rice needs less water than other rice so it does seem true. I will only really know when I cook basmati in the microwave to compare with how I cook with Jasmine.

Otherwise, the recipe is great and the same tricks from the last recipe applies i.e. must deglaze pan so the bottom won't burn, pile rice only on to of the chicken so the rice doesn't burn, and finally, natural release for only 5 minutes.

Sunday, November 11, 2018

IP Easy Nasi Biryani

Wanted a really simple recipe that I could also cook in my IP. Found this one which is easy and tastes good enough since I don't have a discerning palate.

https://ministryofcurry.com/chicken-biryani-instant-pot/

Ingredients
8 to 12 pieces of chicken drumstick

Marinade 
2 tsp garam masala
1 tbsp red chilli powder
1 tbsp ginger grated
½ tsp tumeric
2 tbsp lemon juice
¾ cup yoghurt
1/4
2 tsp salt

Into the pot
1 bay leaf
Caramelised onion chutney
3 cups of basmati rice
3 cups water
2 to 3 tbsp of caramelised chutney

Garnish
½ cup Sultanas
½ cup cashews

Method
1) Marinate the chicken for min 20 minutes, or best overnight. Wash and then soak the rice for 20 minutes.
2) Press Saute. Drain the chicken and into the pot and briefly fry. Remove chicken and set aside. Pour in the marinade and deglaze the pot.
3) Add the onions at the bottom layer followed by chicken on top.
4) Drain the rice and layer on top, be careful to avoid spilling the rice onto the bottom of the pot. Add the bay leaf and water. Switch on Manual and set 10 minutes.
5) When the alarm beeps, let it release for 5 minutes and then Quick Release. If the top of the rice is not fully cooked, fluff up the rice and mix it into the rest of the rice and let it rest a further 5 minutes.
6) To serve, dig deep into the pot to take some chicken pieces and followed by rice. Garnish the rice with sultanas and cashews if desired.


Recipe feedback
- The recipe uses only garam masala and that was enough spices for me. 
- The use of basmati makes all the difference! The grains were separate and didn't stick to the bottom. The quick release also ensured that the rice didn't cake on the bottom of the pot and burn.
- She caramelised the onions from scratch. I used a store bought chutney!
- She cooked twice. First time 4 minutes for the meat and then release. Next, 6 minutes after adding the rice on top and then release. I couldn't be bothered and I don't think it affected the rice was over cooked. In fact, the rice was perfect.

Found a more 'authentic' recipe although it's not by an Indian. It's by a Japanese blogger who lives in Australia but what I like is that because it's for the Australian context, the ingredients are easily available here. Might try it next time.
https://www.recipetineats.com/biryani/


Updated: A more complicated recipe here https://simmetra.blogspot.com/2019/01/ip-nasi-chicken-biryani.html

Tuesday, December 23, 2014

Thai red fish curry and tomato rice

There's a japanese tomato rice recipe going around. Basically the idea is toss veg, rice and meat into a rice cooker and cook. Embed a whole tomato in the rice and voila. But reduce the amount of water added by about ½ cup for each tomato added. I totally forgot about this so my rice was too soggy, but that will work out since I tend to make enough leftovers, where the rice can get pretty dry if the right amt of water was added initially. The trick with the meat was also to leave it in big enough pieces to cook during the time it takes to cook white rice. Not too small or it will over cook. Decided rice was boring so I switched up to Thai red curry.

Ingredients 
3 cups rice
4 basa fillets, sliced in half
8 white mushrooms, quartered 
3 tomatoes, uncut
1 can coconut milk (400ml)
600ml water
4 tbsp Thai red curry paste

Method
1) Place washed rice at the bottom of the rice cooker pot. Insert the fish pieces upright into the rice. Place tomatoes whole in between the fish slices. Do the same with vegs.
2) Dollop on tsps of the curry paste.
3) Pour in the coconut milk. I used the the rice measuring cup and topped up the rest with water. Since I used 3 tomatoes, I should reduce the total liquid volume by about a cup.
 
4) turn on the rice cooker and cook! Note that my cooker isn't the 'dumb' type so instead of 20 minutes to cook rice, it takes between 40 to 90 minutes! Not great for cooking rice but great fo these one pot meals!

Sunday, September 22, 2013

Bur bur pulut hitam

One of my favourite desserts but I've only made this twice in my life, because the rice is quite difficult to find, so was very pleasantly surprised to find it in Australia WMD showcased in Better Homes and Gardens! But of course, ang mo cooked it western style as a savoury rice when it really is meant as a dessert.

Ingredients:
1 packet of rice, approx 250g or 3 cups
18-20 cups of water: this rice is thirsty!
100g rock sugar (add more to taste)

Method
1) Wash the rice by rinsing at least 3 times. This rice seems more sandy than normal rice, or maybe it's my imagination.
2) Put the rice and water into the pot and bring up to a boil, then turn down to simmer. Keep pot uncovered or half covered as it will boil over. Skim off any scum.
3) When the rice has softened, approx 40 mins, add in the sugar. Continue simmering till sugar has dissolved. 
4) Turn off the flame and cover with the lid to allow the rice to rest. It never really breaks down to a gruel unlike normal rice, but it will break up the more it's simmered.
5) Serve with a dollop of coconut cream or some coconut milk.


Saturday, April 09, 2011

Cheat's chicken rice

I have been doing a lot of microwaved meals, mostly because it's quick and easy and least amount of fuss, and it's difficult cooking for 1 person. I discovered this chicken rice equivalent quite by accident. You will see why I say 'equivalent' later. Don't expect really premium quality bak zhum gai type of chicken, this is really more about taste than texture, because there's only so much the microwave can do! Whenever I cook this and my flat mate steps into the apt, she never fails to say "Wow, smells wonderful!" and she's a vegetarian!

Ingredients
3 chicken thighs
1 tbsp sesame seed oil
1 tbsp light soya sauce
1 tsp chopped garlic
1 tsp chopped ginger
1/2 tsp sugar
Black pepper to taste
1 tbsp water
Vegs (e.g. broccoli, cabbage) optional - if adding veg, you need to add more water
1 portion of rice, cooked


Method
1) Marinate the chicken with all the ingredients for at least 1/2 hour.

2) Put everything in a microwave casserole. Microwave at 30% for 20 mins, then turn up to 70% for 3-5 mins. The lower the heat, the more moist your chicken will be but it wil naturally take longer. Each microwave's voltage differs, so you really have to check whether the chicken is cooked, and adjust accordingly. To do this, pierce a fork into the thickest part of the thigh, usually next to the bone, and see if the juices run clear. You can also do it at 10 mins for 50% power if that's quicker. It's all about experimenting with your own microwave to get the best result that works for your microwave.

3) At this point, you're asking, so where is the rice? What happens is that the chicken juices will flow out. You add the rice to this (warmed up if necessary) and it will absorb the juices and it really tastes like chicken rice!!!! See why I said 'chicken rice equivalent'? Because if yo know how chicken rice is really cooked, you know that the rice is usually fried in chicken oil then cooked in chicken stock!

Monday, April 26, 2010

Unagi Temaki


Got this idea from Sakae Sushi. Not difficult.


Ingredients
1 packet of ready roasted teriyaki unagi which has 2 halves of an unagi
1 cup of cooked rice, cooled
1/2 Japanese cucumber, sliced up. You can also use a mandolin into thin shreds
4 sheets of sea weed (nori)
Wasabe (optional)

Method
1) Cook the rice and let it cool. Warm up a packet of ready roasted unagi and slice it once in half length-wise, and another time down the spin. You will get basically quarters of 1 unagi.
2) Cut up the sheet of nori into roughly a palm-size square. Roll it up like a kachang puteh wrapper. Fill it up with rice to fill the bottom, then slide in 1 quarter of the unagi.
3) Slice up the cucumber or shred it with a mandolin. I just got lazy, after all, its a late weekday dinner. Slide it in as well.
4) Take the sauce from the unagi packet and sancho and serve as dipping sauce. Wasabe is optional.
5) Serve and eat immediately, otherwise the seaweed gets soggy and chewy.

Sunday, July 26, 2009

Stewed beancurd in a King Oyster Mushroom Chicken Broth

I saw giant oyster mushrooms from Korea, considered a delicacy here. I was trying to recreate the toufu soup that I had in Korea and this is what I came up with.

The original stewed beancurd soup was vegetarian but my household are meat eaters, and would feel weird without meat, so I threw in chicken and chicken soup. In addition, being so huge, the mushroom slices had an almost abalone texture to them, very meaty and smooth. In addition, just because I'm too lazy too cook the rice separately, I put in brown rice to make it into a porridge. The result - a velvety creamy stock which reminds me of risotto texture.

In addition, I put in the beancurd whole at the beginning, and expected it to break up. I was pleasantly surprised to find it was still whole, and in fact, the taste of the stock had permeated into the beancurd, effectively 'marinating' it!


Ingredients
1 packet of king oyster mushrooms, sliced on the diagonal
1 tin of Swenson chicken stock
1 packet of silken toufu (suitable for soup)
1 cup brown rice
8 chicken wings
1 tbsp wine
1 tbsp light soya sauce
2 cloves garlic, smashed
1 thumb sized ginger, thinly sliced
1 large red onion, diced
1 litre of water

Method
1) Marinate the wings with wine and soya sauce and set side to marinate for at least 1/2 hour.
2) Heat up a pot and fry the diced red onion and ginger.
3) Add the wings and briefly fry until the wings are lightly browned.
4) Briefly fry the mushroom slices.
5) Add the stock and water, and garlic.
6) Pour in the washed brown rice and stir.
7) Carefully place the toufu into the pot, making sure not to break it. Ensure its immersed in the stock.
8) Bring to a boil before turning it down to gently simmer for 20 to 25 minutes.
9) Serve immediately.

Sunday, June 21, 2009

Ondeh Ondeh

Had a hankering for this nonya dessert, which also happens to my dad's favourite, just nice for Father's Day today. Given the exorbitant rates you pay for this commercially and how easy it is to make (edit: easy to make doesn't mean its not tedious, esp when you're doing the 20th ball or so! ) and how well shops don't make it, I thought if I'm going to eat this standard and pay for it, I might as well make it at home! The difference however is that I'm eating it hot and we all know what a huge difference that makes to any food. Anything tastes better hot.

I did a lot of research beforehand, and here are my sources which I've adapted the final recipe from: Basic recipe which I mostly followed and reproduced below: http://www.mytasteheaven.com/2009/04/ondeh-ondeh-nyonya-kuih.html
Basic recipe which I like the 'method' of making the balls: http://fatboyrecipes.blogspot.com/2005/12/my-green-ondeh-ondeh-balls.html
Another simple recipe: http://www.mycookinghut.com/2008/04/06/onde-onde-malaysian-dessert/
Version with sweet potato: http://recipes.sparkpeople.com/recipe-detail.asp?recipe=313655

Ingredients (makes 48 to 50 ping pong sized balls, only because I wanted to use up all the flour and grated coconut!

Skin
500g of glutinous rice flour
240ml of water (in the end I used a lot more than this, can't say the exact amount because i keep adding teaspoons of hot water in to get it moist enough)
2 tsps of pandan leave essence (which is why my balls are white in colour. The original receipe called for 2 tbsp of pandan leaves juice, which I was too lazy to follow, but I will next time! Taste of essence is just not the same!)
2 tablespoons of castor sugar

Filling:-
2 pieces of gula melaka (cut into small pieces)

Coating:-

200g grated coconut (I bought the steamed version from the fridge section of the supermarket, keeps longer)
1/2 teaspoon of salt

Method
1) Pour the hot water into the glutinous rice and mix.
2) Add in the other ingredients for its skin until it forms a dough.
3) Form small balls into size and fill them with a little piece of gula melaka and seal them up.
4) Boil some water in a pot.
5) Put the sealed balls into the boiling water.
6) When the balls float on the water, take them out put into a freezer bag which has the grated coconut inside. Toss around until the balls are well coated.
7) The ondeh-ondehs are ready to be served. Some recipes recommend serving them cold (not chilled, but cold)


End note: I made enough to feed an army! Not an experience I think I'd want to repeat any time soon, my kitchen was like the aftermath of a typhoon afterwards, and no matter how much I cleaned, I still never seemed to get rid of all the grated coconut from everywhere! Next time, I'm going to bring a friend!

Sunday, May 31, 2009

Zhong zhi - Hokkien style

Getting in the mood for this Thu. The thought did cross my mind to do it, but was reading the ingredients and how to made my eyes pop out. However, I did get to enjoy the fruit of other people's labour - thanks to Aunt-in-law and a good colleague!

(recipe taken from Cozycot, user Swissroll)

Rice
Ingredients A
Bamboo leaves : 250g (soaked overnight, washed)
Nylon strings : per required according to individual

Ingredients B
Glutinous rice : 2 kg (washed, Soak for 4 hrs and drained)

Ingredients C
Chopped shallot & Garlic : 1 tbsp

Ingredients D
Salt : 5 tsp
Ground pepper : 1 tsp
Five spice powder : 1 tsp
Dark soya sauce : 1 tbsp
Sesame Oil : 1 tbsp

Method:
1) Heat up 4 tbsp oil, sauté chopped shallot and garlic till fragrant
2) Pour in glutinuous rice and fry till aromatic
3) Mix in Ingredients D to season, dish up for use later

.................................................. ................................

Fillings

Ingredients A
Chopped shallot and garlic : 1 tbsp
Dried shrimp : 200g (washed, soak to soften, drain)

Ingredients B
Chopped shallot and garlic : 2 tbsp
Chinese mushroom : 40 pcs (washed, soak to soften, drain)
* Huiji Waist Tonic : 1 – 2 cup (Huiji measuring cup)

Ingredients C
Pork belly : 2 kg (washed, cut into 40 pcs, marinate for 1 hr with seasonings)
Oyster Sauce : 2 tbsp
Dark soya sauce : 1 tbsp
Sesame Oil : 1 tbsp
Hua tiao wine : 2 tbsp
Ground pepper : ½ tsp.
Five spice powder : ½ tsp
Salt : ½ tsp
Sugar : ½ tbsp
Corn flour : 1 tbsp

Ingredients D
Dried Chestnut : 250g (washed, soak overnight)

Method:

1) Heat up 3 tbsp oil over medium flame, stir fry Ingredients A till aromatic, dish up, reserve for use later
2) Heat up 3 tbsp oil over medium flame, sauté chopped shallot and garlic from Ingredients B, add mushroom to fry till aromatic
3) Add marinated pork belly and fry till fragrant
4) Mix fry chestnut till fragrant
5) Add suitable amount of water, simmer till water is soak up, dish up
6) Take 2 pieces of bamboo leaves, fold to form a pyramid shape
7) Put 2 tbsp of glutinuous rice into it, dig a hole in the centre, add in fillings, cover with another 2 tbsp of glutinuous rice, wrap up, tighten with nylon string
8) Boil a large pot of water. Add in dumplings, cover and cook with low heat for 2 hours till cooked and soft.

Saturday, March 14, 2009

Sushi

sushi
I state categorically upfront - this is not an authentic sushi-making recipe. It is just a easy DIY at home simply because I'm nostalgic - I first made this in the UK and this is the first time in 9 years that I've done the recipe again. At that time, it was just something that reminded me of home. And at that time, I didn't have access to a lot of really Japanese ingredients, like I didn't even have the のり (seaweed) and the bamboo mat, so I improvised by using a sheet of paper in place of the mat. And it worked remarkably well too! I also use smoked salmon which to the non-discerning palate isn't very obviously different from fresh sashimi. Altho we are able to get freshly sliced sashimi at the supermarkets nowdays, I do wonder at the freshness of it.

I did find however that the mat really makes making the square shape of the sushi roll very much easier. I also improvise by using brown rice since that's all I use at home and I must say it makes it very much harder to clump the grains together. It started to spill out.

Ingredients
のり
(1 packet of seaweed)
1 packet of smoked salmon
わさべ (wasabe) paste
sashimi soya sauce (apparently there are many kinds of soya!)
1 cup of rice, boiled and allowed to cool

Method
1) Lay the mat out on a flat surface and place 1 sheet of のり on top.
2) Fluff up the rice. Spread the rice along the bottom of the seaweed. Pat down to clump the rice grains together. Place 2 strips of salmon along the centre of the rice.
3) Lift up the lower edge of the mat and slowly flip it over, ensuring that the edge of the seaweed is tucked in. Roll and flatten to ensure the rice is well packed. Continuing rolling until the seaweed is all rolled up.
4) Cut into squares and present but turning upwards. A little trick - wet the knife blade and you'll find it much easier to slice through and the blade won't get stuck to the rice.

Saturday, January 24, 2009

Andrea's Chicken Rice

Got this chicken recipe from Andrea.

Ingredients
1 whole chicken, cleaned
2 slices of ginger (1 slice whole and 1 slice shredded)
2 cloves garlic
2 chopped shallots
1 tbsp sesame seed oil
1 tbsp light soya sauce
1 cup rice
Pinch of salt

Method
1) Pop a cleaned chicken into boiling water which has a slice of ginger.
2) Remove scum and turn down flame to a simmer.
3) Simmer uncovered for 20 to 25 minutes. Check for doneness by piercing a chicken leg in the thickest part to see if blood still oozes out. Reserve the water for later.
4) Dunk into a ice bath for about 5 minutes.
5) Once cooled, pat dry with kitchen towels. Use a mix of light soya sauce and sesame seed oil and rub into the skin.
6) To make a serving sauce, take a bit of the leftover sesame seed oil and soya sauce (dripping from rubbing the skin), add a bit of the water used to make the chicken.
7) Fry the ginger shreds, shallots and garlic until fragrant. Add the garlic last because it tends to burn fastest. Add the washed rice and stir fry until the rice grains turn a bit translucent.
8) Pour the rice into a rice cooker and add enough of the reserved water (used to poach the chicken) to cook the rice. Add a pinch of salt.
9) Any leftover reserved water can be used as soup e.g. add veggies like cabbage and tomato, and a bit of salt.

Sunday, February 03, 2008

Garlic Chicken Fried Rice

This has always been a nemesis of mine - I could never quite get it right. Either it comes out too soggy, or not eggy enough, or the rice comes out plain. But whatever it is, it comes out without 'wok hei'.
Thanks to the wonders of the Internet however, I got some ang mo tried-and-tested recipes and voila! We have a winner. This is what I did:
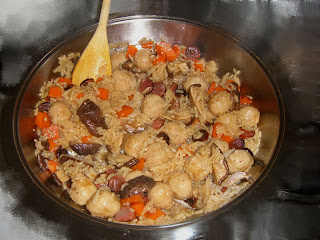
Ingredients (serves 2)1 cup rice
1 chicken breast, cubed
2 cloves of garlic, minced
1/4 cup mixed vegetables
2 eggs
1 tsp sesame seed oil
1 tsp fish sauce
2 tbsp light soya sauce
Oil for frying

Method
1) Marinate chicken with 1 tbsp soya sauce and pepper. Leave to marinate for at least 15 mins.

2) Usually all fried rice recipes call for cold leftover rice, but I've never got any hanging around in my fridge, thanks to the wonders of the microwave. I wondered it if would make a difference - being cold or not. Anyway I had freshly cooked rice, but left it out until it cooled down a lot, so that when you stir it, it doesn't break up so easily and become mush. The whole point of fried rice is really to have dry, separated whole grains of rice.
3) Heat up the pan or wok and fry the chicken. Once 3/4 cooked, add the mixed veg and fry for a minute. Lastly, add the eggs and scramble. Dish everything out and set aside.
4) Either wash the pan, or wipe the pan clean because you don't want any burnt bits in your rice.
5) Add oil again, and heat it up until the pan is very hot. Add the garlic and fry for a minute. Add the rice and stir fry. Dash in the fish sauce, soya sauce and sesame seed oil. I find it helps to use 2 spatulas to ensure everything is stir fried evenly.
6) Once the rice is warmed thru, add back the scrambled ingredients. I find it's easy to add a bit of ingredients, mix well before adding more.
7) Serve immediately with la cheow yao, parsley or spring onion.
I still didn't achieve wok hei and its probably because I used a non-stick pan. However at least for once in my life, the rice grains were well-separated and not soggy!

Friday, July 13, 2007

Chinese paella

I'm a cooking programme junkie. Lately, I watched an old episode of Jamie Oliver in Oliver's Twist and watched him as he brought a Brazilian friend home and tried to prepare authentic Brazilian stew - with a Jamie twist, of course. In particular, 1 dish actually reminded me Chinese cooking. He started off with Brazilian sausages (which look surprisingly like lap cheong), fried them off, then poured in some spare ribs for browning and topping off with other liquids. I also watched a recent episode of Kelly Kwong and saw her fry fried rice, which I've not done for a long time simply because I've not had leftover rice for a long time ever since I discovered the microwave rice cooker. Last night, I watched an episode of Chef At Home and saw Michael Smith prepare something involving basmati rice.

Suddenly I felt inspired - I dusted off my old paella pan and this is that I did:

Ingredients

1 packet chicken balls (too lazy to go and debone chicken thigh and cut into cubes, and don't like using chicken breast because it's very dry)
1 carrot, diced
8 dried shitake mushrooms, soaked in 1/2 cup of hot water
1 large onion, diced
3 cloves of garlic, crushed
1 cup of rice, washed and drained
2 lap cheong, cut into circles
oil for frying

Method

1) Pour the oil into a heated paella pan. Fry off the lap cheong. Once the oil has started to melt and ooze out, add the onions and fry until soft. Add the carrots and fry briefly for about a minute.
2) Drain the mushrooms and slice up. Reserve the water from soaking the mushrooms.

3) Add the crushed garlic, rice and mushrooms to the pan, and briefly fry to incorporate.

4) Pour back the water used for soaking mushrooms, and add another 1 and 1/2 cups of water (ie total 1 cup rice = 2 cups water). Pat down ingredients without stirring the rice too much or the grains will break. Bring to boil.

5) Cover and leave on a slow simmer for about 20 mins until the water has been absorbed and the rice is cooked and fluffy.

6) Serve immediately in the paella pan.

Tuesday, January 02, 2007

Seafood Mui Fan

I remember when I was young, we would go to this food court type restaurant in the basement of the old Orchard Point on Sundays. Now it's gone, after the reno. The food wasn't great, but it was tasty, and served old favourites like hor fun, mui fan, etc.

Mui fan is one of my favourite childhood dishes. It's actually v easy to make, once you got the sauce down pat. And from there, it's easy to move on to hor fun (altho frying the kway teow in dark sauce is a pain) and even crispy noodles. People always told me it would be easy but I still don;'t reckon so, but this is a pretty decent attempt.

Ingredients (serves 4)
150g squid, cleaned and sliced into rings
150g shelled and deveined prawns
1 pkt fishballs
half a can of canned baby corn, drained and sliced
1 baby chinese lettuce (or chinese cabbage can also be used), sliced
1 tomato, diced
2 eggs, beaten
1 tbl oyster sauce
1 tbl Maggi concentrated chicken stock
1 tbl chinese rice wine
2 cups water
2 tbl cornstarch, as thickener

Method
1) In a pot, pour in the water, fishballs, and vegetables. Bring to a boil and simmer for about 5 to 10 minutes.
2) Add the seasoning. Add the seafood and cook for no more than 30 seconds.
3) Bring to a boil. Drizzle in the beaten egg to achieve the 'egg drop' effect.
4) Add the cornstarch to a bit of water, and when the soup is boiling, pour into the pot and stir.
5) Serve immediately on top of steamed rice. You can also serve on top of noodles.

Saturday, June 03, 2006

Brown rice

My organisation has litle 'communities of interest' set up by people who share a common interest to come together and further their interest. Recently, this lady in my office starting eating healthily in a bid to lose weight and for general well-being. She went full time into brown rice and started to gather a following. She decided to set up a brown rice COI.

One of the 'activities' of this COI was to cook brown rice for everyone for lunch, and everyone brings their own food as they share lunch together. Last week, I walked in on the pantry when the rice was cooking and my, I was pleasantly surprised by the fragrance of the rice that whafted out from the pantry. It smelt like baking bread!

Piqued, I decided to ask her for some brown rice cooking tips. I have heard horror stories about cooking brown rice, like how it takes a zillion hours to cook and needs a specific amount of water. None of the 'hand' or 'finger' method of measuring water here!

Here are some tips she shared. Firstly, she recommended using the old fashioned electric rice cooker (the idiot kind), rather than those expensive new- fangled Japanese 'fuzzy logic' rice cookers. The former takes a lot less time to cook any form of rice, and it's also easier to clean up afterwards. Secondly, she said that eating brown rice is more filling than eating white rice, so this helps you to cut down on your portions. This is supposed to be why it is the weight-watchers' answer to GI and a lower carb diet. Lastly, she drew up a chart of recommended water to rice to serving proportions. Here it is:

She recommended Songhe brand, saying that the rice has been washed once before, so when you rinse the rice, it's cleaner. Thus, you only need to rinse the rice once. She has also tried Pineapple brand, which is totally unprocessed. The rice is thus dirtier and requires that you rinse it more than once. However, this may appeal to people who believe that less processing is more 'organic'.
So now it's my turn. I've just brought my first bag of brown rice and I'm raring to go. Altho some people seem to have 'problems' eating brown rice e.g. they'll mix it with white rice, or first-timers find that it over stimulates their bowel movements, this isn't the first time I've tried it. Mom and Gran experimented with replacing white rice with brown rice in our diet many years back. I don't exactly know why they abandoned their attempts, but I'm willing to give it a shot again, if only just to enjoy the beautiful aroma whafting through my kitchen as the rice cooks!

Tuesday, January 24, 2006

Pineapple Fried Rice with Chicken


Ingredients (Serves 4)

1 large pineapple
3 tbsp cooking oil
200g (1/2 lb) chicken leg meat, skinned, boneless, cubed
1 medium onion, roughly chopped
3 cups cooked rice
1/2 tsp tumeric powder
12 tbsp fish sauce
1/2 tbsp soya sauce
50g (2 oz) cashew nuts, roasted
50g (2 oz) raisins
Coriander leaves (cilantro) for garnish

Method
1) Cut the pineapple into half lengthwise. Scoup out the flesh, leaving the skin intact so both havles can be used as serving dishes for the rice. Cut the flesh into medium sized cubes. Reserve 100g for the rice and keep the rest for another use.
2) Place the oil in a wok over high heat. Saute the chicken for a few minutes, until cooked. Reduce the heat and add the onion and stir fry till translucent.
3) Add the cooked rice and tumeric powder and stir well until the rice is well mixed in.
4) Add the fish sauce, soya sauce and salt and pepper to taste. Mix well.
5) Stir in cashew nuts and raisins. Add 100g (1/4 lb) of diced pineapple.
6) Serve hot in the pineapple bowls, garnish with a few cashew nuts, raisins and coriander leaves.

Note
The chicken can be replaced by prawns if desired.

Sunday, October 23, 2005

Pork Porridge

Went to Newton Hawker Centre last night. As the original one is under renovation, it has moved to this previously open area (was it a field or car park? Cant remember) next to these very nice colonial-style black and white shop houses. I did one time think of renting one during my 'shophouse phase' but then saw the hawker centre nearby - not a good thing!

Anyhow, was having a porridge craving. U know how it is when u get the Hong Kong style chok, grains nicely broken down till the whole liquid is this velvelty and delicious gruel that slides down your throat. It can also be stody, like oatmeal, the way my family used to cook it (my mom would say that it's more substantial), but that's not the way I like it. I'm also not a fan of Teochew style muay at all. I'd much rather eat mui fan but maybe that's the Cantonese in me talking. :)

Went to Newton last night for late dinner to satisfy my craving for bbq chicken wings and porridge, but my craving for porridge was cruelly misplaced - 1stly, could only find a fish muay, 2ndly - blardy ripoff - $4! Anyway, with visions of pork porridge swirling in my head, I'd thought I'd try round 2 today. To make it simple, I'm using a rice cooker to do all the work.

Ingredients
300g pork bones (used for soup) or spare rib (this has more meat but is more pricy)
200g pork collar or pork shin - sliced thinly
100g minced pork
100g pork liver, sliced thinly
2 cups rice
1.5l water
1 finger length ginger, sliced thinly
Salt to taste

Marinade
Pork bones - 2 tbsp light soya sauce, 1 tbsp rice wine, 1 tsp sugar, 1 tbsp sesame seed oil
Pork slices - same as above, halve the proportions
100g minced pork - I cheated, as I didn't want to discolor my porridge (making it dark from the soya sauce and wine), after putting in the pork bones, I used the leftover marinade to marinate the minced pork
Liver - 1 tsp salt and 1 tsp ginger powder

Method
1) In the rice cooker, pour in just a big of cooking oil and fry the ginger slices.
2) Drain the pork bones of the marinade. Brown the pork bones. Remember to reserve the marinade liquid to marinade the minced pork. Shape these into balls.
3) Pour in the rice and bowls of water. Stir. Cover and let the rice cooker cook for 1.5 hours.
4) Check the consistency of the gruel, usually, it helps to stir it and add (water) water if necessary so that the rice grains break up and gives a velvety consistency.
5) After 1.5 hours, carefully pour in the pork balls once at a time so that they retain their shape and stir. Add salt to taste.
6) When ready to serve, pour in the liver slices and switch off the heat. These will cook in the heat but you don't want them over-cooked.
7) To serve, Optional: Break in 1-2 eggs into each bowl and ladle the hot porridge on top. The heat will cook the eggs.