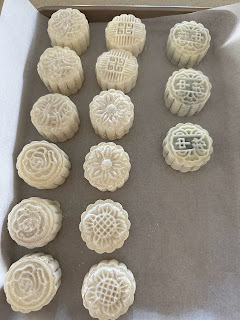
I decided to use the Woks of Life ingredients soley because of the amount of filling I had. I had about 340g of caramelised mung bean filling from Kitchen 101 (omitted coffee) and made black sesame paste, making enough for around 21 mooncakes. Method is from an amalgamation of videos from here which all have various good tips but particularly Souped Up Style. Despite noting that microwaved method seems to require condensed milk, I decided to follow the other recipes without condensed milk because I don't want the skin to have a yellowish tinge.
Ingredients - Makes ten 50g and six 45g (370g dough)
400g filling
50g glutinous rice flour + 3 tbsp for dusting
35g rice flour
35g wheat starch
60g icing sugar
215g milk
25g neutral veg oil
Method
1. Mix the sugar, milk and oil in a large bowl. Sift in the flour. Mix until no lumps.
Optional: if adding colour to the skin, make sure to do it before cooking the dough as there will be no further cooking. Check out the tie-dye doughs here with Emily Lu.
2. Steam or microwave the dough to cook it.
Steam: If steaming, cover with clingfilm and steam on high eat for 25-30 mins until fully translucent and mostly dry. A little oil may be left on top.
Microwave: Cover the bowl. Microwave in 3 increments (around 1.5 mins, 1 min, and 30 seconds). Mix each time with spatula until no liquid remains.
5. Allow to cool slightly for 10 to 15 mins then knead with gloves for about 5 mins until oil is fully incorporated. If easier, transfer onto a flat surface (not floured!) and knead until dough is smooth and non-stick. The dough is easier to work with when still warm. Cover with clingfilm and chill dough in fridge for between 30 mins to 2 hours.
6. While waiting for the dough to rest, portion out the filling into 25g balls. Cover with clingfilm with the plastic touching to prevent drying out and forming a skin.
7. Fry the 3 tbsp of glutinous rice flour until slightly brown for 6 - 7 mins on medium heat. Set aside to cool.
8. Portion out dough into 25g balls. Roll dough balls out into about 3 inch diameter (for 50g mould; 4 inch diameter for 100g mould). Either flatten out between two pieces of parchment if using rolling pin or flatten out between palms. Press around the edge with your finger to thin the edge.
9. Dust the molds well with cooked flour. To really prevent the dough ball from sticking, lightly coat the ball too. (Note that too much flour will blur the pattern). Encase the filling ball in the flattened dough (see videos).
10. Press the ball into a slight cylinder and press the top down with thumb slightly so it doesn't budge out (see video). Place flattened top into the upturned mould and drop the dough ball without forcing it in. Press the bottom into the mould gently with a thumb so it doesn't bulge out. Place the mould with dough ball right side up on parchment. Press the lever down until you feel resistance. Press for about 15 seconds to establish the shape. Press down several more times gently to really imprint the design. Release the mooncake and dust off excess flour with a pastry brush.
11. Chill for a few hours and keep stored in fridge. Best consumed within 3 to 4 days (max 1 week).
Recipe feedback
- As a beginner, I had equal portion filling to dough ie 25g:25g and there was plenty of dough to go around, perhaps a bit too much. I reduced to 45g ie 20g dough to 25g filling and there was JUST enough dough to go round.
- Skin is very easy to handle after it's been properly kneaded. Resting the fridge isn't really necessary but avoid using too much flour on the surface or hands. While it is mostly non-stick, still best to handle using silicon mat and food prep gloves as it can 'suddenly' stick to hands. Avoid using oil on the hands.
- For mung bean filling, do not put in the fridge after portioning into balls as it becomes hard and difficult to press with the mould.
- For the black sesame filling, it becomes quite hard after putting in the fridge. However if left out of the fridge, it falls apart. As a compromise, I apportioned then roughly shaped them into balls before covering with cling film (touching the balls) and put in the fridge. They were in the fridge for only 2 to 3 hours. When ready to use, they were stiff so I used cling wrap to shape them into balls. They were still soft enough to press with the mould.


No comments:
Post a Comment