I've always been using butter in my muffins which give them a great flavour. However, after the initially crispy top comes out of the oven, it soon goes soggy as it gets cold. I came across this recipe which uses oil. I recall that oil has been a great friend to moistness in my chiffon cakes and also aids crispiness from my walnut cookies, so why not give it a try. This method from this recipe is the standard mix wet and dry but do not over-mix. However, what I like is it uses only a few bowls and involves some guess-timate (so less measuring!) which are a boon to working moms who have better things to do than standing there measuring and washing up! The original recipe uses 1 cup blueberries but I decided to sub out half a cup with walnuts.
Recipe source: https://www.inspiredtaste.net/18982/our-favorite-easy-blueberry-muffin-recipe/#itr-recipe-18982
Ingredients (Makes 10 regular or 8 ultra large muffins)
1½ C (195g) plain flour
¾ C (150g) sugar, with 1 tsp topping for each muffin (reduced from 1 tbsp in original recipe; golden caster sugar for topping works better if you have it)
2 tsp baking powder
¼ tsp salt
⅓ C neutral tasting veg oil
1 large egg
⅓ to ½ C milk (80 to 120ml)
1½ tsp vanilla extract
3 to 4 oz Blueberries, frozen or fresh (½ C)
3 to 4 oz walnuts, chopped (½ C)
Method
1. Dry: Whisk together flour, sugar, baking powder, and salt until combined. Set aside.
2. Wet: In a measuring jug, measure the oil and crack in the egg. Whisk until paler. Pour in the milk and top up to the 1 cup line on the jug. Add the vanilla extract and combine well.
3. Pour the wet slowly into the dry and be careful not to over-mix. Mix until the dry patches of flour just disappear.
4. Fold in the chopped walnuts and half the blueberries.
5. Prepare the muffin tins with liners if desired or grease each muffin cup with oil. Scoop in the batter (I used my trusty cookie scoop).
6. Dot on the reserved blueberries and push them into the batter.
7. Sprinkle on 1 tsp of sugar as evenly as possible.
8. Bake at 200 deg C for 15 minutes (for regular sized; add another 2 minutes for ultra large) until a toothpick inserted comes out clean.
9. Remove from tins and leave to cool on a baking rack.
8. To store, leave uncovered at room temperature if eaten up within 1 to 2 days. You can also freeze immediately by wrapping each one tightly in plastic then foil and freezing once they get cool.
Sunday, March 08, 2020
Sunday, February 09, 2020
HK style walnut cookies
Source: https://www.chinasichuanfood.com/chinese-walnut-cookie/
Ingredients (makes 20 to 21 cookies)
100g veg oil (I ended up needing another tsp)
1 egg + 1 for egg wash
70g sugar
230g cake flour
⅛ tsp baking soda (will omit next time, see Recipe Feedback)
½ tsp baking powder
1g salt
80g walnut, chopped
1 tbsp black sesame seeds
Method
1. In a bowl, whisk the egg, sugar, and veg oil until paler in colour.
2. Sift the flours together.
3. Add to dry to the wet gradually and fold in. (at this point, I needed another tsp of oil as there was still a lot of dry flour)
4. Add in the walnuts and fold in. This forms into a nice dough that should collect up all the loose walnut pieces. It therefore makes sense to chop the walnuts rather finely but not too fine that there isn't any bite.
5. Form balls of 25 to 30g each. Roll between the palms into a ball. Transfer each ball onto a parchment covered baking tray and leave sufficient space between them to spread slightly. There isn't a lot of spreading. I need 2 trays.
6. Flatten each biscuit with the palm of your hand. Leave the edges ragged (traditional look) or smoothen them, the choice is yours.
7. Beat the egg for egg wash and brush each biscuit.
8. Top with black sesame seeds and press them into the batter. I even used the remaining egg to really adhere the seeds to the biscuit.
9. Bake at 180 deg C for 19 to 20 minutes. I swapped the trays from the top and bottom shelves halfway.
10. Leave to rest on the tray for up to 5 minutes then dislodge with a spatula. Cool on a wire rack and store in an airtight container.
Recipe feedback
Ingredients (makes 20 to 21 cookies)
100g veg oil (I ended up needing another tsp)
1 egg + 1 for egg wash
70g sugar
230g cake flour
⅛ tsp baking soda (will omit next time, see Recipe Feedback)
½ tsp baking powder
1g salt
80g walnut, chopped
1 tbsp black sesame seeds
Method
1. In a bowl, whisk the egg, sugar, and veg oil until paler in colour.
2. Sift the flours together.
3. Add to dry to the wet gradually and fold in. (at this point, I needed another tsp of oil as there was still a lot of dry flour)
4. Add in the walnuts and fold in. This forms into a nice dough that should collect up all the loose walnut pieces. It therefore makes sense to chop the walnuts rather finely but not too fine that there isn't any bite.
5. Form balls of 25 to 30g each. Roll between the palms into a ball. Transfer each ball onto a parchment covered baking tray and leave sufficient space between them to spread slightly. There isn't a lot of spreading. I need 2 trays.
6. Flatten each biscuit with the palm of your hand. Leave the edges ragged (traditional look) or smoothen them, the choice is yours.
7. Beat the egg for egg wash and brush each biscuit.
8. Top with black sesame seeds and press them into the batter. I even used the remaining egg to really adhere the seeds to the biscuit.
9. Bake at 180 deg C for 19 to 20 minutes. I swapped the trays from the top and bottom shelves halfway.
10. Leave to rest on the tray for up to 5 minutes then dislodge with a spatula. Cool on a wire rack and store in an airtight container.
Recipe feedback
- I'm not sure I will add the baking soda again because the taste was quite evident. There wasn't any acid in the recipe so I don't see how it's going to react.
- The biscuit is shatteringly crispy out of the oven! It doesn't taste exactly like the Chinese walnut cookies that I'm used to so maybe this alternative recipe that uses butter may help
- https://www.rotinrice.com/hup-toh-soh-chinese-walnut-biscuits/
Saturday, January 18, 2020
Sloppy sticky raisin and walnut cinnabuns
I came across Maangchi's rollppang many years ago for dinner buns and it was great. She's now made a cinnabun version but it's terrible! It is so hard to roll and came out sloppy.
Ingredients
¼ C (melted) + ¼ C (softened) + 1 tbsp (melted) butter
1 C milk
¼ C white sugar
¼ C + ⅓ C brown sugar
⅓ C water
1 tbsp cinnamon powder
2¼ tsp yeast
2 eggs
2 tsp vanilla extract
3 tbsp rice syrup or corn syrup or honey
2 pinches salt
3 C + ¼ C plain flour
1 C walnuts
¼ C raisins
Method
1. Prepare the walnuts by toasting them in a pan for a few minutes until fragrant. Set aside to cool and then roughly chop.
2. Melt the ¼ C butter. Create a well in the 3 C flour. Add the melted butter, 2 eggs, yeast. Add the salt away from the yeast and mix into the flour. Mix everything up. It will become very sticky. Stir until smooth, about a minute. Cover and let proof for 1 hour until it has risen to grown its size.
3. Prepare the filling. Mix the cinnamon powder, ¼ C brown sugar, pinch salt, chopped walnuts, and raisins.
4. After the hour has passed, deflate and knead till smooth. It will be very sticky. Cover and proof for 30 minutes.
5. Prepare the syrup. Pour the ⅓ C brown sugar, ⅓ C water, and 3 tbsp syrup and bring to a vigorous boil using medium heat, about 3 minutes. Turn down to a simmer for 3 minutes until shiny and sticky. Set aside to cool.
6. Pour the syrup into a 8x8 inch square pan or 9 inch round tin. Ensure that the bottom of the tin is evenly coated.
7. Use the remaining ¼ C flour to liberally dust the work surface. Pour out the dough onto the workspace. Deflate and knead until smooth. Use your hands (not a rolling pin as it will be too sloppy) to form into a 13x8 inch rectangle.
8. Distribute the filling evenly. Leave a 1 inch border at the far end of the dough.
9. Use a scraper to slowly roll up the dough. Use the flour to push it under the dough so that it isn't sticky and ease the dough over the filling.
10. Cut the rolled dough into 9 equal pieces using dental floss.
11. Arrange each cut piece, filling side up, into the prepared pan. Cover and let it proof for 1 hour.
12. Preheat the over to 175 deg C. When the proofing time is up, bake for 30 minutes or until golden brown.
13. Remove from oven and glaze with the 1 tbsp of melted butter. Serve either butter glazed side up, or sticky sauce side up.
Recipe feedback: Omg I have never had such pillowly cinnabuns! It was a bitch to make and I don't think the sauce was sticky enough, but I was wrong. It has soaked into the buns and more sauce would have made it too sloppy. I don't know if I will make the recipe again but it sure is fantastic!
Ingredients
¼ C (melted) + ¼ C (softened) + 1 tbsp (melted) butter
1 C milk
¼ C white sugar
¼ C + ⅓ C brown sugar
⅓ C water
1 tbsp cinnamon powder
2¼ tsp yeast
2 eggs
2 tsp vanilla extract
3 tbsp rice syrup or corn syrup or honey
2 pinches salt
3 C + ¼ C plain flour
1 C walnuts
¼ C raisins
Method
1. Prepare the walnuts by toasting them in a pan for a few minutes until fragrant. Set aside to cool and then roughly chop.
2. Melt the ¼ C butter. Create a well in the 3 C flour. Add the melted butter, 2 eggs, yeast. Add the salt away from the yeast and mix into the flour. Mix everything up. It will become very sticky. Stir until smooth, about a minute. Cover and let proof for 1 hour until it has risen to grown its size.
3. Prepare the filling. Mix the cinnamon powder, ¼ C brown sugar, pinch salt, chopped walnuts, and raisins.
4. After the hour has passed, deflate and knead till smooth. It will be very sticky. Cover and proof for 30 minutes.
5. Prepare the syrup. Pour the ⅓ C brown sugar, ⅓ C water, and 3 tbsp syrup and bring to a vigorous boil using medium heat, about 3 minutes. Turn down to a simmer for 3 minutes until shiny and sticky. Set aside to cool.
6. Pour the syrup into a 8x8 inch square pan or 9 inch round tin. Ensure that the bottom of the tin is evenly coated.
7. Use the remaining ¼ C flour to liberally dust the work surface. Pour out the dough onto the workspace. Deflate and knead until smooth. Use your hands (not a rolling pin as it will be too sloppy) to form into a 13x8 inch rectangle.
8. Distribute the filling evenly. Leave a 1 inch border at the far end of the dough.
9. Use a scraper to slowly roll up the dough. Use the flour to push it under the dough so that it isn't sticky and ease the dough over the filling.
10. Cut the rolled dough into 9 equal pieces using dental floss.
11. Arrange each cut piece, filling side up, into the prepared pan. Cover and let it proof for 1 hour.
12. Preheat the over to 175 deg C. When the proofing time is up, bake for 30 minutes or until golden brown.
13. Remove from oven and glaze with the 1 tbsp of melted butter. Serve either butter glazed side up, or sticky sauce side up.
| Super sloppy |
Recipe feedback: Omg I have never had such pillowly cinnabuns! It was a bitch to make and I don't think the sauce was sticky enough, but I was wrong. It has soaked into the buns and more sauce would have made it too sloppy. I don't know if I will make the recipe again but it sure is fantastic!
Wednesday, October 23, 2019
Oven baked panko drumsticks (Bonus! Corn quenelles)
I have experimented with oven baked chicken but most of it has been 50% successful and mostly har jeong gai or tonkatsu. The usual result is that the batter comes out pastey or flourey, the colour is uneven, or the chicken is tough and dry. I've often used wings so that the cooking time isn't so long to dry out the chicken. So far, my experiments have been more about method rather than looks, to find something that is easy to prepare, little clean up, and tasty although that mostly had to do with finding the authentic har jeong gai taste. This recipe focuses on the texture i.e. the batter and tenderness of the chicken.
I came across 3 recipes:
1. Chicken experiment: https://www.thereciperebel.com/great-oven-fried-chicken-experiment/
This one is an experiment in itself which tries 4 different methods for different crunch and taste but uses chicken fillet so not quite what I'm looking for, but a great reference post nonetheless.
2. Oven baked Korean fried chicken: https://girlinthelittleredkitchen.com/2015/04/oven-baked-korean-fried-chicken/
This one gave me the idea to mix different types of breading i.e. flour followed by breadcrumbs and then panko. It starts with high temp to crisp up and then turns down to cook.
3. Buffalo wings: https://www.recipetineats.com/truly-crispy-oven-baked-buffalo-wings-my-wings-cookbook/
This one uses baking powder so that the batter is more flour and less breading. The method uses low temp followed by high to crisp up. However, I have found this dries out the chicken, which might be ok if wings are used as the recipe does.
I decided to start with high temp followed by low to cook it thoroughly and this time tried potato rather tapioca, corn and normal flour where I've not had good results, that is, pastey. An idea also struck me to add shredded cheese and that improved the taste and also batter crunch!
Ingredients
1.2 kg chicken drumsticks
3 cups panko
1 cup potato flour
⅓ cup shredded cheese (parmesan or cheddar)
2 eggs, beaten
1 tsp dried sage, oregano, or thyme
salt and pepper to taste
Method
1. Dry the chicken with kitchen paper before starting. Add salt and pepper to the egg wash, flour, and panko and mix well. Add oregano to the egg and mix well. Add the shredded cheese to the panko and mix well.
2. Set up the breading station. I find that using a flat slightly rimmed plate works best, and a ziplock bag for flour makes for easy clean up because otherwise the flour flies everywhere (potato, tapioca, and corn flour is very light compared to normal flour).
3. Coat the chicken in the egg wash and drain as much of the excess as much as possible. This is an important step otherwise it makes the dry ingredients claggy.
4. Coat with flour but ensure that it's well coated. Shake off the excess and ensure this is again done well to avoid turning the egg claggy.
5. Once again, dip in egg wash and coat well, even the 'drum' part of the drumstick. Drain off excess.
6. Finally, dip in the panko and pat down so that the panko really sticks on.
7. Place on a wire rack over a baking tray to catch the drippings. I don't turn in the oven because of the rack too.
8. Bake at 220 deg C for 15 minutes. Turn down to 180 and bake for another 30 to 35 minutes until cooked.
Recipe feedback
I was pretty impressed. The chicken was tender and moist! The batter was crunchy. The potato flour really made a difference. The batter is more crunchy than crispy but definitely a much better texture than whatever I've done so far.
Bonus recipe
I had flour, egg wash, and panko left over so added a can of creamed corn in and mixed it up. I formed corn quenelles and baked them off. I put them in after turning down the temp to 180 deg C so baked for 30 to 35 minutes. They weren't really brown so next time, I might save a bit of the panko and coat the quenelles with that.
I came across 3 recipes:
1. Chicken experiment: https://www.thereciperebel.com/great-oven-fried-chicken-experiment/
This one is an experiment in itself which tries 4 different methods for different crunch and taste but uses chicken fillet so not quite what I'm looking for, but a great reference post nonetheless.
2. Oven baked Korean fried chicken: https://girlinthelittleredkitchen.com/2015/04/oven-baked-korean-fried-chicken/
This one gave me the idea to mix different types of breading i.e. flour followed by breadcrumbs and then panko. It starts with high temp to crisp up and then turns down to cook.
3. Buffalo wings: https://www.recipetineats.com/truly-crispy-oven-baked-buffalo-wings-my-wings-cookbook/
This one uses baking powder so that the batter is more flour and less breading. The method uses low temp followed by high to crisp up. However, I have found this dries out the chicken, which might be ok if wings are used as the recipe does.
I decided to start with high temp followed by low to cook it thoroughly and this time tried potato rather tapioca, corn and normal flour where I've not had good results, that is, pastey. An idea also struck me to add shredded cheese and that improved the taste and also batter crunch!
Ingredients
1.2 kg chicken drumsticks
3 cups panko
1 cup potato flour
⅓ cup shredded cheese (parmesan or cheddar)
2 eggs, beaten
1 tsp dried sage, oregano, or thyme
salt and pepper to taste
Method
1. Dry the chicken with kitchen paper before starting. Add salt and pepper to the egg wash, flour, and panko and mix well. Add oregano to the egg and mix well. Add the shredded cheese to the panko and mix well.
3. Coat the chicken in the egg wash and drain as much of the excess as much as possible. This is an important step otherwise it makes the dry ingredients claggy.
4. Coat with flour but ensure that it's well coated. Shake off the excess and ensure this is again done well to avoid turning the egg claggy.
5. Once again, dip in egg wash and coat well, even the 'drum' part of the drumstick. Drain off excess.
6. Finally, dip in the panko and pat down so that the panko really sticks on.
7. Place on a wire rack over a baking tray to catch the drippings. I don't turn in the oven because of the rack too.
8. Bake at 220 deg C for 15 minutes. Turn down to 180 and bake for another 30 to 35 minutes until cooked.
Recipe feedback
I was pretty impressed. The chicken was tender and moist! The batter was crunchy. The potato flour really made a difference. The batter is more crunchy than crispy but definitely a much better texture than whatever I've done so far.
Bonus recipe
I had flour, egg wash, and panko left over so added a can of creamed corn in and mixed it up. I formed corn quenelles and baked them off. I put them in after turning down the temp to 180 deg C so baked for 30 to 35 minutes. They weren't really brown so next time, I might save a bit of the panko and coat the quenelles with that.
Saturday, October 19, 2019
Tau suan with water chestnut
Idea from MyKitchen101 https://mykitchen101en.com/water-chestnut-lek-tau-suan-split-mung-bean-dessert-with-youtiao/
I have previously experimented with normal Tau suan and also with Gula melaka tau suan but this was the recipe that started it all.
Mostly the same recipe but slight improvement in method.
Ingredients
500g mung bean
1 small can of water chestnut, chopped
250g rock sugar (more or less depending on taste)
10 cups of water
7 pandan leaves, knotted
10 tbsp water + 5 tbsp tapioca or sweet potato starch or potato starch
Method
1. Rinse the mung bean until the water runs clear. Leave to dry in a colander.
2. Bring 3 cups of water to a boil. (I used my rice cooker). Throw in the knotted pandan leaves. Pour the mung bean onto a steamer basket and steam for 3 minutes. Switch off and leave to to steam in the residual heat for 5 minutes.
3. Take out the steam basket and set aside. Remove the pandan leaves. Top up the water to 10 cups and the sugar. Bring to a boil.
4. Add the mung bean and cook for about 3 minutes or more (to your liking). I like the beans to be whole and still have a bit of bite. Stir in the chopped water chestnut.
5. Mix up the starch slurry and while the water is simmering, dribble in the slurry. Stir quickly as it comes back up to a boil and turn off once it has come to a boil.
6. Serve with cruellers.
Recipe feedback
I used potato starch and the next day after refrigeration, it clumped together and was no longer flowy. A few days after that, it exuded water. I now understand why people use sweet potato starch which keeps it flowy.
I have previously experimented with normal Tau suan and also with Gula melaka tau suan but this was the recipe that started it all.
Mostly the same recipe but slight improvement in method.
Ingredients
500g mung bean
1 small can of water chestnut, chopped
250g rock sugar (more or less depending on taste)
10 cups of water
7 pandan leaves, knotted
10 tbsp water + 5 tbsp tapioca or sweet potato starch or potato starch
Method
1. Rinse the mung bean until the water runs clear. Leave to dry in a colander.
2. Bring 3 cups of water to a boil. (I used my rice cooker). Throw in the knotted pandan leaves. Pour the mung bean onto a steamer basket and steam for 3 minutes. Switch off and leave to to steam in the residual heat for 5 minutes.
3. Take out the steam basket and set aside. Remove the pandan leaves. Top up the water to 10 cups and the sugar. Bring to a boil.
4. Add the mung bean and cook for about 3 minutes or more (to your liking). I like the beans to be whole and still have a bit of bite. Stir in the chopped water chestnut.
5. Mix up the starch slurry and while the water is simmering, dribble in the slurry. Stir quickly as it comes back up to a boil and turn off once it has come to a boil.
6. Serve with cruellers.
| Finally the right timing, my beans are still whole! |
I used potato starch and the next day after refrigeration, it clumped together and was no longer flowy. A few days after that, it exuded water. I now understand why people use sweet potato starch which keeps it flowy.
Saturday, September 28, 2019
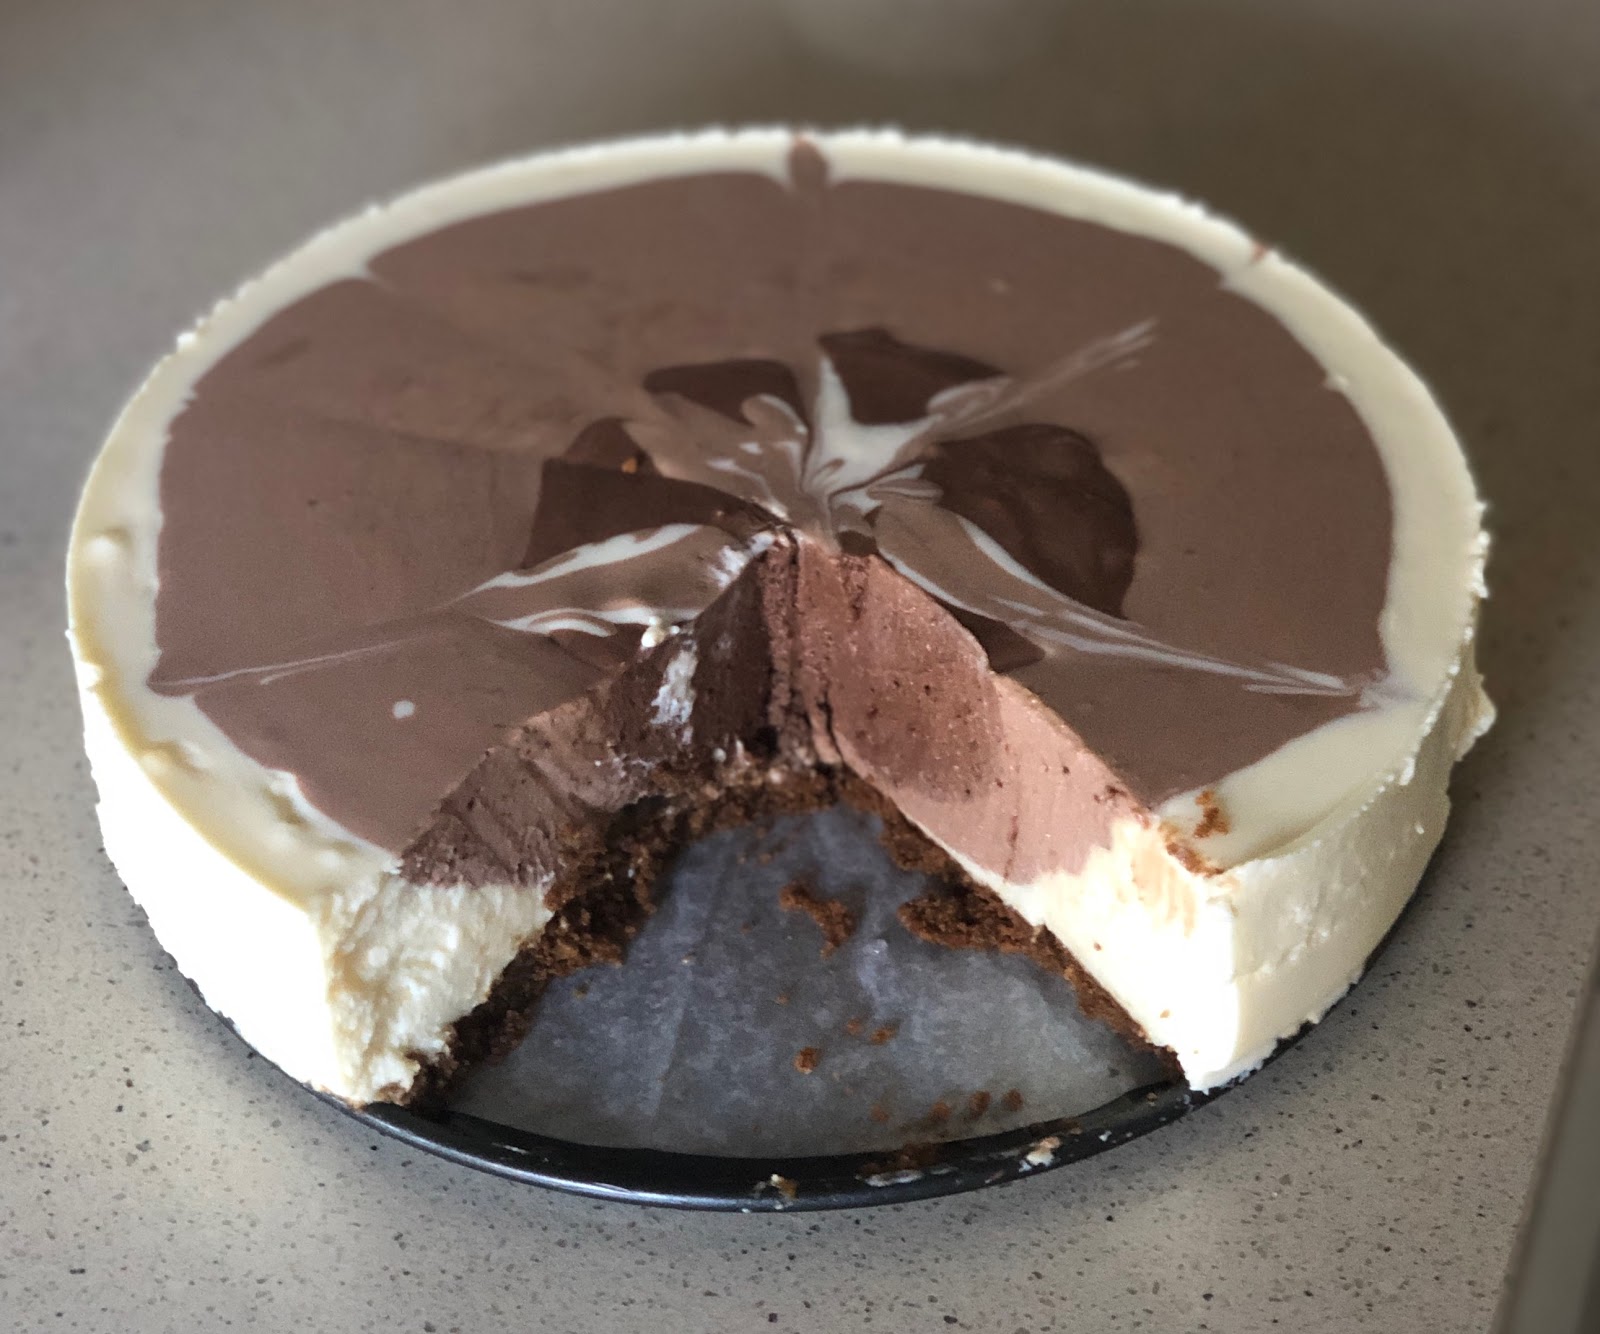
No-bake Chocolate mousse gradient cheesecake
From the first attempt which was the no-bake choc mousse ripple cheesecake, I decided to perfect my technique. I found the proportions in this first version excessive (e.g. 520g of double cream) which is what happens when you use maths. I decided to go with my gut feel and also what's available in the supermarket (e.g., I can buy a 250ml double cream bottle but would have to buy a large 500ml double cream and add 20g from a new packet). The measuring was also too fiddly and while I'm a perfectionist, I can live with less than equi-distant circles.

Ingredients (8 inch round tin)
15 ginger snap biscuits or similar sweet biscuit
2*250g blocks of Philly cream cheese, softened + 4 tbsp powered sugar
75g butter, softened
250ml double cream + 3 tbsp powdered sugar
cold 350ml milk + 4 tbsp powdered sugar
2 tbsp gelatine powder
5 tbsp cocoa powder
Method
1. In a food processor, process the biscuits until a fine crumb forms. Add the butter and chop till it forms the texture of wet sand.
2. To make the cheesecake base, line the bottom of a 8 inch springform tin with parchment. Oil the sides of the tin with butter. Pour in the sandy crumbs and press down with a spatula or the bottom of a glass. Press it in until the layer is flat. Leave in the fridge to firm up.
3. Sprinkle the gelatine powder onto the surface of the cold milk and leave it to bloom.
4. After about 5 minutes, microwave the milk for a minute (until warm to the touch) and whisk in the gelatine until no lumps remain.
5. In a clean food processor bowl, beat the philly with the powdered sugar until smooth. Pour in the milk and pulse until smooth. Pour into a big mixing bowl.
6. In the food processor bowl, beat the double cream with the powdered sugar until textured but not yet stiff. Pour into the cheese mixture and fold in. Set aside.
7. In a smaller mixing bowl, add a few tbsp of the batter and 3 tbsp of cocoa powder. Whisk until smooth and pour in more batter (total should be less than ⅓ of the total batter) until you attain a dark chocolate colour.
8. In a medium mixing bowl, repeat the method with the 2 tbsp of cocoa powder. Pour in the batter, this should be about half of the remaining batter. You would be left with the remaining half of the batter that has no cocoa (i.e. cream colour) in the big bowl. Store the big and medium bowls in the fridge for about 5 minutes to firm up slightly, otherwise the batter is too runny and the pattern will not be distinct.
9. Take the cheesecake base out from the fridge. Pour in the batter from the big bowl onto the base. Return to the fridge to chill for 5 minutes.
10. Carefully pour the batter from the medium bowl from a height (5cm) onto the centre of the colour. This allows the batter to spread and fill slowly.
11. Pour in the final darkest colour in the small bowl. This batter is slightly thicker due to the high concentration of cocoa powder, so ladle it to fill the centre but do so slowly and carefully. Carefully use a palette knife to smoothen the top.
12. Drop the cake tin from a height of 5 cm to dispel big bubbles. If desired, swirl the colours with a palette knife.
13. Return to the fridge to chill for at least 4 hours until firm. To unmould, run a knife around the edge of the tin to loosen from the side. (I forgot and the cake tore trying trying to dislodge itself from the tin!) To serve, use a cold knife and wipe the blade with a damp cloth after each cut.
Ingredients (8 inch round tin)
15 ginger snap biscuits or similar sweet biscuit
2*250g blocks of Philly cream cheese, softened + 4 tbsp powered sugar
75g butter, softened
250ml double cream + 3 tbsp powdered sugar
cold 350ml milk + 4 tbsp powdered sugar
2 tbsp gelatine powder
5 tbsp cocoa powder
Method
1. In a food processor, process the biscuits until a fine crumb forms. Add the butter and chop till it forms the texture of wet sand.
2. To make the cheesecake base, line the bottom of a 8 inch springform tin with parchment. Oil the sides of the tin with butter. Pour in the sandy crumbs and press down with a spatula or the bottom of a glass. Press it in until the layer is flat. Leave in the fridge to firm up.
3. Sprinkle the gelatine powder onto the surface of the cold milk and leave it to bloom.
4. After about 5 minutes, microwave the milk for a minute (until warm to the touch) and whisk in the gelatine until no lumps remain.
5. In a clean food processor bowl, beat the philly with the powdered sugar until smooth. Pour in the milk and pulse until smooth. Pour into a big mixing bowl.
6. In the food processor bowl, beat the double cream with the powdered sugar until textured but not yet stiff. Pour into the cheese mixture and fold in. Set aside.
7. In a smaller mixing bowl, add a few tbsp of the batter and 3 tbsp of cocoa powder. Whisk until smooth and pour in more batter (total should be less than ⅓ of the total batter) until you attain a dark chocolate colour.
8. In a medium mixing bowl, repeat the method with the 2 tbsp of cocoa powder. Pour in the batter, this should be about half of the remaining batter. You would be left with the remaining half of the batter that has no cocoa (i.e. cream colour) in the big bowl. Store the big and medium bowls in the fridge for about 5 minutes to firm up slightly, otherwise the batter is too runny and the pattern will not be distinct.
9. Take the cheesecake base out from the fridge. Pour in the batter from the big bowl onto the base. Return to the fridge to chill for 5 minutes.
| Looking much neater than my first attemp. Note how thick the batter in the centre is |
11. Pour in the final darkest colour in the small bowl. This batter is slightly thicker due to the high concentration of cocoa powder, so ladle it to fill the centre but do so slowly and carefully. Carefully use a palette knife to smoothen the top.
12. Drop the cake tin from a height of 5 cm to dispel big bubbles. If desired, swirl the colours with a palette knife.
| After swirling |
Sunday, September 08, 2019
Sik hye 식혜
Sources
1. https://mykoreankitchen.com/sikhye/ : Most comprehensive recipe, describes using the course malt barley, the powder, and the teabag
2. https://www.maangchi.com/recipe/sikhye: I mostly used this method but it also describes making it a slushie
Generally, the recipes are pretty aligned. The difference between these two and other recipes is whether they use the course malt barley or the powdered type. While Maangchi uses the powder, Korean Kitchen thinks that the powdered type doesn't help the rice grains to float to the surface. However, I used the powder and didn't have a problem so I think it's because Korean Kitchen left the powder in a cheesecloth.
Ingredients
1 cup malted barley
18 cups of water
1 cup of cooked rice (short grain or glutinous rice)
1 cup sugar
pine nuts and red dates for garnishing (optional)
Method
1. Add the water to the malted barley and stir well. Soak the malted barley 2 to 3 hours in a large bowl and let the sediment settle. The clear water should have separated to the top.
2. Meanwhile, cook the rice with slightly less water so that it's a bit undercooked.
3. Once the rice is cooked, carefully strain the malted barley water with the help of a cheesecloth, into the rice. The sediment should have settled at the bottom. Be careful not to stir up the sediment at the bottom.
4. With the sediment, pour in the remaining 4 cups of water and leave to steep.
5. Leave to ferment in the rice cooker using the Keep Warm function at between 55 to 60 deg C. After 4 hours, check to see if a dozen or so rice grains have floated to the top. If they have, sik hye is ready. It only took me 3 hours. If grains haven't, leave it to ferment for another hour.
6. Once the grains has floated, again carefully pour the malted barley water into the pot, once again, with the help of the cheesecloth. Throw away the sediment.
7. Bring the sik hye to a boil and add the 1 cup of sugar to dissolve. Skim off the foam and boil for 10 minutes.
8. Once finished boiling, leave to cool. Strain off the rice grains and wash it in cold water to wash off the starch. Keep the rice grains in a separate air tight container with some cold water. If the grains are left in the sik hye, the whole liquid turns grey.
10. Strain off the sik hye into a glass bottle.
11. Serve hot or chilled in a bowl, topped with red date and pine nuts if using, and about two tablespoons of rice grains.
12. Keep the rice grains and sik hye refrigerated for up to a week. Once it goes sour, it's time to throw it away.
Recipe feedback
The grains delighted me because they felt so light on the tongue. I was expecting porridge-type of stodgey rice but the grains here were light and fluffy!
1. https://mykoreankitchen.com/sikhye/ : Most comprehensive recipe, describes using the course malt barley, the powder, and the teabag
2. https://www.maangchi.com/recipe/sikhye: I mostly used this method but it also describes making it a slushie
Generally, the recipes are pretty aligned. The difference between these two and other recipes is whether they use the course malt barley or the powdered type. While Maangchi uses the powder, Korean Kitchen thinks that the powdered type doesn't help the rice grains to float to the surface. However, I used the powder and didn't have a problem so I think it's because Korean Kitchen left the powder in a cheesecloth.
Ingredients
1 cup malted barley
18 cups of water
1 cup of cooked rice (short grain or glutinous rice)
1 cup sugar
pine nuts and red dates for garnishing (optional)
Method
1. Add the water to the malted barley and stir well. Soak the malted barley 2 to 3 hours in a large bowl and let the sediment settle. The clear water should have separated to the top.
2. Meanwhile, cook the rice with slightly less water so that it's a bit undercooked.
3. Once the rice is cooked, carefully strain the malted barley water with the help of a cheesecloth, into the rice. The sediment should have settled at the bottom. Be careful not to stir up the sediment at the bottom.
4. With the sediment, pour in the remaining 4 cups of water and leave to steep.
5. Leave to ferment in the rice cooker using the Keep Warm function at between 55 to 60 deg C. After 4 hours, check to see if a dozen or so rice grains have floated to the top. If they have, sik hye is ready. It only took me 3 hours. If grains haven't, leave it to ferment for another hour.
6. Once the grains has floated, again carefully pour the malted barley water into the pot, once again, with the help of the cheesecloth. Throw away the sediment.
7. Bring the sik hye to a boil and add the 1 cup of sugar to dissolve. Skim off the foam and boil for 10 minutes.
8. Once finished boiling, leave to cool. Strain off the rice grains and wash it in cold water to wash off the starch. Keep the rice grains in a separate air tight container with some cold water. If the grains are left in the sik hye, the whole liquid turns grey.
10. Strain off the sik hye into a glass bottle.
11. Serve hot or chilled in a bowl, topped with red date and pine nuts if using, and about two tablespoons of rice grains.
12. Keep the rice grains and sik hye refrigerated for up to a week. Once it goes sour, it's time to throw it away.
| Malted barley soaking |
| Floating rice grains! |
| Sik hye with rice grains and topped with red date |
The grains delighted me because they felt so light on the tongue. I was expecting porridge-type of stodgey rice but the grains here were light and fluffy!
Sunday, July 21, 2019
Black forest swiss roll
I adapted from the coffee swiss roll by Yochana and my adaptation was spot on!
Ingredients
5 eggs, at room temperature
90g sugar (do not reduce this amount)
30g cocoa powder
70g plain flour
pinch of salt
65g corn oil or melted butter (I use oil)
Filling
150ml double cream
¼ cup icing sugar (do not reduce this amount)
1 cup drained canned and pitted cherries
Topping
100ml double cream
4 tbsp icing sugar
Drained cherries for deco
Method
1. Take out the eggs and bring them to room temperature.
2. Prepare the pan by lining it with parchment.
3. Beat the eggs with sugar until pale and foamy, until the ribbon stage. It should triple in volume.
4. Add the oil in batches and also mix until incorporated.
5. Fold in sifted cocoa powder, flour, and salt.
6. Pour into the pan and flatten with spatula. Ensure that fills the corners of the pan. Drop from a height to dispel the bubbles.
7. Bake at 180 deg C for 18 to 20 minutes until the top springs back when touched.
8. Once out of the oven, immediately take the cake out of the tin and let it cool on a wire rack for 5 minutes.
9. Place a clean baking paper on another larger baking tray. Invert the cake onto the baking tray and remove the backing of the cake. Let it cool further on a wire rack.
10. Once cool enough to handle (about 5 minutes), roll the cake up as tight as you can (but be careful not to crack the cake!) using the baking paper to assist. Cover with a cloth and leave to cool completely.
11. While waiting for the cake to cool, beat the double cream with the icing sugar until stiff peaks.
13. When the cake is completely cool, unroll it. Cut off 1.5 cm at a diagonal on one of the short ends. This will help the cake to form a nice seam. Spread on the cream thinly with an offset spatula. Place the drained cherries to only the first quarter of the cake (the side you begin rolling). If you put too much fruit, it becomes very hard to roll. Re-roll the cake. Make sure that it is resting on the seam.
14. Wrap the cake in the baking paper and then wrap over with cling film. Let it cool and rest in the fridge on its seam, for a minimum of 1 hour or best overnight.
15. While chilling, make the topping. Just before serving, pour on the whipping cream for the topping and decorate with cherries. Serve immediately!
Recipe feedback
Ingredients
5 eggs, at room temperature
90g sugar (do not reduce this amount)
30g cocoa powder
70g plain flour
pinch of salt
65g corn oil or melted butter (I use oil)
Filling
150ml double cream
¼ cup icing sugar (do not reduce this amount)
1 cup drained canned and pitted cherries
Topping
100ml double cream
4 tbsp icing sugar
Drained cherries for deco
| The toppings cover the cracks in the cake |
1. Take out the eggs and bring them to room temperature.
2. Prepare the pan by lining it with parchment.
3. Beat the eggs with sugar until pale and foamy, until the ribbon stage. It should triple in volume.
4. Add the oil in batches and also mix until incorporated.
5. Fold in sifted cocoa powder, flour, and salt.
6. Pour into the pan and flatten with spatula. Ensure that fills the corners of the pan. Drop from a height to dispel the bubbles.
7. Bake at 180 deg C for 18 to 20 minutes until the top springs back when touched.
8. Once out of the oven, immediately take the cake out of the tin and let it cool on a wire rack for 5 minutes.
| The top. The skin got stuck to the paper and peeled off. Oh no! |
10. Once cool enough to handle (about 5 minutes), roll the cake up as tight as you can (but be careful not to crack the cake!) using the baking paper to assist. Cover with a cloth and leave to cool completely.
11. While waiting for the cake to cool, beat the double cream with the icing sugar until stiff peaks.
| Cracks on the side from being very heavy handed with the cake |
| Decorated |
| Everything looks nice after a clean up! |
Recipe feedback
- Considering I adapted this recipe from the coffee swiss roll, it was great! It was very moist but a bit crumbly and this showed when I tried to roll it. The top skin of the cake stuck to the parchment when I had inverted it onto the baking try to remove the backing. I had to turn it back so that the bottom of the cake was showing on the outside.
- I had forgotten to add sugar to the filling cream and it would have gone really well against the sourness of the cherries. But overall, satisfied!
Updated: This cherry swiss roll has an interesting way of placing the cherries to roll up.
https://www.anncoojournal.com/cherry-swiss-roll-cake/?fbclid=IwAR1c2Bn5ROhI8EZbTWM4Dq4Thj1QgWWgCnMi0BncgteVN3QQwvQ_z30LseY
Updated: This cherry swiss roll has an interesting way of placing the cherries to roll up.
https://www.anncoojournal.com/cherry-swiss-roll-cake/?fbclid=IwAR1c2Bn5ROhI8EZbTWM4Dq4Thj1QgWWgCnMi0BncgteVN3QQwvQ_z30LseY
Sunday, June 30, 2019
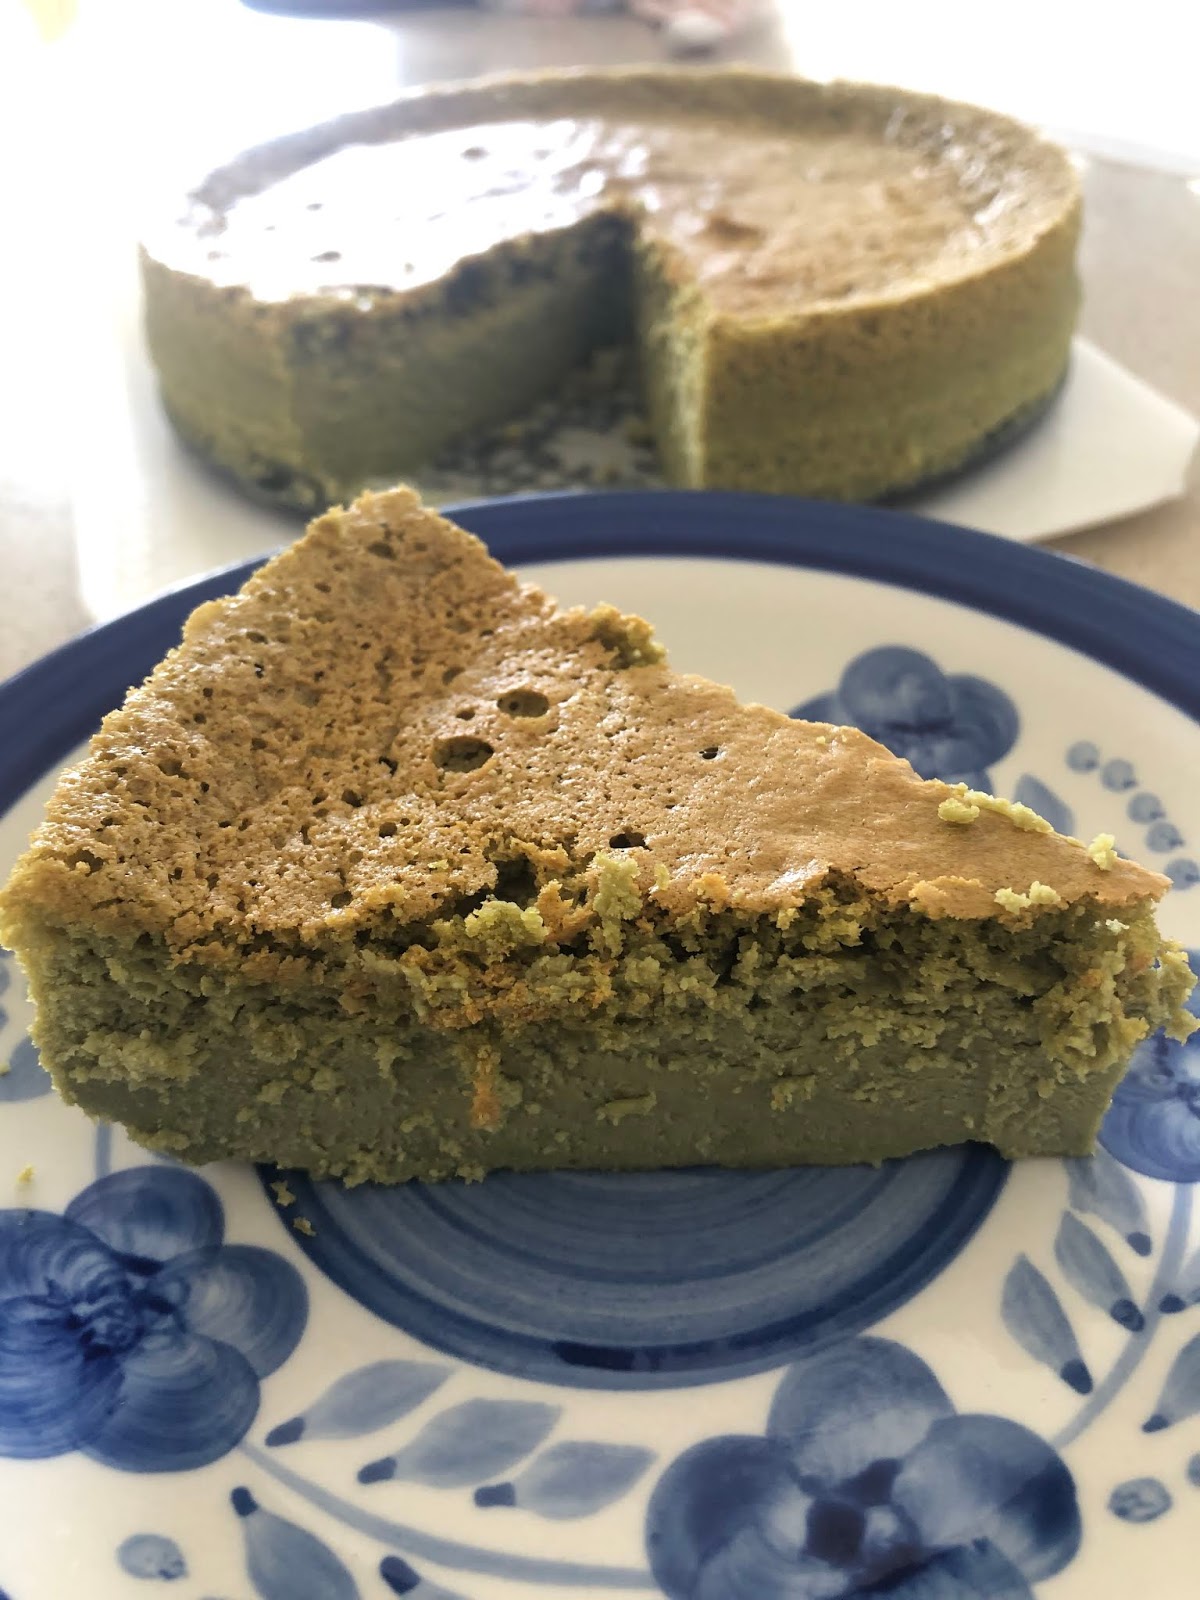
Matcha cheesecake
I intended to make a matcha chocolate cheesecake with double cream, 3 eggs, and no flour in a 28 inch tin but unfortunately, my cream had gone bad. I had to quickly switch recipes and found one that also uses 1 packet (250g) of cream cheese but needed cake flour and 6 eggs. That was alright, I had these ready.
Source: https://www.craftpassion.com/matcha-japanese-cheesecake/2/
I adapted the method based on what I had already done halfway and the temperature is indeterminate because I accidentally left the oven on during the portion where the oven door was open.
Ingredients (for 8 inch tin)
1 block (250g) cream cheese, room temp
6 eggs, separated
140g sugar
100ml milk
60g butter
60g cake flour
8g corn flour
12g matcha powder
¼ tsp salt
¼ tsp vinegar or lemon juice
Method
1. Line a 8" tin with parchment. Butter the sides. Wrap the outside of the tin with double layer of foil so that water does not seep in. Meanwhile, prepare a larger baking tin (large enough to fit the cake tin).
2. Melt the cream cheese over a bain marie. Add egg yolks and beat with whisk until smooth.
3. Add half the sugar and whisk. Add the salt and combine.
4. Place the milk and butter in the microwave and microwave until the butter has melted. Add to the batter and combine.
5. Sift together the cake flour, corn flour, and matcha. Pour into the batter in batches and fold.
6. In an extremely clean bowl, beat the egg whites. Add the sugar in batches and beat. Add the vinegar and beat. Beat until stiff peaks.
7. Mix the batter with ⅓ of the meringue. Add the next third and fold in. Finally, pour the batter into the bowl with the remaining third of the meringue and carefully fold in so as not to knock out the air.
8. Pour into the cake tin and drop on the counter top to dispel the big bubbles. Use a spatula to make slashes to dispel more bubbles.
9. Place in the baking tin and pour in just boiled water so that it comes ⅔ up the side of the cake tin.
10. Bake for 160 deg C for 45 mins, then 140 for 45 minutes. Switch off and leave to cool in the oven with door open for 30 minutes.
11. Remove to countertop and drop from a height of 10cm (protect your counter top of course!). This prevents it from shrinking too much. As it cools, it will shrink away from the sides. Leave to cool completely, preferably overnight in the fridge.
12. To unmould the cake, use a spatula to go round the sides to release. Cut with a clean knife and to get really cleanly cut slices, wipe after each cut.
Source: https://www.craftpassion.com/matcha-japanese-cheesecake/2/
I adapted the method based on what I had already done halfway and the temperature is indeterminate because I accidentally left the oven on during the portion where the oven door was open.
Ingredients (for 8 inch tin)
1 block (250g) cream cheese, room temp
6 eggs, separated
140g sugar
100ml milk
60g butter
60g cake flour
8g corn flour
12g matcha powder
¼ tsp salt
¼ tsp vinegar or lemon juice
Method
1. Line a 8" tin with parchment. Butter the sides. Wrap the outside of the tin with double layer of foil so that water does not seep in. Meanwhile, prepare a larger baking tin (large enough to fit the cake tin).
2. Melt the cream cheese over a bain marie. Add egg yolks and beat with whisk until smooth.
3. Add half the sugar and whisk. Add the salt and combine.
4. Place the milk and butter in the microwave and microwave until the butter has melted. Add to the batter and combine.
5. Sift together the cake flour, corn flour, and matcha. Pour into the batter in batches and fold.
6. In an extremely clean bowl, beat the egg whites. Add the sugar in batches and beat. Add the vinegar and beat. Beat until stiff peaks.
7. Mix the batter with ⅓ of the meringue. Add the next third and fold in. Finally, pour the batter into the bowl with the remaining third of the meringue and carefully fold in so as not to knock out the air.
8. Pour into the cake tin and drop on the counter top to dispel the big bubbles. Use a spatula to make slashes to dispel more bubbles.
9. Place in the baking tin and pour in just boiled water so that it comes ⅔ up the side of the cake tin.
10. Bake for 160 deg C for 45 mins, then 140 for 45 minutes. Switch off and leave to cool in the oven with door open for 30 minutes.
11. Remove to countertop and drop from a height of 10cm (protect your counter top of course!). This prevents it from shrinking too much. As it cools, it will shrink away from the sides. Leave to cool completely, preferably overnight in the fridge.
| Hasn't shrunk that much after cooling for half hour on countertop |
| A bit dense but at least not eggy tasting |
Recipe feedback
- My temperature control was really bad because I was alternating between fan forced and non-fan forced. I realised that with heating element (non-fan forced) only, the temp dropped 20 deg very quickly and the guage was off by at least 20 deg. So even though I started at 160 deg C, it quickly dipped to 130 or when I switched on the fan, it rose to 170. After I switched off the oven (or thought I did), there was no jiggle left. I and left the door open but had in fact left the heater on so the temp dropped from 160 to 130 in the 45 mins that the door was open.
- Whatever the case may be, it seems that the initial hot air of 160 is needed to both brown the cake and dry up the top, but also to create the lift. The 140 deg C is then needed to dry the inside and cook through. Thus, a half-half timing that I've incorporated above seems for a 8" cake.
- Matcha is very difficult to work with. It either creates a very dry cake or very dense without much lift. Thus this cake was very dense and I don't know if it's because of the matcha or because my eggs weren't fresh enough. I had beaten still stiff peaks but it didn't seem to have helped.
Sunday, June 16, 2019
Kueh dadar (Pandan pancake with coconut filling)
I had some leftover coconut from the last recipe and no idea what to do with it. Decided to try out these recipes:
1. https://www.curiouscuisiniere.com/mini-kueh-dadar-rolled-coconut-crepes/ : for the proportions and use of tapioca starch in the batter
2. https://www.asianfoodchannel.com/en/recipes/nyonya-kuih-dadar : how to extract pandan juice
https://www.shiokmanrecipes.com/2016/11/25/kueh-dadar-kuih-ketayap/ : video and tips
Ingredients (makes 8)
Inti (coconut filling)
200g dried coconut shreds, unsweetened
100g palm sugar or gula melaka
2 pandan leaves
1 tbsp water
pinch of salt
Crepe
200g flour (1 cup + 5 tbsp)
10 pandan leaves
250 ml coconut milk
150 ml water
1 egg
1 tsp tapioca starch
1 tsp oil
pinch salt
Method
Filling
1. Shave up the gula. Add the water into the pan and dissolve the sugar over low heat.
2. Add the knotted pandan leaves and stir. Remove the pandan leaves.
3. Add the coconut and stir until all the sugar syrup has been absorbed.
Crepe
1. To prepare the pandan juice, blend the pandan leaves in 150ml of water. Line a sieve with a cheese cloth and pour in the blended pulp. Squeeze out 150ml of juice. Set aside.
2. Sift the flour into a bowl add the salt. Stir and create a well in the centre.
3. Pour in the santan and mix until no lumps remain. Pour in the pandan juice and mix. Add the oil and mix.
4. Pour on 100 ml of batter and pour in the centre of the pan from a height of about 10cm above the pan. Rotate to swirl the batter as thinly as you can. Keep the heat low so as not to brown the crepe. Cook until edges start to curl. Remove (there is no need to cook the other side but it should be dry). Repeat until all the filling has been used up.
5. Depending on the size of your crepe, use about 2 tbsp of filling per crepe. Fold
1. https://www.curiouscuisiniere.com/mini-kueh-dadar-rolled-coconut-crepes/ : for the proportions and use of tapioca starch in the batter
2. https://www.asianfoodchannel.com/en/recipes/nyonya-kuih-dadar : how to extract pandan juice
https://www.shiokmanrecipes.com/2016/11/25/kueh-dadar-kuih-ketayap/ : video and tips
Ingredients (makes 8)
Inti (coconut filling)
200g dried coconut shreds, unsweetened
100g palm sugar or gula melaka
2 pandan leaves
1 tbsp water
pinch of salt
Crepe
200g flour (1 cup + 5 tbsp)
10 pandan leaves
250 ml coconut milk
150 ml water
1 egg
1 tsp tapioca starch
1 tsp oil
pinch salt
Method
Filling
1. Shave up the gula. Add the water into the pan and dissolve the sugar over low heat.
2. Add the knotted pandan leaves and stir. Remove the pandan leaves.
3. Add the coconut and stir until all the sugar syrup has been absorbed.
Crepe
1. To prepare the pandan juice, blend the pandan leaves in 150ml of water. Line a sieve with a cheese cloth and pour in the blended pulp. Squeeze out 150ml of juice. Set aside.
2. Sift the flour into a bowl add the salt. Stir and create a well in the centre.
3. Pour in the santan and mix until no lumps remain. Pour in the pandan juice and mix. Add the oil and mix.
4. Pour on 100 ml of batter and pour in the centre of the pan from a height of about 10cm above the pan. Rotate to swirl the batter as thinly as you can. Keep the heat low so as not to brown the crepe. Cook until edges start to curl. Remove (there is no need to cook the other side but it should be dry). Repeat until all the filling has been used up.
5. Depending on the size of your crepe, use about 2 tbsp of filling per crepe. Fold
Subscribe to:
Posts (Atom)
-
This mantou dough XiaoHong uses a different method with single proof by adding the yeast AFTER the dough has been kneaded. Ingredients 50...
-
Tried this with chicken wings, only because I love wings so much. I changed the cooking times to 180 deg C at 20 minutes covered, then 10 mi...
-
Based on the SoupedUpRecipes version of claypot rice (uses beef) which uses her claypot that I bought, I changed the ingredients I have ava...