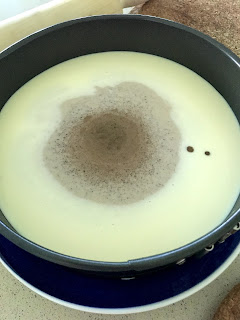
I decided to upsize the matcha cheesecake to a 8 or 9" (using maths) but to use cocoa powder and a biscuit base instead. So here is my amalgamation of these two recipes and also borrowing from the base from Nigella's no-bake cherry cheesecake.
Ingredients (for 8" pan)
Base
125g sweet biscuits (about 24 biscuits e.g. oreo with cream removed, ginger snap, digestives, milk biscuits)
75g softened or melted butter
Mousse filling
6 sheets gelatine, cut into smaller pieces and soaked in cold water
approx tbsp cocoa powder
380g milk
210g sugar
520g double cream
2 boxes of 250g cream cheese (room temp)
Bowl 1: 5 tsp + 180g mouse
Bowl 2: 4 tsp + 240g mousse
Bowl 3: 3 tsp + 300g mousse
Bowl 4: 1.5 tsp + 300g mousse
Bowl 5: 360g mousse or remainder
Method
1) Crush the biscuits either in a food processor or in a bag and then bashed with a rolling pin. Add the softened to melted butter and incorporate well.
2) Grease a biscuit tin. Pour crushed biscuits into the tin and flatten the bottom with a flat surface. Push the mixture up the sides. Place in the fridge to harden while working on the filling.
3) Prepare 4 bowls. Pour in cocoa powder and 2 to 3 tsp of water. Proportions above.
4) Microwave the milk until hot but do not boil. Remove gelatine sheets and squeeze out extra water. Add to the scalded milk. Mix to dissolve.
5) Add the sugar and stir until incorporated.
6) In Bowl 5, cube the cheese cheese. Pour part of the milk mixture and mix well. Add the remaining milk mixture and mix until incorporated. If required, sieve the mixture to remove lumps.
7) Beat the double cream (I used Bowl 4) until the surface is textured.
8) Add beaten double cream to the milk-cheese mixture in Bowl 5 and fold in.
9) In separate bowls, mix the paste for each bowl. Pour in the mousse into each bowl (use a kitchen scale) and fold in to incorporate. Bowl 5 has the remainder.
10) Remove the cake pan from the fridge. Starting with Bowl 5, pour in the centre from a height so that it forms a nice circle shape and spreads to the sides. Next, carefully pour Bowl 4 (second greatest volume of mousse and lightest colour) in the centre from a height. Repeat with Bowls 3, 2, 1 in that order (decreasing volumes of mousse and increasing darkness in colour).
11) Cover and leave to cool in the fridge for at least 4 hours or best overnight.
12) To unmould, run a spatula around the edge and test with a finger to ensure that it has detached from the ring. Also use a hairdryer to heat up the rim would help.
13) Serve with more whipped cream. Keep the uncut cake in the fridge or it will melt.
Recipe feedback - updates incorporated above
I made several mistakes.
1. I way under-estimated the gelatine and it turned out too watery so when I poured it on, the colours all blended into each other.
2. Trying to save a bowl for washing up, I decided to beat the cream cheese, sugar, and lastly the double cream all in the processor. Not beating the double cream separately and then folding in the cream cheese seemed to make a difference because once I added in the milk, all hell broke loose when it all became a sloppy messy. (The chocolate ripple recipe beat everything together but on deeper inspection, now I realise that recipe has no milk.)
 |
| Try 1 - Colors merged |
 |
| Try 1 - All messed up inside |
 |
| Try 1 - Cross section. The white is more distinct because I waited 5 minutes before pouring the first brown but didn't wait thereafter. |
4. I only used 1 carton of cream cheese which made for a very short 1.5inch cake. I have doubled to 2 boxes of cream cheese.
Updated: A much simpler recipe: https://simmetra.blogspot.com/2019/09/no-bake-chocolate-mousse-gradient.html


No comments:
Post a Comment