I want to try this...
http://onepotchef.blogspot.com.au/2013/04/3-ingredient-peanut-butter-cookies.html
Saturday, April 27, 2013
Chinese roasted five spice chicken
I finally tried the Chinese roast chicken recipe from here. Based on the recipe by Rasa Malaysia, I finally found the Chinese roast chicken of my childhood. I always thought it had to do with a certain rub that my maids used to use, but I found that this recipe recreates the taste equally faithfully. The only problem lies with my technique, which differs from Rasa Malaysia because I'm impatient and don't have the time to let the chicken skin dry. I also compensated by mopping up excess moisture with paper towels and using a higher temperature, but it doesn't seem to have worked. But I guess there are no shortcuts to success, and next time I'll try to follow it more faithfully. The following is my recipe, not hers but is certainly based on hers.
 |
| Chinese roast chicken, served with over roasted vegetables |
Ingredients
Marinade
1 kg drumsticks, cleaned
2 tbsp light soya sauce
1 tbsp dark soya sauce
1 tbsp Chinese wine
1 tsp five spice
1/4 tsp salt
1 tbsp crushed garlic
1 tbsp crushed ginger
1 1/2 tbsp honey
1 tsp sesame oil
Coating
1 tbsp white rice vinegar
1/2 tsp honey
1 tbsp rice wine
Method
1) Marinate the chicken thighs in the marinade, preferably overnight.
2) Scald the chicken thighs with boiling water. This washes the marinade off the skin. Drain and blot dry wtih paper towels. (next time, I'll also let it air dry for about an hour in the fridge, uncovered).
3) Coat the skin the the marinade. Leave it to dry for about 3 hours. (I only did 1/2 hour! Next time I'll leave it for the required 3 hours, in the fridge)
4) Roast at 220 deg C for 20 minutes, turning halfway. Turn down the temperature to 180 deg C and roast for another 25 minutes, or 200 deg C for another 20 minutes if you're impatient. Naturally, the longer and the lower the temperature, the more succulent your chicken will be.
5) Rest the chicken for about 10 to 15 minutes, covered under an aluminium foil before serving.
Updated: i tried the full recipe, with skin airing for half then the 3 hours and using the same 220 then 200 deg C roasting ... The skin was crispy but still not for long, and the meat was a bit too dry.
Monday, April 08, 2013
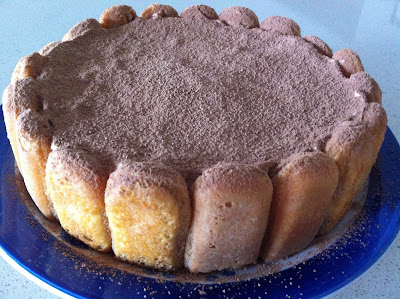
Tiramisu cheesecake
From Cooking with Karma
A no-bake cheesecake - just the way I like them!
Ingredients
500g of cream cheese
3/4 cup of caster (super fine) sugar
300ml of whipping cream
2 teaspoons of gelatin mixed in 2 tablespoons of warm water (you can use agar of lemon juice instead)
1 teaspoon of vanilla bean paste (you can also use extract or essence)
2 tablespoons of baileys irish cream (optional)
For base and sides:
Sponge finger biscuits - about 25-30
2 tablespoons of coffee
1 tablespoon of sugar (I'll probably omit this since the sponge fingers already have sugar on them)
2 cups water, recently boiled
For chocolate topping:
Mix 1 tbsp cream with cupful of chocolate buttons. Use the microwave to melt in 5 to 10 second bursts and use a metal spoon to stir. Transfer into a ziplock bag and cut off one corner to use as an improvised piping bag.
Review:
Perhaps because my cake tin was smaller but I only needed 17 to 18 biscuit fingers. However, after trying the cake, I found the cheese too overpowering. Next time, I'll put in an additional layer of biscuit in the middle to cut through the monotony and 'ger-lak-ness' of the cheese.
My attempt:

Perhaps because my cake tin was smaller but I only needed 17 to 18 biscuit fingers. However, after trying the cake, I found the cheese too overpowering. Next time, I'll put in an additional layer of biscuit in the middle to cut through the monotony and 'ger-lak-ness' of the cheese.
My attempt:


Saturday, March 30, 2013
Coffee-infused raisins with chocolate chip ice creams
Bombastic though the name is, the recipe is very simple. It's all about using the basic ice cream recipe, then after beating the cream and adding the condensed milk, just add:
1) 1/2 cup of raisins infused in 1/2 up of coffee
2) 1 tbsp of coffee (soaking liquid reserved from raisins)
3) 1 tsp rum (to counter the coffee liquid becoming ice)
After the mixture has frozen for 3 hours, use a fork to break up the big chunks of ice. Repeat again 3 hours late. This is to mix up the raisins which would otherwise have sunk to the bottom of the container.
My chocolate still seized up to become chocolate 'chips'. This time I was careful to use a metal spoon rather than a wooden one, which could have moisture inside, one of the leading reasons of causing chocolate seize up. I was also careful to microwave the chocolate in short bursts to prevent burning. I learnt from surfing that I should not have used chocolate buttons, which has a very low chocolate percentage!
 From left to right: black sesame ice cream, and coffee-infused rains with choc chips
1) 1/2 cup of raisins infused in 1/2 up of coffee
2) 1 tbsp of coffee (soaking liquid reserved from raisins)
3) 1 tsp rum (to counter the coffee liquid becoming ice)
After the mixture has frozen for 3 hours, use a fork to break up the big chunks of ice. Repeat again 3 hours late. This is to mix up the raisins which would otherwise have sunk to the bottom of the container.
My chocolate still seized up to become chocolate 'chips'. This time I was careful to use a metal spoon rather than a wooden one, which could have moisture inside, one of the leading reasons of causing chocolate seize up. I was also careful to microwave the chocolate in short bursts to prevent burning. I learnt from surfing that I should not have used chocolate buttons, which has a very low chocolate percentage!

Friday, March 29, 2013
Oven "fried" chicken
I think I've finally cracked it. After much experimentation and combinations of various recipes, this seems to work best. A thought stuck me when I was warming up frozen fish fingers (ok, they were more like cutlets) and noticed that there seemed to be oil oozing from under the bread crumb layer. There obviously is oil involved underneath! Fish isn't really that oil, so where did the oil come from?
I scoured the Internet and voila, came across a recipe where instead of using egg (the most usual thing used to 'stick' the breadcrumb mixture onto the chicken skin), the recipe called for butter. Amazing! So with a few tweaks to the my previous attempts, e.g. instead of using a baking sheet and a wax paper, I decided to use a wire rack (suggested by another recipe) so that the air gets underneath as well to ensure an all over crisp, with the added advantage of not needing to turn halfway!
Ingredients
1kg chicken wings, cleaned (remove stray feathers). I used the 3 jointed wings with tips attached.
1 tsp five spice (you can use any dried herbs you like)
1 tsp salt
pinch of pepper
4 tbsp corn flour
1 cup panko breadcrumbs
50g butter, melted
Method
1) Place wings in a bowl and pat dry with kitchen towels as much as you can. Add the salt, pepper and five spice and mix well. Leave in the fridge to dry and marinate, preferably overnight.
2) Add the corn flour and stir to ensure even coverage.
3) In a microwaveable bowl, melt the butter. This usually takes about 1 minute on low, but stop after 30 seconds and stir. Be careful not to burn the butter.
4) Coat each chicken wing with the melted butter.
5) In a bag, pour in the panko bread crumbs. Toss in the chicken wings and toss everything about to ensure even coating.
6) Remove each wing and it on top of the wire rack which has been placed it in a baking tray to catch all the oil.
7) Bake in a pre-heated oven at 220 deg C for 25 minutes, then turn down to 180 deg C for another 20 minutes or until golden brown. Serve immediately.
Saturday, March 23, 2013
Pickled green chilli
What do you do when a little bit of fertiliser causes your chilli plants to amply reward you with 75 green chillis? Make pickles!
Of course i could have waited too they ripened on the plant but then what do i do with 75 red chillis, when i still have 7 now dried red chillis sitting on my window sill?
Recipe from my favourite Malaysian food blogger.
http://rasamalaysia.com/pickled-chilies/2/


Of course i could have waited too they ripened on the plant but then what do i do with 75 red chillis, when i still have 7 now dried red chillis sitting on my window sill?
Recipe from my favourite Malaysian food blogger.
http://rasamalaysia.com/pickled-chilies/2/
Saenggangcha
Why pay $10 or more per bottle of tea when you can make it yourself? My favourite winter tea is ginger tea, and I've been particularly partial to the korean ones that you can buy at Korean supermarkets. However, they cost an arm and a leg for a bottle, although it does last a long time. My one piece of ginger and some honey that I had in the cupboard cost me probably less than $2 in total.
I surfed the Internet and it's so easy to make your own! Or if you can find Korean citroen fruit, even better!
I used this recipe from my favourite Korean cook but there are tonnes of others.
http://www.maangchi.com/recipe/saenggangcha
Her recipe is easy because there is no cooking involved, and it's so fast. It took me less than 5 minutes with a grater, faster if you use the food processor (but I was feeling reluctant to fire up the food processor for just a couple of seconds' work!).
Add equal portion of honey (Maangchi put her grated ginger into a measuring cup but I just eyeballed), stir well and voila!
Can be served hot (add recently boiled water) or cold (she didn't even add boiling water, just cold water and ice).
Maangchi does advice us to keep the bottled mixture in the fridge though.
Saturday, February 23, 2013
Soya sauce pork
Two recipes which I'll like to try:
Ginger vinegar trotters: http://ellenaguan.blogspot.sg/2010/06/ginger-vinegar-trotter.html
Soya sauce pork belly: http://ellenaguan.blogspot.com.au/2013/02/braised-pork-belly-with-rice.html
Another Tau Yew Bak: http://www.noobcook.com/tau-yu-bak-braised-pork-belly-in-soy/2/
Ginger vinegar trotters: http://ellenaguan.blogspot.sg/2010/06/ginger-vinegar-trotter.html
Soya sauce pork belly: http://ellenaguan.blogspot.com.au/2013/02/braised-pork-belly-with-rice.html
Another Tau Yew Bak: http://www.noobcook.com/tau-yu-bak-braised-pork-belly-in-soy/2/
Tuesday, February 19, 2013
Budae jigae
I have been curious about this stew for a long time. Deciding to follow this recipe http://aeriskitchen.com/2011/05/army-base-jjigae/, I adapted it slightly.
this is my second attempt because I didn't have spam the first time. However, I didn't use ramyeon this time because I overdosed on it during mark I. However, I like the idea of melted cheese on the ramyeon, so I might try that next time.
Ingredients
450g kimchi
8 large franks, chopped
1 can 250g spam, cubed
1 packet of silken tofu
1 tbsp dwenjiang
1 tbsp gochujiang
1 tsp sugar
1 tsp fish sauce (remember that the franks and spam will be salty)
1 tbsp sesame seed oil
3 cups water
Method
1) Assemble everything in a shallow stew pot.
2) On high heat, bring everything to a rolling boil for 10 minutes. Turn down flame to low, and cover. Simmer for another 10 to 15 minutes.
3) To serve with ramyeon, you can either put it in the pot, or I prefer to cook it separately.
4) To add the cheese on top, add it after you have turned off the flame, and cover the pot. The residual heat will melt the cheese after about 2 minutes.
Sunday, February 17, 2013
Ching tng 清汤
This is a popular and very light dessert that is supposed to be cooling. As I make it during this CNY period (today being 初八), I remember my kao mo, my ee may and my fifth grandaunt, all who would make this during CNY for visitors. Ideally, I should have 八包 inside, but well, one has to do best with what one has! They sometimes add ginger to make it more heaty and nourishing, but I prefer it without. The correct preparation of the individual elements and timing to add them are probably the hardest part of this recipe. Otherwise, it's quite stress free, simply toss in the pot and go. Some recipe writers even use the slow cooker.
Ingredients (honestly, I'm just guessing. I go more by 'feel' and also which items I like more. One good source may be EllenaGuan or NoobCook)
2 knotted pandan leaves
3 l of water (i always make enough for leftovers for days)
100g cup barley
100g dried lotus seeds
100g canned gingko (I didn't add this as I don't like gingko)
100g red dates
100g longan
50g boxthorn
Sugar to taste (I find it takes about 10 to 14 tsps. You can also use rock sugar, which is actually preferred)
White fungus (I didn't add this either because I don't like it)
Pang da hai (I didn't have this because I have no idea what it is!)
Dried lilly buds (only some websites add this. I didn't have this either because I don't like it)
2 pieces dried parsimonne (didn't use this - didn't have it!)

Method
1) To prepare the white fungus, soak it in hot water for about 10 to 15 minutes until it softens up. It will swell quite considerably. Cut off the tough core using a scissors, and then you can separate each 'leaf' into bite site chunks.
2) Lotus seeds are perhaps the most finicky. If prepared wrongly, they become very hard. Even with an inordinately long cooking time, they will just dissolve but then there won't be any lotus seed to bite into. Soak the dried lotus seeds in recently boiled water from a kettle for 10 to 15 minutes until they soften. Remove the bitter green spout inside each seed. It is very important that the lotus seeds do not touch room temperature or cold water as they will seize up. It's fine to rinse them with tap water when they come out of the packaging but they have to go straight into boiling water almost immediately. Thus, all the websites that say to soak them overnight, in hot water (which will become cold) or otherwise, are wrong! I followed the advice of KitchenTigress on preparing lotus seeds based on her experiments and she was spot on! My lotus seeds were still slightly crunchy yet soft and yielding inside. They didn't dissolve into a soggy mess, but neither were they hard on the outside.
3) There is no need to soak the dried lily bulbs, but you do have to wash them very carefully with water.
4) Add the water, barley, red dates and knotted pandan leaves and bring to a boil. Let it boil on high heat for 10 minutes, uncovered (or it will boil over).
5) Add everything else except the sugar. Boil on high heat for 10 minutes until all the scum surfaces. Remove the scum. Turn down to low heat and simmer for about 15 to 20 minutes until the lotus seeds are cooked. The lotus seeds will take the longest to cook of if they're tender, everything else will be fine.
6) The sugar has to be added last, or it will also cause the lotus seeds to seize up too and remain hard. Add the sugar and simmer for about another 5 minutes.
7) Remove the pandan leaves and it is ready to serve! This can be served hot or cold. Naturally, I prefer cold in the hotter months.
Subscribe to:
Comments (Atom)

-
This mantou dough XiaoHong uses a different method with single proof by adding the yeast AFTER the dough has been kneaded. Ingredients 50...
-
 I have tried different ways to cook glutinous rice and stir fry it. I tried the IP version several times but I never got it right. It was a...
 -
There are several videos now trending about putting flour in oil when the oil is cold and then putting in bite-sized pieces. Magically the c...