Thursday, April 06, 2017

Pork bao (in milk bun)

My pleats are now more regular

I've tried various bao recipes. These include using cake or bao flour which was very hard to shape, original recipe using flour only, and this one that uses a mix of cake and normal flour and milk.

This recipe uses normal flour and milk and so far, gives the best result in terms of soft and spongey bun that still retains distinctive pleats. The speciality of her recipe is rising 3 times. However, it is strange because there's a lot more yeast than other recipes and leaves a slightly 'winey' taste. I'm wondering if the extra yeast has reacted with the milk. On a side note, I must say my bao wrapping skills have improved after watching the video, at least my pleats are more regular but now I just have to learn to make the goldfish lip. The dough is also great; it's not sticky at all and didn't even require additional flour and it held its shape.

Bun recipe: http://seonkyounglongest.com/chinese-steamed-buns-mantou/
The only change in upsizing to 3 cups of flour.

Ingredients (makes 12)
3 cups of flour
¾ cup warm milk
⅓ cup warm water (may not use all)
2 ½ tbsp oil
1 tbsp yeast
¼ cup sugar
1 ½ tsp salt

Filling
500g minced pork
2 carrots, diced finely
2 spring onions, chopped
2 tbsp soya sauce
2 tbsp water

Method
1) To the dry flour, add the yeast, salt (on the opposite side), and sugar. Combine.
2) Create a well and add the warm milk, oil, and enough water for the dough to come together. (I actually needed a tsp more water)
3) Knead for 5 minutes. Meanwhile, prepare the parchment pieces.
4) Place in an oiled bowl and cover with cling film. Let it prove for 1 hr.
5) After 1 hr, beat out the air, reform into a ball, and let it prove for another hour.
6) Knead and divide out into 12 balls. Cover half of the balls with cling film and place in the fridge.
7) Prepare the filling. Combine the minced pork, soya sauce, spring onions, and carrot. Knead the meat or use a chopstick and stir in 1 direction. Add the water and continue stirring. The mince should be sticky.
8) Roll out the each balled dough into 3 inch diameter rounds. Form the bao: Best video I've found
9) Let the buns prove for another 25 to 30 minutes.
10) Cover the lid with a cloth to prevent condensation from dripping on the bao and ruining its surface. When the water has come to a rolling boil, steam bao for 10 minutes. DO NOT open the lid to peak. Switch off the heat and let the bao sit for another 5 minutes so that the shape stabilises.
11) Serve hot. Uneaten baos keep very well in the freezer.

Thursday, March 23, 2017

Yuzu 유자 chiffon

The weather has finally cooled down and out comes the chiffons again. I wanted to finish my leftover cake flour and found the perfect recipe that utilises all the leftover flour. There was a bit of tweaking because my yuzu was really thick so I had to add an extra splash of warm water into the batter otherwise it still had dry flour spots!

As usual, I used my favourite chiffon blogger whose recipes are always spot on
http://thedomesticgoddesswannabe.com/2014/12/yuzu-유자-chiffon-cake/

Ingredients
8 eggs, separated
40g sugar (reduced from 48g; for the yolks)
184g cake flour
1 tsp baking powder
½ tsp salt
96ml oil
5 tbsp yuzu + warm water = 144ml liquid in total
1 ½ tsp vanilla extract
70g sugar (reduced from 80g; for whites)

Method
1) Make the yuzu liquid.
2) Add the sugar to the eggs and whisk till the yolks are pale.
3) Add in the oil and continue whisking till pale.
4) Add the yuzu liquid and combine.
5) Sift the cake flour, salt, and baking powder. Sift into the yolk mixture and use the whisk to mix until just combined. Set aside.
6) In a separate very clean bowl, beat the egg whites on low until opaque. Add the sugar in 3 batches. The first batch should be added after the egg whites have just turned opaque and then in another 2 further additions. Once all the sugar has been added, beat at high speed until just before stiff peaks.
7) Add the meringue in 3 additions. Add the first third of the meringue to the yolks and mix. You don't have to be too gentle.
8) For the second batch, carefully fold the meringue into the yolk mixture using a whisk and rotating motion.
9) For the final batch, pour the yolk mixture into the remaining meringue and very carefully fold in using the whisk, rotating the bowl as you go along.
10) Pour into the tin, making sure to keep the batter on the outer edge. I rotated the tin to ensure more even distribution.
11) Using a spatula, slash the batter and especially trace around the outer and inner rims to break up the big bubbles.
12) Bake at 160 deg C for 80 minutes.
My most perfect chiffon 'top': no cracks because the temp remained stable!
Yuzu specks not noticeable
13) Invert the tin onto an elevated surface e.g. I placed the tin on top of a tin of canned food. Let it cool completely. 
14) Once cool, use a butter knife or offset spatula and trace around the rims to loosen the cake.
15) Serve immediately and store in an airtight box for up to 3 days.

Friday, February 17, 2017

Steamed eggs (Instant pot)

Was looking for how to 'boil' eggs in the IP and came across these useful links:

1) 'Experiment' of cooking eggs in IP with minute by minute picture using low pressure (because high pressure turned whites chalky) quite a hard core experiment http://www.pressurecookrecipes.com/pressure-cooker-soft-hard-boiled-eggs/

2) Method is described for pressure cookers in general, not just IP but timings are consistent with the first article https://www.hippressurecooking.com/cracked-soft-medium-and-hard-boiled-eggs-in-the-pressure-cooker/

3) Also as minute by minute pictures but uses high pressure. Uses ice bath to help with removal of shell.

To summarize: steam at low pressure
: 3 - 4 mins: soft boiled eggs
: 5 - 7 mins: onsen tamago (runny yolk)
: 8 - 10 mins: medium boiled eggs (yolks squidy but not runny)
: 11 - 14 mins: hard boiled eggs   

Steam at high pressure
: 3-5 mins: soft boiled eggs
: 5-6 mins: medium boiled
: 8-10 mins: hard boiled (8 is just set)  
Method
1) Starting with a cold pot, add 1 cup of room temp water. Set the trivet provided (or a steaming basket) into the pot for steaming, and place between 1 to 12 eggs (straight from the fridge) into the trivet.
2) Use STEAM and adjust to LOW pressure. Set the desired time.
3) Use immediate quick release and transfer eggs into cold running water or an ice bath to stop cooking.
4) Tap the top and bottom of the shell and peel carefully.  
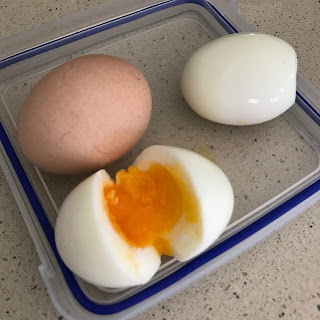
6 minutes
Recipe feedback
Not quite sure what went wrong but I set the timer for 6 minutes and instead of getting onsen tomago eggs, I ended up with medium hard boiled eggs (but my yolks were not very squidy either)? I followed all the instructions ie fridge cold eggs, immediate release, and transfer into cold (altho not ice cold) water. I started with 8 eggs, am not sure if that affected the result. Next time I will experiment with 5 minutes instead.

Updated: 15 Sep 17
This is what a 4 minute egg looks like. I steamed 8 eggs and although 1 burst and this one looks as set as the 6 minute one, there was another egg which still had a spot of orange in the centre.

Updated 20 June 18
I have previously tried steaming at 2 minutes and 3 minutes. There was only a slight difference but both were set yolks. 2 minutes having a slightly less set than 3 minutes but both were orange in the centre. None were liquidy.

Instead of using the Steam function, I decided to try Manual but at low pressure for 2 minutes and voila! Finally successful.


Sunday, January 29, 2017

Buttermilk pancakes

Was quite dissatisfied after the last pancake recipe which took too long to cook and was difficult to tell when it was cooked. I've since renamed that recipe as hotcakes since it's so thick and this one as pancakes since it's much thinner. Generally very happy with this recipe which is also much easier to remember in terms of ingredient ratios. Unlike other pancake recipes, this crumb is decidedly light and fluffy rather than chewy, so the buttermilk definitely makes a difference.

Source: http://www.joyofbaking.com/breakfast/ButtermilkPancakes.html

Ingredients (8*4" pancakes)
1 C flour
1 C (240ml) buttermilk (1C milk + 1 tbsp acid, stir and leave to settle)
3 tbsp (40g) butter, melted
1 tsp baking powder
¼ tsp baking soda
2 tbsp sugar
¼ tsp salt

Method
1) In a bowl, sift in the flour, baking powder and baking soda. Add in the salt and sugar and whisk together.
2) In pitcher, add the melted butter, and egg to the buttermilk.
3) Create a well in the dry ingredients and pour in the wet, whisking gently to incorporate. Don't beat vigorously but some whisking is needed to get rid of the lumps. This produces a thin batter.
4) Into an oiled pan (pour in some oil and wipe off excess with kitchen towel), pour in 1 scoop of batter from 10cm above to produce the round shape. Use medium high heat.
5) Like any pancake, once bubbles appear on the top (about a minute), flip over and cook until the bottom is brown.
6) Serve immediately.

Update: Remade a year later with the addition of banana.

Friday, January 27, 2017

Lemon chiffon

I had a lemon leftover and had no idea what to do with it. Since the orange chiffon was so successful, I decided to adapt it for the lemon recipe. The only difference I made was to increase the sugar.

Ingredients (for 26cm pan)
8 eggs
77g sugar (increased by 20g or 1 tbsp; for yolks)
68.5 ml (¼ C or approx ½ lemon) freshly squeezed lemon juice
2 tbsp grated lemon rind (approx 1 lemon)
68.5 ml (¼ C) oil
½ tsp salt
126g cake flour
140g sugar (no change from orange chiffon recipe; for whites)

Method
1) In a medium bowl, beat the yolks and sugar until pale yellow. Add oil and beat till pale.
2) Add the rind and salt. Whisk till distributed.
3) Add the juice and whisk. Add the flour in 2 batches and fold in gently. Set aside.
4) In a very clean big bowl, whisk the eggs till stiff peaks.
5) Add the meringue in 3 batches. The first batch, it is used to loosen the yolk mixture so you don't have to worry about knocking out the air. Ensure no white streaks remain. With the second batch, fold in carefully with the whisk. For the final batch, pour the yolk mixture back into the leftover third of meringue. This time, very carefully fold in using the whisk. Ensure no white streaks remain.
6) Pour from a 10cm height into the prepared pan. Use the spatula to trace around the inner and outer rims to dispel air bubbles. Smooth the top. (Do not drop on the counter top)
7) Bake in 180 deg C oven for 80 minutes. I reduced to 175 deg C after 30 minutes and still tented with foil for the last 20 minutes as it was still browning too fast, maybe because of the extra sugar?
8) Invert out of the oven to cool completely. Unmould once completely cool.

Recipe feedback
- It wasn't unduly sweet with the extra 20g of sugar but neither was the lemony taste very distinct.
- This is the fifth chiffon I've done. This and the orange seemed to brown much faster, probably because I was using a much higher heat than all other chiffons - 180 deg C. I think 175 might be a more appropriate temperature for both recipes but still 80 mins.

Pouring and shape
I've learnt that in all my chiffons, the centre around the chimney seemed to rise much faster than the outside, leading to a dome shape (see the chocolate chiffon which has the most pronounced dome). This means that after turning it over, the cake slants at an odd angle. Also, one website said not to rotate the pan but I've had one other lop-sided (see the coffee chiffon) chiffon with right side higher than the left. 

To combat this, I've learnt to
a) concentrate pouring my batter at the outer rim and let it flow inwards naturally. 
b) rotate the pan halfway through the batter and start pouring from the opposite edge and let the batter meet in the middle.
c) Smooth out the top. Any little peaks/lumps will burn.

Monday, January 23, 2017

Three egg spinach in superior stock

I have tried this recipe many many times but never managed to get it right. I've tried ikan billis, chicken stock, chicken stock cubes, etc. Nothing worked, it just never tasted as delicious as in the restaurants. However, inspired by Italian and Japanese food, I decided to use canned anchovies. I never liked the dried anchovy in the finished product, so this was perfect.

Ingredients
1 clove of garlic, sliced
1 bunch of washed and prepared spinach (enough to feed 4)
1 salted egg, cubed (try not to cut them too small as they will disintegrate)
1 century egg, cubed
1 egg, beaten
2 anchovies, drained of oil and chopped finely
1 dashi packet
½ C water

Method
1) In a bit of oil, fry the garlic until fragrant.
2) Add the dashi to the water and the anchovies. Add in the stalks and cook for 2 minutes, covered. 
3) Add in the spinach leaves, salted egg, and century egg. Cook partially covered for another 2 minutes. Do not fully cover the lid otherwise the leaves will turn an unattractive brown.
4) Drop in the beaten egg (aka egg drop soup method) and partially cover to cook for another minute. Turn off the flame and let the eggs continue to set in the residual heat. 
5) Serve immediately. 

Buttermilk almond hotcakes

I have heard A LOT about buttermilk pancakes, how it's been touted as the best, softest, fluffiest pancakes ever. However, I think I still prefer hotcakes at least in terms of method. The mouthfeel made little difference to me.

I used this recipe from JOC because her recipes have been pretty foolproof. I don't know whether it's really because I used substitute buttermilk rather than 'real' butter milk but it took a lot longer to cook than expected. In the sweltering summer heat, I don't have the patience to stand there in front of the hot stove and sweat while waiting for it to cook at low flame. 

Update 1: I might try a pan with a cover next time but I still need to wait pretty long for it to cook through). 
Update 2: I have renamed this as 'hotcake' rather than pancake because I have found a recipe that produces a much thinner but less cake-like pancake.

Ingredients (feeds 2 people, makes 6*5 inch pancakes)
1 ¼ C flour
1 tsp baking powder
1 tsp baking soda
1 beaten egg
pinch of salt
1 ¼ C buttermilk (substitute ratio of 1 cup milk to 1 tbsp acid e.g. lemon juice)
2 tbsp melted butter
1 tsp almond essence
2 tbsp sugar (reduced from ¼ C sugar)

Method
1) In a pitcher, beat the egg, add the buttermilk, melted butter, and almond extract.
2) In a bowl, mix the dry: the flour, baking powder, baking soda, and salt.
3) Sift the dry into the wet and fold in with the whisk. (This prevents lumps unlike the usual method of creating a well in the dry, pouring in the wet, and slowly incorporating). This makes a very very thick batter.
4) Warm up the pan and pour in a little oil. Wipe off excess with a kitchen paper. Pour on 1 scoop of the batter from a height of 10 cm. This creates the round shape.
5) Turn down the flame to medium low heat otherwise the bottom will burn before the inside is cooked. This takes much longer to cook than hotcakes and dorayaki pancakes. 
6) Unlike all the latter but similar to crepes and pancakes, flip when bubbles appear on the top. Do not press down.
7) Serve hot immediately.

Sunday, January 22, 2017

Orange chiffon

Been some time since I've baked chiffons because the weather has just been crazy. However, to celebrate dad's birthday, I decided to bake one albeit 1 day late. When I started on his actual birthday, some of the yolk got into the egg white and had to be discarded. I didn't have enough eggs left to restart, so it had to be postponed to an afternoon later after a trip to the supermarket last evening.

I went back to the recipe by my favourite fail proof chiffon blogger. This is the most number of eggs used - 8 eggs (hence I ran out of eggs) but interestingly, she used 8 egg yolks and 7 egg whites and I hate leftover one or the other, what am I supposed do with a leftover yolk? The rest of her recipe sizes for small cake pans used equal number of yolks and whites, so I surmised that 7 whites was all her largest pan (25cm) could take. Since mine was 26 cm, I decided to go all the way and it proved to be a good decision. This is the fullest and biggest chiffon I've ever made!
Notice how tall it has risen compared to previous chiffon attempts
Also baked at the highest temp amongst all the past chiffons, 180 deg C. Hence the big crack?
The offset spatula leaves a shaggy finish but my knife was scraping OFF aluminium shavings from the side of the pan! :O

Recipe adapted from http://thedomesticgoddesswannabe.com/2014/11/orange-chiffon-cake/
to reduce sugar and increase the egg whites.

Ingredients
8 eggs
57g sugar (for the yolks)
68.5 ml freshly squeezed orange juice (about 1 orange; ¼ C)
½ tsp salt
68.5 ml oil (¼ C)
1.5 tbsp grated orange rind (about 3 oranges; I reduced from 2 tbsp as 1.5 was really good enough)
126g cake flour
140g sugar (for the whites; reduced from 148.5g)

Method
1) In a smaller bowl, whisk the eggs and sugar until pale and creamy.
2) Add the oil and whisk till pale. 
3) Add the salt and orange juice and whisk to incorporate. Add in the orange rind and whisk to incorporate.
4) Sift in the flour and carefully use the whisk to stir in until no lumps remain. Set aside.
5) In a big clean bowl, whisk the egg whites on low speed until foamy and opaque.
6) Add the sugar in 3 additions. Once all the sugar has been added, increase to high speed. Whisk till stiff peaks, stopping periodically after soft peaks to ensure that you don't over beat.
7) Add the meringue to the yolk mixture in 3 batches. The first batch, use it to loosen the yolk mixture. The second batch, carefully fold it in. For the final batch, pour back into the bowl with meringue and very carefully fold in until no white streaks remain.
8) From a height of 10cm, pour into the cake pan. Carefully flatten the top of the cake batter otherwise there will be burnt spots. Ensure that there is more of the batter on the outer than inner edge.
9) Use a spatula to trace around the outer and inner rims. This will burst big bubbles.
10) Bake at 180 deg C for 80 minutes (no grill). I reduced to 175 deg C after 30 minutes as it was browning too fast.
11) Around the 75 minute mark, use the skewer to check for doneness. It should come out clean. If ready, remove immediately and invert it onto a can for the cake to cool.
12) When it has completely cooled (I draped damp towels on it to speed up the cooling process. It still took 1 hour even with constant change of towels on an ambient 30 deg C day!) unmould by running an offset spatula around the edge. Remove the side of the pan and run the spatula under the bottom of the cake. Invert onto a plate (the bottom becomes the top of the cake).

Friday, January 06, 2017

Pork and beef bao

This is my third time making bao as I was not satisfied with the past 2 attempts because the bao dough was never tight. The first one used only plain flour and it was rather tough although the dough was a joy to handle. The second one used only cake flour because while it was very fluffy, the dough was horrible as it was very difficult to work with, and the addition of baking powder was obvious to the tastebuds.
Note the stock that seeped out.
Desperate, I decided to look for another recipe and discovered that some Chinese cooks use wheat starch which I read has very low glutein. I don't think I can find that here. Maybe cake flour would work, so the best alternative seemed to be mix plain and cake flour. You never would have guessed it but I found that exact recipe from an ang mo source that uses half of each.

http://www.foodnetwork.com/recipes/brian-boitano/pork-steamed-buns-recipe.html

His bao look so ugly but the recipe works a dream - the dough is the right amount of fluffiness but still a dream to work with - see my distinct pleats! It's also got a slight 'smile' probably due to the self-raising agent in my self-raising cake flour.
My bao pleating skills have improved

This is my adaptation for 16 bao with the original recipe for 12 in brackets, because I always feel that 12 is too few after all the work! I also added the mantou method of this blogger who did 3 rises.

Ingredients for 16 * 3" bao (12 in brackets)
2 ¼ tsp yeast (no change)
½ + ⅓ C water (½ C)
½ + ⅓ C milk (½ C)
2 C plain flour (1 ½ C)
2 C cake flour (1 ½ C)
3 tbsp sugar (no change)
1 ⅓ tbsp oil (1 tbsp)
pinch of salt (no change)
(½ tsp baking powder from original recipe omitted because my cake flour is self-raising)

Filling: approx 600g (approx 450g) Refer to this recipe

Method
1) In a big bowl, add the flours, yeast, salt on the opposite side, and sugar. Use a wooden spoon to stir to incorporate.
2) Create a well in the middle and pour in the oil. Stir to roughly incorporate.
3) Microwave the milk and water till it reaches blood temperature, about 30 to 40 seconds. Pour in the liquid slowly. I didn't use up all the liquid because of the high humidity of my present conditions. You want a shaggy dough but without dry spots of flour but should not be so sticky that it coats and sticks your fingers.
4) Work the dough for 10 minutes until it leaves the bowl clean. Cover with cling film and let it prove for 45 to 60 mins until doubled in size.
5) To test, stick a finger in the dough and the hole should not close. On a lightly floured surface, knead the dough for 5 mins until smooth and shiny.
6) Cover with cling film and let it prove again for 45 to 60 mins.
7) Meanwhile, prepare your filling, and cut approximately 4" square parchments.
8) Cut the dough into 16 equal pieces and refrigerate half.
9) Fill the dough with 2.5 tbsp of filling and pleat to close. Remember to crimp the top close - I never understand bloggers who leave a hole on top. Why do you want the filling to dry out? Transfer the completed bao into a square of parchment. 
10) Let the bao prove for about 15 minutes. Towards the end of that time, start the water boiling. Remember to cover the lid with a cloth secured with a rubber band so that the condensation doesn't drip on the bao and ruin its pretty smooth face.
11) When the water has come to a rolling boil, steam 4 to 5 bao at a time for 10 minutes on medium high heat. Resist any urge to open the lid. Turn off the flame and let it rest for 5 minutes for the shape to stabilise.
12) While each batch is steaming, I prepare the next batch and cover the ones that are ready. The timing is about right ie 15 minutes is sufficient proofing time.
13) Best eaten immediately but if not, let the beauties cool on a wire rack to prevent any soggy bottoms.
14) Freeze and they keep well! Reheat by steaming in the microwave from frozen, approx 5 to 6 minutes in a steaming tray.


Tuesday, January 03, 2017

Ricotta from failed yoghurt

Tried making yoghurt again with my Instant Pot because I had an 2L in the fridge and didn't know what to do with it. However, disaster struck. When it didn't reach 180 deg F after the first boil, I got smart and used the Saute function like the last time (Normal, not even High which was what I used last time). Immediately I noticed that it 'burped' then split and become grainy! I was rather shocked. From then on, it was unsalvageable, no matter how much I whisked away.

After adding my frozen starter (from my last homemade batch), I prayed that it would be ok. Next morning, this is what I found - lumpy with a layer of whey on top. 😩 So upset but then I read this link and proceeded to make ricotta. I strained it using a fine mesh strainer and cheesecloth (sterilised first with boiling water!) into a big bowl and let it sit. Although the link recommends 12 hours in the fridge, mine separated quite easily in 5 minutes and I had a forkable texture, I didn't need the ricotta too hard.

http://forkableblog.com/?p=1666 

Ricotta
The taste wasn't too unpleasant, except for a slight antiseptic taste which I suspect came from my new  cheesecloth. I had forgotten to rinse it because I thought the scalding with boiling water would do that for me. Ah well.

But why did my yoghurt fail to begin with? This link offers some explanations:
http://nourishedkitchen.com/troubleshooting-homemade-yogurt-questions/

1) Heating up the milk too fast.
I can't use the Low saute because that only goes up to 105 def F whereas Normal is 160 deg F, also well below the 180 deg F needed. I should indeed have used High which even then, is only 170 deg F. - so that's not the cause.

2) Heating beyond 180 deg F. 
Some links say we should go up to 185 deg F and I went to 190 deg F the last time 
- so that's not the cause.

3) Dead starter
This is possible. Although other links indicate that it's perfectly ok to freeze the starter and use the thawed version to make yoghurt, it is much safer to use fresh culture. I can't be sure, but this might have been a reason. My thawed starter was very liquidy but whether the culture was dead or not, I have no way of knowing.

4) The wrong milk
I was already aware that I shouldn't use low fat milk but this link gave me the answer - using A2milk!

I quickly went to look at my discarded milk bottles and voila, the culprit. No wonder the milk and split so fast! 

Also, ancilary to this, I learnt that 

5) Don't use greek yoghurt as starter 
http://www.thefrugalgirl.com/2013/09/homemade-yogurt-troubleshooting-guide/

Dunno why. Stick to Yoplait or Dannon. I use regular Coles housebrand and that's fine.

6) If saving starter from the homemade yoghurt, buy a new batch after the 6th or 8th attempt otherwise the acidity is off.

http://greatist.com/health/make-your-own-homemade-yogurt-how-to-diy

Updated 10 Sep 17
I have been using fresh yoghurt culture or frozen culture and read somewhere that freezing the culture doesn't kill the yoghurt bacteria. I also read that you can't keep using 'cloned' yoghurt culture indefinitely, that sometimes you need to use a fresh batch. After some experimentation, this is what I learnt:

Re (5): there is nothing wrong with using fresh Greek yoghurt as a culture, so (5) is wrong.


Re (6): Freezing cloned culture may be a bad idea. I tried 2 different experiments: fresh greek yoghurt + frozen cloned culture and fresh cloned yoghurt + frozen clone culture. Both worked. However, the first one needed 10 hours and was very thick; the second one was runny even after 10 hours (but did thicken up slightly in the fridge overnight). So maybe the problem is with using frozen cloned culture.

Alternatively, I also used a lot of cloned culture (ie the fresh + frozen) which came up to about ½ cup,  and also the fermentation time ie the longer the thicker. However, there will be point beyond which it won't get any thicker unless the whey is strained.


Black vinegar pig trotters