Saturday, July 29, 2023

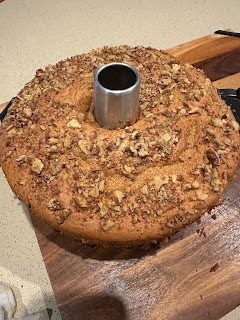
Walnut coffee chiffon

Adapted from Kat Kwa because I'm using 6 instead of 5 eggs. She also used coffee essence and evaporated milk which I don't have on hand but I wanted to bake chiffon to use up my cake flour.

Ingredients

100g walnuts, toasted and chopped

3 tsp instant coffee

4 tbsp hot tbsp water

100 ml milk

7 eggs, separated

160g sugar

100g corn oil

170g cake flour

1 tsp baking powder

½ tsp lemon juice


Method

1. Toast the walnuts at 180 deg C for 5 mins. Set aside to cool and then chop.

2. Separate the eggs and set aside.

3. Mix the instant coffee. Add the milk and stir. Let it cool.

4. Separate the eggs and set aside.

5. Add ⅓ of the sugar to the yolks. Lightly whisk.

6. Add oil to the yolk mixture and lightly whisk till pale.

7. Add coffee mixture. Mix well. 

8. Sift in the flour and blend well with whisk to remove lumps.

9. Beat egg whites until opaque. Add lemon juice. 

10. Add sugar in three batches and continue to beat until stiff peaks.

11. Add one third of the meringue to the yolk mixture and blend.

12. Return the mixture to the meringue and gently fold in with a whisk until no more white streaks. Once mostly folded, use spatula to gently fold in ensuring no more streaks.

13. Add 40g of chopped walnuts and fold in.

14. Pour mixture into the tin. Use a spatula to push the batter away from the centre funnel to the rim. Tap the tin on the counter to dispel big air bubbles. Use a skewer to trace around to remove smaller bubbles.

14. Sprinkle the remaining chopped walnuts on the top.

15. Bake at 160 to 165 deg C for 70 to 75 minutes. (160 for 70 mins sld work) 

16. Once removed from the oven, turn upside down to let the chiffon 'hang' until totally cooled.

17. Unmold the cake but cutting it out. Serve the cake upside down.

Recipe feedback

- Despite my agar-ation of ingredients through comparing ingredients and baking times with previous chiffon recipes, I deviated quite far from Kat Kwa's original recipe but still did very well.

- Baking at the lower temp for longer worked. It was JUST cooked so still very moist and the sides were not charred.

- As expected, coffee taste was not strong and could hardly taste it. Looks like coffee essence is a must.

- It was just sweet enough so cannot reduce the sugar.

- Roasting the walnuts beforehand made a difference to the taste. The baking temp for the chiffon cannot be 170 deg C which is the temp I usually use for chiffons because the walnuts which have already been roasted once would just burn and turn bitter.

Monday, July 24, 2023

IP one-pot meatball macaroni

This is a IP macaroni cooked in one pot with a decidedly Asian flavour. It is surprisingly easy and quick and very tasty and didn't even have aromatics!

Ingredients

250g beef mince

250g pork mince

2 tbsp corn starch

2 eggs, beaten

2 tsp curry powder

1 tsp mustard powder

1 tbsp light soya sauce

1 tsp salt

Dash of pepper

1 tsp cardommon powder

1 tsp cumin powder

1 tsp coriander powder

4 tbsp mirin

4 tbsp cooking sake

1 bottle of passata

½ to 1 C water

250g pasta (macaroni or similar short tubular pasta)

2 cloves smashed garlic

½ onion, chopped

1 tsp ginger, minced

1 beef stock cube

Salt and pepper to taste

Method

1. Mix the beef and pork minces together. Add the corn starch, beaten egg, cornstarch, curry powder, mustard powder, salt and pepper. 

2. Mix well. Knead the mince until it's sticky and leave to marinate for at least 30 minutes.

3. In the IP, turn to high Saute heat mode. Add oil and heat up. 

4. Form meatballs (about ¼ C each) and roll into meatballs. In batches to avoid crowding and thus stewing rather than frying, pan fry the meatballs. Once meatballs are nicely browned on all sides, remove and start on the new batch. Really take time with this to develop the flavour. Remove from pot and set aside.

5. If using aromatics, lightly fry until fragrant. Add the sake and mirin and scrub the bottom to remove the brown bits. 

6. Add the meatballs back preferably in one layer and allow the alcohol to boil away.

7. Pour on the passata. Add about half a bottle of water and rinse out the bottle. 

8. Add the spices and beef stock cube and stir. 

9. Pour the pasta into the pot. If the liquid doesn't cover the meatballs and pasta, top up until just covered.

10. Close the lid and seal. Cook in 'chilli/bean' mode for 3 to 4 minutes (depending on pasta package instructions. E.g. take the cooking time divide by 2 minus 1).

11. Allow graduate release for 5 minutes. Taste and season if necessary. Serve immediately, with cheese if preferred.


Tuesday, July 18, 2023

Spring onion Flower buns

This 花卷 is a northern Chinese bun used in place of noodles and rice, unlike southern Chinese cuisine. There are several ways of rolling the bun but the ingredients and method are pretty similar. However, I've not had good experience with the standard 包 method so I prefer to use the revolutionary recipe I've found except the pleats may not come out so nicely.

Here are several video recipes I've found with bun rolling techniques and also standard recipes. 

1. Deliholic: Three different ways of cutting or rolling the buns

2. Revy loves big apple: cautions that adding soda to spring onion can ensure the colour stays green but the powder stains the bun yellow.

: cautions against buns that aren't well-rested won't roll into nice flowers but will tear.

: Combine then rest 10 minutes while preparing the scallions, knead 5 minutes and rest 10 minutes, roll into buns then rest until buns have proved to twice their size (no time given), steam 15 minutes.

3. Magic ingredients: Most comprehensive video

: says that no special flour or yeast

: Combine then knead 10 minutes or rest 15 minute before kneading if the bun is too 'tight'. Rest 1.5 hours and prepare scallions. Pan fry the onions with salt and cool. After proving, knead for 3 minutes before rolling into buns. This 3-minute kneading can be omitted but will result in smoother buns. However, this will cause the buns to tighten up again, which will require 15 minutes resting before forming the buns. If the buns prove too hard to form into the flower shape, rest 5 minutes. Prove 1 hour. Steam 15 minutes but let steam escape 5 minutes.

4. Cook with Bin

: nothing really special about this except the use of salt and pepper or other taste to the bun and fold 4 times rather than 3.

: highlights that you know the buns have proofed correctly when they feel light rather than dense


Ingredients (makes 12 to 14)

Followed this recipe but increased to 500g of flour in total

Starter

250g bao flour

2 tsp yeast

1 tbsp sugar

200ml warm water

1. Mix sugar with water until dissolved.

2. Add bao flour and mix. Sticky batter. Cover and allow to rise for 2.5 hours in a warm place.

Filling

1 spring onion, finely chopped

2 tbsp oil

2 tsp sesame seeds (optional)

salt and pepper to taste (or 5 spice powder)

When the starter is proofing, chop up 1 spring onion finely. Add a pinch of baking soda and fry in 2 tbsp oil until just fragrant. Add optional 2 tsp sesame seeds. Set aside to cool.

Main bao

250g bao flour

3 tbsp sugar

2.5 tsp baking powder

3 to 4 tbsp of water (just enough to bring dough together)

1 tbsp + 2 tsp lard or veg oil

¼ tsp salt

1. Mix the flour, sugar, baking powder and combine.

2. To the starter, add the lard and water. Combine. It will be very sticky and wet.

3. Add the dry mixture and mix well. Beat (if using KA) until it cleans the side of the bowl. If using hand, mix in the bowl until the bowl comes clean. Transfer onto flour surface and knead for 10 minutes. Shape into a ball. Allow to rest, covered, for 10 minutes before shaping if the dough is too taut.

4. Roll out the dough until about 1cm thick and rectangular. Layer on the spring onion oil. Less is more! Sprinkle on salt and pepper. Fold on the long edge 3-4 times (width of each fold should be length of index finger) and pat down after each fold.

5. Cut strips, about 2cm wide alternated with 1.5cm wide. Lay the thinner strip on top of the thicker strip. Pull both ends then twist around a chopstick twice (watch the video). Lay the rosette down on the table and hold it between third and fourth fingers,  pin down the seams and carefully withdraw the chopstick.

6. Let the buns rest in a covered steamer for 10 minutes. You know they're ready when you pick them up and they feel light rather than dense. Heat up the water from cold with the buns on top. Once the water starts to boil, steam for 10 to 12 minutes.

7. Turn off the fire and open a side slit to let the steam escape. After 5 minutes of resting, serve.

Recipe feedback

- Less really is more with the filling. Following one blogger, I chopped up the spring onions as much as I could. Also, following another blogger, I tried to spread a very thin layer of oil but still was too enthusiastic. This meant the bun was very hard to twist (because it was oily and going everywhere) and form into a nice tight rosette. However it kept the 'petals' fairly separate and pretty.

- It's important to salt the bun either in the mixture or in the bun itself.

Saturday, July 15, 2023

IP Korean Sauna eggs

Korean sauna eggs 찜질방 달걀 are different to Japanese onsen eggs because they are more like roasted eggs. There are several recipes on the web but I've adapted this from Amy+Jacky who did extensive testing, and the 'regular' recipe by Beyond Kimchee and SparklestoSprinkles who recommend the 2-2-2 recipe (2 tsp of salt, 2 cups of water, IP for 2 hours).

1. Eggs must be room temp.

2. Lay eggs on the bottom of the IP in a single layer. Trivet isn't required. Ensure eggs fit in a single layer, do not stack. (fits around 8 to 10 eggs)

3. Add 2 cups of water and 2 tsp of salt. (Amy+Jacky claim that salt doesn't make a difference although their own experiment shows that it improves the brown colour).

4. Seal the pot and cook on Manual at High Pressure for minimum of 2 hours. Ideal texture and taste will be 3 to 3.5 hours. At 3.5 hours, the egg yolk becomes like salted egg. Anything longer is a waste of time (see Amy+Jacky's experiment)

5. Use quick release. Transfer immediately to ice water and let it sit for about 5 to 10 minutes. 

6. Peel. This should be really easy! Serve hot or cold. If keeping in the fridge for more than a day, recommend to store in airtight container and do not peel the eggs.

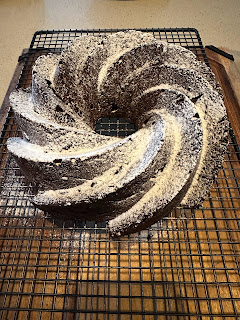
Lady Grey bundt cake

This week was a simple cake. Tried this recipe from aprettylifeinthesuburbs which used Lady Grey tea despite calling the recipe Earl Grey. I've converted the measurements to metric because I no longer trust cups and tsp measurements which can go horribly wrong! Converted using King Arthur Baking.

Ingredients

½ C butter (softened)

1 C sugar (198g)

2 eggs

½ tsp vanilla

2 C (240g) flour

4 tsp baking powder

1 C milk (236ml, 227g)

2 teabags of chosen tea (I used Lady Grey)

Icing sugar to dust

Method

1. Prepare a Bundt tin with goop and dusted with flour.

2. Heat 1 cup of milk and steep teabags for 10 minutes. Let cool and discard teabags.

3. Cream butter and sugar. 

4. Add eggs one at a time and beat until incorporated.

5. Add vanilla and mix well.

6. In a separate bowl, combine flour with baking powder. 

7. To the creamed butter, add ⅓ flour followed by ½ tea milk and repeat until all combined.

8. Pour/spoon into Bundt and push the batter away from the centre funnel to the rim to avoid peaking.

9. Bake at 177 deg C (350 deg F) until baked and skewer inserted comes out clean.

10. Put pan on cooling rack for 10 minutes. Invert the cooling lack onto the pan and tightly clamp it on. Invert and allow cake to completely cool on the cooling rack.

11. Dust with icing sugar if using.

Saturday, July 08, 2023

Dark chocolate pear and walnut bundt

I have been craving a pear and walnut chocolate cake, don't ask me why. The caveat was that I needed to use my bundt so after looking around, I settled on this recipe by Sugar Love & Spices for Ciambella dark choc, walnut and pear cake. (no video - I wish there was because I don't know if I'm doing it wrong!)

Ingredients

100g milk

60g dark chocolate, chopped

125g sugar

3 eggs

120g butter, room temp

135g flour

30g cocoa

Pinch of salt

¼ tsp cinnamon

Pinch of cardomon (optional but I had it)

4g (1 tsp) baking powder

70g walnut, toasted and chopped

1 pear, peeled and cubed


Method

1. Prepare the bundt tin by oiling and flouring or covering with goop. I took the extra step of sifting on cocoa powder.

1. In a small pot, heat the milk and sugar until dissolved. 

2. Add the chopped chocolate and mix until dissolved. Do not let the mixture boil. Set aside to cool slightly.

3. Add the eggs one at a time and whisk to incorporate.

4. In a bowl, mix the dry powered ingredients: flour, cocoa, salt, cinnamon, cardomon, and baking powder. Mix well and set aside.

5. In a KA bowl, beat the butter until pale and fluffy. Scrape down.

6. Drizzle in the chocolate mixture at the side of the bowl slowly. Beat. The mixture will be clumpy and appear to seize up, do not panic.

7. Add the flour mixture 3 or 4 tbsp at a time and beat in at Speed 2. Once the flour has been mixed in, turn up to between Speed 4 to 6 but do not overbeat.

8. Fold in the chopped walnut and pear. The batter will be quite thick, like muffin mixture.

9. Spoon in the mixture and make sure to push the batter to the sides rather than near the funnel (otherwise the cake tends to peak in the centre). Bang the ban on a (protected) countertop to dispel air bubbles.

10. Bake for 180 deg C for 35 to 45 minutes. (mine took 34 because the oven temp was quite constant today but even then it was probably a bit over-cooked. 32 might have been enough)

11. Let the cake cool in the tin for at least 15 to 20 minutes. Then, put a serving plate tightly over the cake tin and invert. The cake should slide out easily if you prepared the tin correctly!

12. Store outside the fridge in an airtight container for up to 3 days.

Recipe feedback

- This yields a smaller cake than the previous chocolate bundt. It is not sweet but feels very dry even fresh out of the oven.

- The liquid goop (microwaved till runny) dusted with cocoa was a good idea in terms of looks.

- The batter was more muffin-like so it was very holey compared to the previous cake. However, nothing a dusting of powdered sugar can't solve!

- The cake tastes best the next day when it's less crusty and dry straight out of the oven. It stayed moist up to 2 days after, kept at room temp. I put a cup of water in with the cake in the airtight box and it really helped the cake stay moist!

Monday, July 03, 2023

IP One-pot Macaroni and cheese (not baked)

Comparison recipes using one pot and not baked mac and cheese:

Centrecutcook (includes video)

- evaporated milk, cheddar and cream cheese, other cheese optional, butter

- no roux

- 4 minutes and quick release. If package cooking time is less than 6 minutes, then pressure cook only 3 minutes.

- Add bacon or sausages etc.

Damn Delicious

- Double cream, cheddar and parmesan

- no roux

- 6 minutes and quick release

- Add veg.

Amy and Jack (includes video, tried below)

- Evaporated milk, egg, butter, cheddar

- 4 mins and gradual release (intermediate between quick and not natural release). 

- To derive cooking time: take package time/2 - 1 on high pressure with gradual release.

- no roux but uses keep warm to cook the egg and melt cheeses

I decided to mainly A+J which is the most complicated recipe but also looks the most delicious, but adding ideas from the rest!

Ingredients

454g macaroni or similar pasta

1 l (4 C) water

4 tbsp butter

397g sharp cheddar, grated (not package)

170g cream cheese

Salt and black pepper to taste

2 large eggs, beaten

1 tsp mustard powder

1 tsp hot sauce

1 tsp onion or garlic powder

355ml evaporated milk (I substituted with double cream and milk)

4 tbsp butter

Optionals: 1 cup frozen veg and 1 cup cooked bacon

Method

1. Pour macaroni and water into the pot. Add salt to the water.

2. Seal and cook for 4 minutes (or follow formula above based on package) on high pressure.

3. In the mean time, mix the cream, milk, mustard and onion or garlic powders, and 1 tsp hot sauce if using.

3. Unseal and gradual release. Turn on the keep warm. There should be no more than ¾ water left, drain any excuess.

4. Add the butter and mix well.

5. Pour in the egg mixture and mix well. If adding frozen veg or cooked sausages and bacon, add it now.

6. Add in the cheeses, ⅓ at a time and stir until fully melted. 

7. Check for seasoning and top up if necessary. Serve immediately. 


Saturday, July 01, 2023

Mocha bundt with walnuts

This is the base recipe by King Arthur which I adapted because I wanted to use up my walnuts. No KA needed.

Ingredients

Cake

1 C (227g) coffee

227g butter, room temp

¾ C (64g) cocoa (dutch processed or natural)

2 C (397g) sugar

¾ tsp baking powder

⅓ tsp baking soda

¾ tsp salt

2 C (240g) flour

2 tsp vanilla extract

2 large eggs, room temp

½ C (113g) sour cream or yoghurt, room temp

Glaze

⅓ C (113g) chocolate chopped or semi-sweet chips [weight measurements seem wrong, double check]

¼ C (57g) heavy or whipping cream [weight measurements seem wrong, double check]

½ C toasted walnuts, roughly chopped

Straight out of the tin

Drizzle on granache

After painting with granache in poor light

After painting with granache in good light

After cutting off the broken bits

Method

1. Prepare a bundt pan with goop.

2. Put coffee, butter and cocoa in a pan and whisk until butter melts. Alternatively, use a microwave. Set aside to cool.

3. Put sugar, baking powder, baking soda, salt, and flour and mix well. 

4. Toss the walnuts in the flour mixture to coat well.

5. Pour the chocolate mixture into the dry ingredients and mix well.

6. In a separate bowl, whisk eggs, vanilla, sour cream/yoghurt. 

7. Pour in the chocolate batter and mix well. 

8. Spoon batter into the prepared bundt pan to prevent air bubbles. Lightly tap on the countertop to dispel air bubbles. Fill the bundt to about ⅔ way or about 1¼ inch from the top. Use a spatula to spread the batter so that sides are higher than center. DO NOT OVERFILL. Pour the excess into cupcake liners.

9. Place on lower oven rack. Bake for 50 to 55 minutes at 175 deg C (I needed the full 55 minutes because the oven went down to 180 then down to 150) until long toothpick comes out clean, start checking about 8 minutes before total time. (Check dark pans around 40 mins). Leave in tin for 10 minutes before the inverting out onto a baking rack. Allow to cool completely.

10. Make the glaze. Heat up cream in pan on medium heat or in microwave bowl. Cream should be bubbling along the edge. DO NOT BOIL.

11. Pour the cream over the chocolate (in a heatsafe bowl) and let sit. DO NOT TOUCH. Then after 5 minutes, use a metal spoon only, stir from the edges to the middle until chocolate melts. Cool for 15 minutes to thicken to pouring consistency. 

12. Put the cake rack over a pan to catch dripping chocolate. Spoon the granache over the cake and let it drip down the sides. 

Recipe feedback: 

- The sugar seems like A LOT but it's necessary because of the chocolate, coffee, and sour cream. Do not reduce by more than 20 g.

- The goop was very obvious with the floury streaks. It looked better after I painted it with granache using a pastry brush.

- The fins were very crunchy straight out of the tin. A bit dry in fact but the rest of the cake was ok, very moist.

- Do not keep in the fridge overnight, it becomes dry and hard.

- The glaze weight measurements seem wrong, may need double checking. In the end I used ⅔ C choc chips and ½ C double cream otherwise there is insufficient cream to melt the choc.

Chocolate comparison recipes

Here are a list of comparison recipes for Bundt pans, to celebrate my new 10 cup or 2.6l bundt! I've chosen those that use the KA rather than the mix wet with dry method that muffins often use, because I want a moist cake rather than a light fluffy one. Bundt care from Williams Sonoma.

Goop recipe for lining the pan: Food Network goop

Walnut, chocolate, and pear

Sugar love spices: 10 - 12 cup bundt (tried here)

- Flour, baking powder, cocoa, milk, butter, dark choc block.

Giallozafferano: 9 inch round

- cake flour, powdered yeast, dark choc chips, oil, milk, lemon juice


Walnut and chocolate

Green Thumb Foodie: 9 inch round (not bundt)

- Flour, baking powder, cocoa, veg oil, milk

Alpine Ella: 8 inch square (not bundt)

- Flour, baking soda and baking powder, buttermilk, coffee, cocoa, veg oil 

- sour cream only if making frosting

Wholesome Pastisserie: 8 inch round (not bundt)

- Flour, baking powder, coffee, cocoa, butter and olive oil

- Choc block and heavy cream only if making granache


Mocha

RecipeTinEats easy choc fudge cake: 9 inch round (not bundt)

- Flour, coffee, Cocoa, baking powder, boiling water

- Choc and heavy cream only if making granache


Chocolate bundt

Baker by nature: 10 to 12 C bundt

- Flour, baking powder, Cocoa, coffee, butter and oil, brown sugar, sour cream

- Choc block and heavy cream if making granache

Two peas and their pod: 10 to 12 C bundt

- Flour, Cocoa, baking soda, sour cream or yoghurt, butter

- Choc block, heavy cream, and corn syrup only if making granache

Fool proof living: 10 inch bundt (aka 10 - 12 C)

- Flour, cocoa, baking soda, sour cream, butter

- Choc block, heavy cream, honey, and nuts for glaze

Williams Sonoma: 10 C bundt

- Flour, cocoa, semisweet chocolate, sour cream, baking soda, boiling water, butter, brown sugar

- Choc block, butter, heavy cream for granache


Mocha bundt

King Arthur: 10 to 12 C bundt (tried here) - no KA

- Flour, Cocoa, coffee, baking power and baking soda, sugar, sour cream or yoghurt

- Choc block and heavy cream only if  making granache

A pretty life in the suburbs: 10 C bundt (my exact model) - similar to above but uses mixer

- Flour, coffee, cocoa, baking powder + baking soda, oil, yoghurt

- No glaze


Hokkaido milk bread loaf