Tuesday, December 28, 2021

Chocolate castella cake

Since this post that compares the different type of castella cakes, I have tried the standard recipe here. It came out mostly successful but the bottom was gummy. Y suggested that it was because my oil hadn't been heated up high enough, and I think it was because I didn't follow the steps correctly. 

I was making halfway when the electricity went out and so stalled after the flour had been beaten into the yolk. Luckily no ill effect.


That was a recipe for 7 eggs in a 8" square pan. I looked around and most other recipes were either 5 or 6 eggs in the same size and shape pan. I decided to adapt 3 recipes for this attempt, mostly based on how spongey the final product looked in the video. The methods were mostly the same except one added the egg yolks before milk, another added the milk before the yolks, and a third didn't even have any yolks. The baking temps and timings were mostly consistent at 150 deg C but I thought I'd increase by another 2 minutes given my experience with uncooked bottom the last time.

Sources: Laura's Kitchen, Apron, and Table Diary. This recipe largely follows the ingredients from Apron but the methods from Laura's Kitchen and Table Diary.


Ingredients (20cm or 8 inch square tin)

6 eggs, separated

70ml oil

28g cocoa powder

60g cake flour

90ml fresh milk, fridge cold

½ tsp vanilla

¼ tsp salt

75g sugar

splash of lemon juice

Method

1. Separate the eggs when cold. If possible, put the egg whites back into the fridge to chill.

2. Prepare the tin by lining outside with aluminium foil and the inside with parchment.

3. Bring the oil up to between 70 to 80 deg C. I found that heating it for about 1 minute on high already brought it up to 100 deg C (!) so heat on low fire for approx a minute and check with a thermometer. Don't guess cos you won't guess correctly!

4. Sift the flour, cocoa powder, and salt into the oil. Mix well with a spatula.

5. Add half of the cold mix and mix, follow by the other half. Ensure no lumps remain. The mixture may be claggy at this point, that's normal.

6. Add one egg yolk at a time and combine well. At the end of the all the yolks, the mixture should be silky smooth. Set aside.

7. At speed 2, beat the egg whites with lemon juice until foamy. Add the sugar in 3 batches and turn up to speed 4. Once all the sugar has been added, increase the speed to between 6 to 8. Just before it reaches soft peaks stage, turn down to speed and beat for 1 minute to remove the big air bubbles.

8. Add ⅓ of the meringue into the chocolate batter. You can be rather rough and not worry about the air as  the point at this stage is to lighten the chocolate batter and to mix it well. 

9. Add the next ⅓ of the meringue and use either a whisk or spatula to fold well, taking slightly more care not to knock out all the air.

10. Pour the batter back into the remaining ⅓ of meringue and this time, slowly but carefully fold until no more white streaks remain.

11. Pour into the prepared tin. Drop the tin onto the countertop from about 5 cm heigh to knock out the air bubbles.

12. Place the tin into a larger tin, and pour hot water into the larger tin. (I didn't bother with this step because I had put the larger tin and room temp water in the tin to pre-heat in the oven, and sat a rack on the larger tin. So when the oven was sufficiently hot, I put the smaller tin on top of the rack of the larger tin) Ensure that your foil is above the water line so that no water goes into the cake tin.

13. Bake at 150 deg C for 62 minutes. Remove from oven and de-pan. Remove the parchment. Allow to cool down before carving.

Recipe feedback: 

- I could do with another say 10g of sugar as it wasn't as sweet as I'd like, but this is a Korean recipe and maybe they're less into sweet stuff? Who knows. I chose this recipe because it had the lower amount of sugar compared to the rest so I should have expected this. But I can live without the additional sugar.

- The recipe is perfect! The additional 2 minutes just EXACTLY dried out the cake without making it dry.


Friday, December 24, 2021

Choc chip, fruit and fruit cookies

Been looking for a simple recipe that doesn't involve too much technique. The hardest part about this recipe was assembling the ingredients - that took me 45 minutes (excluding grocery shopping!) The whole process took close to 3 hours but only because I was waiting for the butter to come up to room temperature. 

Recipe from https://rasamalaysia.com/chocolate-chip-cookies-recipe/ I have adapted the method and added ingredients.

Ingredients (Makes 42 cookies)

320g flour

80g corn starch

2 tbsp cocoa powder

¼ tsp baking soda (it is important to measure or you'll end up with soapy tasting cookies!)

½ tsp vanilla extract

pinch of salt

250g butter, softened

120g fine white sugar

100g brown sugar

2 eggs, lightly beaten (room temp is best)

250g choc chips (I made the mistake of using melting chips which melted at summer room temps. Urgh. I used raisins and choc chips to make up 250g in total)

100g chopped almonds

Method

1. Combine the flours, cocoa powder, baking soda, and salt. Use a sift if desired. Set aside in a bowl.

2. In a stand mixer bowl, combine the butter and sugars. Cream them at Speed 6 for about 4 minutes, stopping every 30 seconds or so to scrape down. Cream until paler in colour and the sugar grains are no longer discernible. If you don't have a stand mixer, creaming by hand is fine. Finally, add the vanilla.

3. Pour in the beaten egg a little at a time and continue to beat.

4. Sift in the flours and stir into the batter.

5. Stir in the choc chips (and raisins if using), and chopped almonds. Reserve a few choc chips and nuts for decoration.

6. On a prepared baking parchment, dollop on the cookie dough. Decorate with leftover choc chips and nuts. I used a cookie scoop (about 1 tbsp each). Ideally, if time permits, put the dough in the fridge for about 20 minutes to make it easier to work with. Roll into tall cylindrical balls so that the cookies hold their shape better.

7. Bake at 200 deg C for 10 minutes for soft cookie and 12 minutes for crunchier cookie. The cookies don't really spread in the oven so they can be placed more closely together on the parchment.

8. Remove from oven and let the cookies cool on a rack (they crisp up) before consuming.


Recipe feedback - The cookies weren't too sweet so no need to reduce the sugar. 


Monday, September 20, 2021

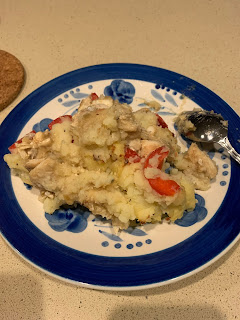
Fisherman's pie

I have known about this recipe since about 20 years ago when I was first introduced to it in the UK. It is one of their 'traditional' fares but I have never made it because I have never found the right fish or had leftover mashed potato.

I finally had one too many potatoes in the fridge and decided to try my hand at this pie. It also just happened that I had bought some frozen fish fillets.


Not very appetising looking but tastes delish


Ingredients

7 to 8 frozen fish fillets, cut into chunks (allow to thaw a little to facilitate cutting)

2 tbsp corn starch

4 potatoes, peeled and cubed

1 capsicum, cubed

2 tsp curry powder (or whatever preferred seasoning)

2 tbsp of butter

1 tsp chicken stock powder

Salt, white and black pepper to taste

Method

1. Prepared the mashed potato. Bring cubed potatoes to a boil with enough water to cover. Takes about 10 to 15 minutes once the water is boiling. Be careful, it will overflow!

2. While potatoes are cooking, prepare the fish. Line a shallow baking tin. Add in the cubed fish fillets and toss in corn starch, salt, white pepper, and curry powder. Ensure that the fish is laying in a single layer.

3. Top with capsicum, again laid in a single layer. 

4. Place into the oven and bake for 15 minutes at 180 deg C until the fish is semi-cooked.

5. Once potatoes are fork tender, drain. Mash with the butter, chicken stock powder, salt, and black pepper. 

6. Spoon over the mashed potato on top of the capsicum and smooth the top. Draw designs with a knife or fork. The more nooks and crannies, the most crispy!

7. Bake for 20 minutes at 200 deg C. If the mashed potato has not turned golden brown, turn on the grill and grill on high for about 5 minutes.

8. Serve immediately!


Pandan juice and paste chiffon

I have tried real pandan juice chiffon  and the colour was always a bit anemic yellow and not entirely fragrant. I decided to top up with paste and also make this a taller 7 egg cake rather than 6 eggs.


Ingredients

7 eggs, separated

150g sugar (120 for whites, 30g for yolks)

58ml coconut oil or corn/sunflower/canola oil

105ml coconut milk

77ml pandan juice

4 to 5 drops of pandan paste

168g cake flour

½ tsp salt

Method

Follow standard instructions for making chiffon cake (refer to recipe link above).


Saturday, September 18, 2021

Gula melaka agar

This works because of science! I didn't set out to make a jelly with the distinct two layers but the densities separated on their own.

Ingredients

Juice of 10 to 15 pandan leaves, topped up with water to make 500ml

¾ block of gula melaka

1 can of coconut milk (approx 400ml), topped up with water to make 500ml

1 packet of Swallow brand agar agar powder


Method

1. To extract the juice of pandan leaves, add just enough water to a blender to pulverize 10 to 15 pandan leaves, snipped into short lengths. Pour into a container lined with cheesecloth and allow to drain. Squeeze out any remaining juice and discard the dredges. Leave the juice to separate. More sediment will settle at the bottom.

2. Top up both the coconut milk and juice with water to make 500ml each.

3. Pour the coconut milk into a saucepan and add the gula melaka. On a medium flame, slowly rotate the gula melaka to melt until completely dissolved. If the coconut milk seems to be starting to boil, pour in a bit of the pandan juice.

4. Once completely dissolved, pour in the remaining pandan juice and add the agar agar powder. Stir to dissolve and ensure no lumps remain.

5. Bring to a boil. Once it starts to foam, switch off the flame.

6. Pour immediately into a prepared jelly mold. Prepared means to wet the mold so that it's easier to remove later.

7. Allow to cool completely before putting in the fridge to chill, at least 4 hours or overnight if time permits.

Saturday, September 04, 2021

KA Pork bun 肉包

Finally found the prefect recipe. And it was off the bao flour packet! Can't go wrong with this. Recipe was originally for 350g of flour but I wanted to use up all 500g of flour so have adapted accordingly.


Recipe (makes 20)

500g bao flour

¾ C warm water (approx 40 deg C)

5 tbsp milk

1 tbsp instant yeast

1¼ tbsp oil

3 tbsp sugar

½ tsp salt

Meat filling

750g minced pork

½ tbsp sesame seed oil

1 tbsp corn starch

¼ tsp salt

1 tbsp light soya sauce

Dashes of pepper to taste

½ tbsp minced ginger

2 chopped scallions

Method

1. In the KA bowl, mix the flour, warm water, milk, yeast, oil, and sugar. Combined until no more dry spots. Add more water if necessary to combine.

2. Turn on the KA at Speed 2. Beat for a while until everything leaves the bowl then turn up to Speed 4. Beat for about 7 to 9 minutes until the bowl is clean. You should be able to stick your finger through the dough and leave a clean edge rather than a jagged one.

3. Remove the dough hook. Oil the bowl and put the ball of dough back. Cover and proof until the dough has doubled in size, approx 45 to 60 mins at 23 deg C.

4. While waiting for the dough to proof, prepare the filling. Add everything into a mixing bowl and mix well. Mix well with a wooden spoon or pair of chopsticks and stir in one direction only until the meat mixture is sticky. Cover and refrigerate.

5. Cut out parchment squares for the baos to sit on, or prepare the steaming basket.

6. Divide the dough and meat into 20 equal portions. I kept half of the dough in the fridge so it wouldn't proof so fast. Roll and wrap each of the buns. Seal tightly so that the meat is not exposed. This equates to approximately 1 chinese tbsp of filling per bao.

7. Place the wrapped baos on the parchment and into the steamer basket. I'm using bamboo, so around 5 bao per steamer. Cover and allow to proof for 40 minutes.

8. Towards the last 10 minutes of proofing the first batch, warm up the wok and bring to a rolling boil. steam for 10 minutes. Once you can see the steam escaping from the top lid, turn down the flame to medium. After the 10 minutes, switch off the flame and let the buns rest for 2 minutes.

9. Allow to cool fully on a cooling rack before storing in the fridge.

Recipe feedback

Everything about this recipe was spot on! It really helps to use the correct flour and also the recipe that comes recommended. The size of the buns was also correct. 

- The buns were easy to work with and came out very fluffy. However, the pleats would not stay, so it was easier to just make the buns as round as I could.

- It's important to shape the filling into a nice slightly peaked dome ball as this helped to hold up the bun's dome.

- My bun skin wasn't smooth but that's probably due to over-proofing during the first session and insufficient deflating, and maybe an overly high steaming temperature. But one battle at a time.

Saturday, July 17, 2021

Taiwanese style Pandan Castella

Recipe from Emojoie (watch the video). Comes with a very good video! (See my Taiwanese and Japanese comparison list of recipes)

Ingredients (for 20cm or 8 inch square pan)

115g cake flour

115g butter or oil

115g milk

7 eggs, separated

1 tsp vanilla extract

115g sugar

½ tsp pandan essence

Whipping cream (optional)

Method

1. Separate the eggs. Bring everything to room temperature. Prepare the tin by lining the outside with foil (as it will go into a water bath) and inside with parchment. Ensure that the height of the inside parchment is 9cm tall.

2. In a saucepan, gently melt the butter and milk. Bring up to 50 deg C.

3. Pour the mixture into the sifted cake flour. Beat with whisk while still warm.

4. Add the egg yolks one at a time and beat. 

5. Add the vanilla and mix in.

6. Beat the meringue with all the sugar. Towards the end, turn the speed down low so that the bubbles are smaller. Beat until soft peak.

7. Pour the yolk mixture into the meringue. Use a whisk to gently fold in as you rotate the bowl. Finish off using a spatula to fold in to ensure no more white streaks remain. This also bursts the big bubbles.

8. Pour the batter in from a height. Use a spatula to push the batter into the corners and flatten the top. Shake the batter so that the big bubbles burst.

9. Put the cake tin in a bigger baking tin and pour 80 deg C water until about ⅓ up the side of the cake tin.

10. Place in the oven and bake at 150 deg C for 65 to 70 minutes.

11. Remove from the oven and the bath. Remove the paper while it is still hot. The cake will begin to deflate slightly.

12. Can be cut and served while still warm. Serve with whipping cream in between if desired.

Try 1:

Top was perfect! Spongy and light. Smooth surface with no cracks. But inside was uncooked. I did 65 minutes and used the Breville oven. I may need the full 70 minutes.

- Sugar level was ok. However, really very eggy tasting despite the ½ tsp pandan essence.

- Only difference from Breville Japanese souffle cheesecake is that I had to wrap the bottom of this pan with foil because it had a removable base. However, with both, I used cold water which I pre-heated with the oven. I put a grill on the outer pan and kept the water level below the grill. Maybe if I wrap the pan, I do have to use 80 deg C water as the recipe suggested.

- Perhaps too my method was off. 1) I didn't heat oil and milk until 50 deg C, only 40 deg C. 2) I beat the yolks then added the melted butter and milk (instead of other way round), and (3) beat the flour in (instead of pouring the yolk mixture into the flour and folding). 

- I followed the recipe of pouring the yolk mixture into the meringue and folded in, although I used (4) a spatula rather than whisk initially. Maybe all together I was too heavy handed. Next time I should follow the regular method I use for cheesecake where meringue is mixed in 3 batches.

- According to Y, temp of milk and oil are not high enough, causing the oil to separate from the mixture. Makes sense!


Sunday, July 04, 2021

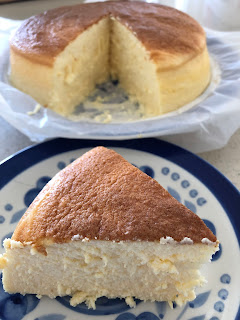
Japanese cotton souffle recipe (improved)

I have tried making the Japanese cotton cheesecake so many times but it never succeeded. I realised it has less to do with the recipe than the oven! I decided to use my new-ish Breville air fryer oven because I have never used the bake function, and the blogger's oven looks like the older version of my oven.

Karen Ling: https://www.youtube.com/watch?v=Vl4gg-0b7Zo

It is a 100% success! A lot has to be said about using digital ovens. I am never going back to my conventional analog oven for this cake.

Ingredients (fits 8 inch cake springform tin)I

250g cream cheese, softened

80 unsalted butter, softened

50g whipping cream

150g fresh milk

5 eggs, separated

35g corn starch

100g sugar

2 tsp vanilla extract

¼ acid eg lemon juice or white vinegar


Method

1. In a bain marie, melt the cream cheese and butter. Add the whipping cream and fresh milk and mix until smooth and no lumps remain. Turn off the heat and take the pot off the heat. 

2. Add the egg yolks and mix with a whisk until smooth. Add the vanilla extract and combine.

3. Sift in the corn starch and fold in. Set aside.

4. In a really clean bowl, add the egg whites and acid. Whip up the meringue until soft peaks (approx 5 minutes on KA speed 6) by separating and adding the sugar in three batches. 

5. Dollop ⅓ of the meringue into the cheese mixture and mix well, no need to be too careful with bursting the air bubbles. 

6. Add the next ⅓ of the meringue but this time, fold in gently with a whisk. 

7. Pour the entire cheese mixture into the remaining ⅓ meringue. Fold gently with a whisk, then change to the spatula and fold, enduring no more white streaks.

8. Pour into a 8 inch springform with the bottom lined with parchment. Line the outside of the pan with foil to prevent water seepage. I didn't because I clipped the parchment into the tin, and also put a rack in tray of water so the water level was below the parchment. Use the spatula to flatten the surface and draw strokes in the batter to dispel air bubbles. Lightly tap the tin on the counter top to burst big bubbles.

9. Preheat to 175 deg C. Fill the bottom tray with about ¼ inch water. Put in the tin.

10. Turn down and bake at 150 deg C for 30 minutes. Turn down to 130 deg C and bake for another 30 minutes. Then turn off the heat and let the pan sit inside the oven with the door closed for a further 30 minutes.

11. Unmold the cake and let it cool, then store in the fridge for at least 4 hours. Serve up.

The blogger also used a mirror pectin glaze, which I didn't bother with.

Recipe feedback

Recipe is perfection! Top was smooth (other than my failure to properly flatten the top of the batter). I might have been able to use the mirror pectin to hide the craters. No cracks on the top and nice golden top. No unexplained 'waist' on the sides. Inside was cooked through. The use of corn starch instead of cake flour meant very smooth mouth feel. It wasn't too sweet.

- Update: Kathrine Kwa suggests using room temp water about ¼ up side of round tin that has the cake in it. Bake 150deg C for 90 mins, then turn off oven. Crack open door and leave inside to rest for 30 mins before removing from oven and then tin. Nothing mentioned about dropping tin on counter.

Wednesday, May 19, 2021

Fried Bak Teow (Beancurd rolls)

I first tried to make this and air fry it but it was never successful because I had the wrong type of beancurd skin. Adapted the Spice and Pans recipe including the correct method of wrapping. 

(Turn on the sound!)

Ingredients
1 packet of beancurd skin, cut into rectangles
500g minced pork
300g prawns, cut into 4 to 6 pieces
2 tsp five spice powder
3 carrots, cubed
250g canned bamboo, cubed
250g canned water chestnut, cubed
½ red onion, chopped
2 eggs, beaten + 1 for brushing
Pepper to taste
Salt to taste
3 tbsp corn starch

Method
1. Other than the beancurd skin, mix minced pork and prawns with the beaten egg. Mix in one direction only until sticky. Add the cornstarch and mix well. Set aside to marinate for minimum 1 hour.
2. Prepare the vegetables. When ready to wrap, add to the meat mixture
3. Prepare the beancurd skin. Wipe down with a damp cloth or paper towel to make it more pliable.
4. Wrap according to the video. Use about 1.5 tbsp of mixture (depending on the size of the beancurd sheet that you've cut) and flatten. Then seal sides and wrap the edge of the skin over the mixture and pull it into a roll.
5. Seal with egg.
6. Deep fry or shallow pan fry at 180 deg C for 4 to 5 minutes until golden brown. 
7. Serve immediately.

Saturday, March 27, 2021

IP Braised Chu Hou beef brisket

More autumn flavours. Minimal fuss, I didn't even bother to blanch first. Finally found the correct method for getting melt in the mouth brisket and without getting mushy veg!

Ingredients

1kg beef brisket

2 tbsp chu hou sauce

2 tsbp oyster sauce

1 tsp sugar

2 tsp white peppercorns, toasted and crushed (put in a tea bag)

2 to 3 tsp soya sauce (to taste)

2 slices ginger, thinly julienned

4 cloves garlic, minced

2 spring onions, chopped + 1 for garnishing

1 bell pepper, chopped

2 tomatoes, chopped

1 tbsp tomato paste

1 beef bullion cube, crushed

2 tbsp corn flour + 2 tbsp water to make a slurry

Method

1. Marinade the beef with the chu hou, soya sauce, and oyster sauce. Leave overnight.

2. In the Instant Pot, saute the aromatics. 

3. Add a trivet and pour in 1.5 C water (I pour the water into the marinating bowl to wash out the leftover marinade). Put beef brisket on top of the trivet. Cook using the Meat function for 50 minutes.

4. Remove the brisket and let it rest. Once rested, slice it up.

5. While waiting for the brisket to rest, make the sauce. Add the beef bullion cube and tomato paste. 

6. Add the tomatoes and bell peppers. Use the Saute function. and let the sauce reduce to about half. Do not cover.

7. Once the sauce has reduced and the vegs are cooked (no more than 5 minutes), add the corn starch slurry to thicken up the sauce.

8. Serve up and garnish with more spring onion. 

IP Pumpkin soup

My colleague gave me a quarter of a kent pumpkin from her mom's veg patch and I put it to good use. With the cool weather of autumn starting, it was a great time to detox with a good veg soup! The magic ingredient is galangal!

Ingredients
¼ pumpkin, skinned
4 medium carrots, sliced
2 medium potatoes, cubed
1 can butter beans, drained
¼ C barley
1 packet store bought chicken soup (or use veg soup to keep it vegetarian)
Water
2 slices of galangal
2 slices of ginger
4 cloves garlic
2 spring onions, sliced
2 tsp white pepper
200ml double cream
chives, chopped (for garnish)


Method
1. Prepare the vegetables. 
2. Toast the white peppercorns and then crush with pestle and mortar.
3. Saute the garlic, ginger, galangal, and spring onions. Add the chopped veg and briefly saute.
4. Pour in the stock, add the crushed white peppercorns (i use a disposable tea bag).
5. Set on soup for 20 minutes. Naturally depressurise.
6. Using the Saute function, pour on the cream and bring back to the boil. Reduce if required.
7. Run through either with an immersion blender or I just used a potato masher to leave it more rustic.
8. Garnish with chopped chives and serve immediate.

Monday, February 15, 2021

BBQ Bak kwa

I've tried bak kwa on several occasions (in 2012 and 2018) but it was never perfect. It never tasted correct as in it tasted like bbq meat and while that was nice in itself, it was not bak kwa. Ingredients from Burning Kitchen and method from Lazy Awesome Dad and adapted for the amount of meat we had. The bacon was my suggestion.


Ingredients

500g minced pork

200g maple smoked bacon

10 tbsp sugar

2 dashes of pepper

1½ tbsp Chinese rose cooking wine

¼ tsp five spice powder

1 tbsp oyster sauce

2 tbsp dark soya sauce

1 tbsp light soya sauce

2 tbsp honey

1 tsp sesame oil

Glaze

1 tbsp hot water

2 tbsp honey or maltose

Method

1. Chop up the bacon into little pieces. In a food processor, process the bacon until ground.

2. Mix the bacon and the minced pork. Add all the ingredients and mix very well. Use a chopstick and mix in one direction only until sticky.

3. Cover and refrigerate to allow it to marinade for at least 8 hours or overnight.

4. The next day, put parchment onto baking tray. This is very important otherwise clean up will be impossible.

5. Measure out the parchment of paper and double that. Fold in half and score the end. Open the parchment and put on ⅓ of the mixture. Close the parchment on top and using a combination of your hands and the rolling pin, roll it out to about 1 to 2mm thick (see Lazy Awesome Dad's video). Try to avoid rolling until the ends and leave a gap at each end. Once you're done, transfer onto the parchment and lift off one half of the parchment and cut it off. Repeat for the other 2 trays.

6. Bake at 175 deg C for 7 minutes. Use a pizza cutter and cut into slices, around 10 by 10 cm. Flip. 

7. Return to cook for another 10 minutes but swap the upper and lower trays going back into the oven. 

8. To really create that BBQ flavour, it has to be grilled on the BBQ. Brush with the diluted honey/maltose glaze and flip until nicely charred. Serve immediately.

Side by side comparison of glazed and bbq (below) vs non-glazed from oven


Friday, January 01, 2021

Air fried har cheong gai (prawn paste chicken)

I love prawn paste chicken but fried HCG isn't healthy. I've tried multiple recipes and methods including oven frying with different marinades, as well as different coatings i.e., baking soda coating and panko. All these recipes used a dry, usually flour, coating and then baking but nothing worked well. They also left dry bits of flour that was turned claggy. I haven't come across the best marinade that isn't too salty.

Based on these experiences, I decided to try my own recipe but this time, use a batter rather than dry coating. This involves mixing egg yolk and corn starch into the marinade rather than coating the chicken, as adapted from air fried curry chicken by Miki. She has several baked prawn paste chicken recipes but based on my past experiments, they're unlikely to be what I'm looking for.

I only managed to capture a picture of the drumlets as I had finished eating the mid wings before I remembered!

Ingredients

Marinade

1.2kg wings

½ tsp oyster sauce

1½ tbsp Lee Kum Kee prawn paste

2 tbsp shaoxing wine

2 tsp corn flour

dash of pepper

½ tsp sugar

Batter

2 -3 tbsp corn flour

2 egg yolks

Method

1. Cut up the wings into drumlets and mid wings. Discard the wing tips. I used to leave them with the mid wings but it made it hard to fit everything into the air fryer.

2. Mix marinade ingredients. Allow to marinade for at least 4 hours but up to 6 hours max.

3. Preheat the air fryer to 200 deg C. Line the air fryer tray with foil then top off with baking parchment. I have tried pure foil before and it just sticks even after oiling and doesn't help with the crispiness.

4. Place wings on a lined air fryer basket. Lightly spritz with oil. Place meat side up. Do not spritz. Cook the mid wings and drumlets separately - 10 to 12 minutes for mid wings and 12 -13 minutes for drumlets, remembering to turn halfway. When turning halfway, spritz BEFORE turning that side over so that the batter doesn't stick onto the parchment or foil. Do not spritz on the top side.

Recipe feedback

- The taste was correct! I cooked the wings and drumlets separately, which meant the drumlets were left to marinade overnight in the fridge. The drumlets became slightly too salty the next day. Next time, I cannot marinade more than 6 hours.

- The yolk and corn starch yielded a very crispy batter but unfortunately, kept sloughing off the chicken skin. It pooled on the baking parchment (see picture). I wonder about spritzing with oil, does this make the surface too wet and prevent the fat in the skin from rendering and thus turning crispy?

- Next time I will try: Remove from the marinade (the raw chicken releases a lot of liquid, no doubt due to the salt content of the prawn paste too!) and wipe off excess with kitchen paper. Dredge lightly in corn starch. In a separate bowl, mix egg yolk and corn starch into a batter. Coat the dredged chicken in the cornstarch. Place meat side up on a lined tray. Halfway through, spray the chicken BEFORE turning but do not spritz the topside with oil as that seems to prevent the skin and batter from drying out and turning crispy.

Hokkaido milk bread loaf