Tuesday, March 26, 2024

Buchujeon (Garlic chives pancake)

I have tried various recipes for jeon but have never really succeeded in keeping the jeon crispy unless I used a lot of oil. For the first time ever, I have garlic chives. Based on Korean Bapseng, I added bacon. Although she uses ready made batter, she also suggests a batter with ice cold water.

Unfortunately was cooking indoors so couldn't crisp up the jeon. But the recipe works!

Ingredients

¾ C flour

2 tbsp corn starch

2 tbsp rice flour

½ tsp salt

1C icy cold water

¼ medium onion

1 tbsp light soya sauce

3 ounces garlic chives

½ tbsp gochujang (if not using bacon, use 1 tbsp for spicy finish)

4 slices of bacon, sliced

Dipping sauce

1 tbsp soya sauce

1 tsp vinegar

½ tsp sugar

pinch black pepper

Method

1. Prepare the chives by cutting into 2 inch long batons. Slice the onions.

2. Prepare the batter. It should be thin.

3. Add oil. Fry the veg until charred.

4. Pour on the batter. Make 1 big pancake or smaller ones. Add more oil to the sides if required. Press down to char. Flip and repeat 2 to 3 mins each side.

5. Serve immediately.

Saturday, March 23, 2024

Fried fish kway teow

I have been wanting to cook this for the longest time but never had the wok! So finally here it is. I didn't have fish so had to substitute with prawns and fishballs but everything else is the same.

Inspiration from I Cook I Bake I Blog and Meatman. These are the 'wet' versions. Importantly, both recipes cook the fish slices in stock so that they don't break up. Everything is blanched including the noodles. The stock is cooked with wine and soya sauce, thickened with starch slurry and this gravy poured over the noodles. These look bland - who wants to eat boiled fish?

I am attempting the 'dry' version which the fried prawns, noodles, sprouts and chives are all fried. The main highlight is the fried mackerel which I happened to stumble upon in Coles while looking for white sliced fish! 

Ok this is not exactly what I meant by san lor hor fun but it's still stir-fried kway teow!


Haven't eaten curry fried mackerel for 20 years!

The difference the char kway teow recipe is:

1. Coat the kway teow only with light soya and dark soya, no cooking caramel.

2. Marinated the pat dried mackerel in Japanese cooking sake for 10 mins. Pat dry and coat with 4 tbsp potato starch mixed with 2 tsp curry powder. Fry for 7 to 10 minutes, turning occasionally.

2. I fried the prawns (coated in corn starch) individually instead of stir frying, removed, then add the egg and scrambled, instead of sort of doing a prawn omelette. This used the leftover oil from frying the fish.

3. When I fried the noodles, I didn't use any extra oil! Just what was available from the noodles itself and also what had been used for frying the fish, oil, and eggs. Added the drizzle sauce (leftover fish marinade, 1 tbsp light soya, 1 tbsp dark soya, tsp of chicken powder).

4. I added bok choy.

Friday, March 22, 2024

Dry-style Char Kway Teow

I've always wanted to wok. However, my previous wok was unwieldly and difficult to upkeep. I decided to invest in an expensive wok, hoping it would be non-stick with usage and not too much upkeep. However, my carbon steel work has rusted and even though I've restored it, it requires continual upkeep.
Dry-style

Lo and behold, after getting Hexclad, I am finally digging into my throve of recipes to try. I haven't followed any specific recipe but worked around the key principles. My main purpose was not to be too oily (didn't end up so) and not to have the noodle break up too much. 

BONUS wet-style below.

Ingredients (serves 2)

500g fresh kway teow 

3 lap cheong, sliced diagonally

3 eggs, beaten

9 to 10 prawns

8 -9 fishballs, halved or sliced fish cake

small bunch of bu chu (8 to 10 stalks)

handful of bean sprouts (roots removed if preferred)

2 tsp of baking powder

1 tbsp corn starch

2 tsp fish sauce

2 tbsp Dark soya sauce + 1 tbsp (wet)

1 tbsp Light soya sauce

1 to 1.5 tbsp cooking caramel (enough to coat) + 1 tbsp (wet)

5 cloves of garlic, smashed

1 tbsp Hsaosing cooking wine (wet)

1 tbsp rose cooking wine (wet)

Salt and pepper to taste

Method

1. In a bowl, separate the noodles. Peel off noodle by noodle. Depending on the brand, there might be enough oil to do so, if not, heat up in microwave 1 min to loosen then peel off one noodle at a time. Do not soak in water! 

2. Prepare all the ingredients so that stir frying can be a rapid process. First, coat the noodles with light soya, dark soya and cooking caramel. Toss the noodles gently to coat and be careful not to break up. Ensure well coated and add more cooking caramel if required so the colour is dark enough. Cooking caramel is not salty (unlike soya sauce) and not very sweet so can use more.

3. Next, to marinate the prawns, coat with 1 tsp of baking powder. Leave for 5 minute then wash off and pat dry. Add the fish sauce, corn starch, dash of pepper and mix well. 

4. Beat the eggs with a pinch of salt and pepper.

5. Cut the other ingredients - slice lap cheong diagonally, smash the garlic, clean and trim the bean sprouts. For the bu chu, cut off the white ends and keep them separate. Then, cut the green stalks into thirds.

6. Heat up a wok on medium heat. When heated enough, add 2 tbsp of oil. Add the prawns and leave to cook for 1 minute on one side before flipping. After another minute, toss.

7. Pour the egg on top and leave to cook for about 2 minutes. Once the edges are dry, push the cooked egg curds to the centre of the wok so that the uncooked liquid egg is able to flow out to the edge of the wok and cook. Once prawns and egg are both ¾ cooked, remove from the wok.

8. Without adding any more oil, add in the lap cheong. Once the oil has rendered, add the garlic and fry till aromatic (about 10 seconds). Don't let them burn. 

10. Add the fish balls and stir fry until warmed up. Remove lapcheong, garlic, and fishballs from the wok.

11. Finally, add 2 tbsp of oil and pre-heat. Add the white talks of the bu chu and stir until fragrant. 

12. Add the noodles and toss to coat with oil. Allow to slightly char, turning up the heat if required but don't burn the wok! (Hexclad prefers medium high heat to high heat, when stuff starts to stick).

13. Add the leafy green stalks of the buchu and bean sprouts and toss until well mixed. Add back all the other ingredients and toss to mix well.

14. Remove from wok and serve immediately.

Wet-style (in this style, I omitted Lap Cheong)

WET-style

To make the noodle slightly more saucy and KL style, following changes are required:

1. Add baking powder to the prawns. Leave for 15 mins. Wash and pat dry. Marinade prawns in hsaosing, cornstarch, pepper and fish sauce. After 15 minute, drain the prawns and pat dry. Reserve the marinade and add 1 tbsp rose cooking wine.

2. To the kway teow and rice/Hokkien noodles, add 1 tbsp light soya sauce, 2 tbsp dark soya sauce and 2 tbsp cooking caramel.

3. Follow the same steps to stir fry as per Dry-style but strain out the noodles from the marinade and be careful not to pour the noodle marinade sauce into the wok.

4. After the bean sprouts and chives have been added to the noodles, stir fry for a few minutes. Drizzle the leftover prawn marinade and noodle marinade around the edge of the wok and continue to stir fy.

Thursday, February 22, 2024

Glutinous rice

I have tried different ways to cook glutinous rice and stir fry it. I tried the IP version several times but I never got it right. It was always too sticky. I learnt from Meatman recently that there was no need to soak the rice for so long if cooking it in a rice cooker. I decided to give it a try.


The Meatman recipe called for soaking 30 minutes. The ratio was glut rice+ jasmine rice 500g : 500ml liquid (sauces + ingredients).

I decided to try cooking with brown rice without soaking at all but using the burnt rice function on my rice cooker. Instead of following the recipe, I used the finger indication. 

The outcome? The rice was washed very cleanly but was still a bit mushy and yet the brown rice was undercooked. I switched off the electricity and left it to steam on its own in the heat. After 1 hour, the brown rice was finally just cooked but the glut rice was still too soft.

I fried it up with sauce and ingredients (mushrooms, egg, garlic) but it was still a bit too soft and sticky.

In future, I will use less water. The recommended is ⅔C water to 1 cup glut rice.

Friday, February 16, 2024

Seafood vermicelli (woon sen)

I've come across several versions of this, but this seems the easiest. I am not one for Thai vermicelli so this recipe is preferred.

Adapted from Meatman who use black pepper prawns and a claypot.

Ingredients

2 basa fish fillets, sliced

5 to 6 prawns

5 - 6 squid rings

2 cakes of vermicelli noodles

8 garlic cloves, minced

1 tsp coriander powder (or fresh roots if you have it)

200ml stock (chicken or fish) or water and stock powder

3 tbsp oyster sauce

1 tbsp Chinese rice wine

1 tbsp Mirin

1 tbsp Japanese cooking sake

1 tbsp fish sauce (divided use)

3 tbsp water

dash of black pepper

dash of white pepper

1 tbsp corn starch

½ tsp black powder, ground

spring onion (to garnish)

Method

1. Rehydrate vermicelli with warm water for 5 - 10 minutes. Do not use boiling water or the noodles will turn mushy. Drain and set aside.

2. Marinate the seafood with half tbsp fish sauce and white pepper, and 1 tbsp corn starch.

3. Marinate the vermicelli with oyster sauce, chinese cooking wine, black pepper, half tbsp fish sauce and stock powder.

4. Preheat a claypot with oil. Fry the garlic and coriander roots if using. Be careful not to burn.

5. Deglaze with water or stock. Add marinated vermicelli and toss to coat.

6. Add cayenne and black pepper and toss to coat.

7. Top with seafood, cover and cook for 2 minutes.

7. Garnish with spring onions.

Christine's recipes also has a more authentic steamed prawn with vermicelli version.

Thursday, February 15, 2024

Air Fry Har Jeong Gai (prawn paste chicken)

I have been trying to perfect my Har Jeong Gai for very long now. It started with oven baked but never very correct. While I've almost nailed the taste, the batter has always escaped me.

Now that I have an air fryer, I thought I'd try a new recipe culled from ideas off the internet. I'm not concentrating on the taste here but on the batter.

You can see two wings in the top left corner which I attempted to squash and flatten the batter and 'paint' onto the wing, they looked better

To dredge 

This chicken breading recipe is revolutionary not because it's tasty but because it reduces waste. Basically, 1 egg for every 1 tbsp of flour. I used corn starch or potato starch which I find to be lighter than flour.

To coat

It's 1 tbsp of rice flour + 1 tbsp of oil per drumlet or wing, plus one (for up to 10 wings) or two more (for more than 10 wings) of each for the road because who likes under-battered wings? The rice flour really is the game changer. Using the AF to 'fry' any other batter (other than panko) crumb will not make it crispy but in some cases, can be like eating raw flour.

The trick is to combine the rice flour and oil until it resembles bread crumbs. Then, the dredging slurry of egg and corn starch gives it the liquid that binds the rice flour + oil mixture into a light and dryish 'liquid' batter that just coats the wing and adheres to it. You can try 'painting' it onto the wing (I did) so that it is smoother than just lumpy bits of batter but other than looks, it really doesn't matter.

Then, airfry the wings skin side up at 220 deg C for 5 minutes to bind the batter to the skin. Do not turn or the batter will fall off! 

Turn down to 200 deg C and fry 8 to 10 minutes until cooked (when the skin bubbles). The oil from the skin also helps the batter to stick to the skin.

Feedback

I had originally turned down to 180 deg C for 8 minutes and it came out undercooked. The batter was just cooked but like eating uncooked bread crumbs. After re-cooking for another 2 minutes at 200 deg C, it was perfect. The batter tasted very mealy and more crunchy than crispy, but the clumpy rice batter just tasted like rice biscuit. [Temps adjusted above.]

Other recipes for future:

Noob Cook - no flouring in AF

Spice N Pans - uses baking powder and corn flour in marinade, then coat in plain flour and spritz with oil before AF (which I tried but didn't work?). His temps were 160 deg C for 15 mins then turn and 200 deg C for 3 - 5 mins. I should try these temps next time.


Saturday, February 10, 2024

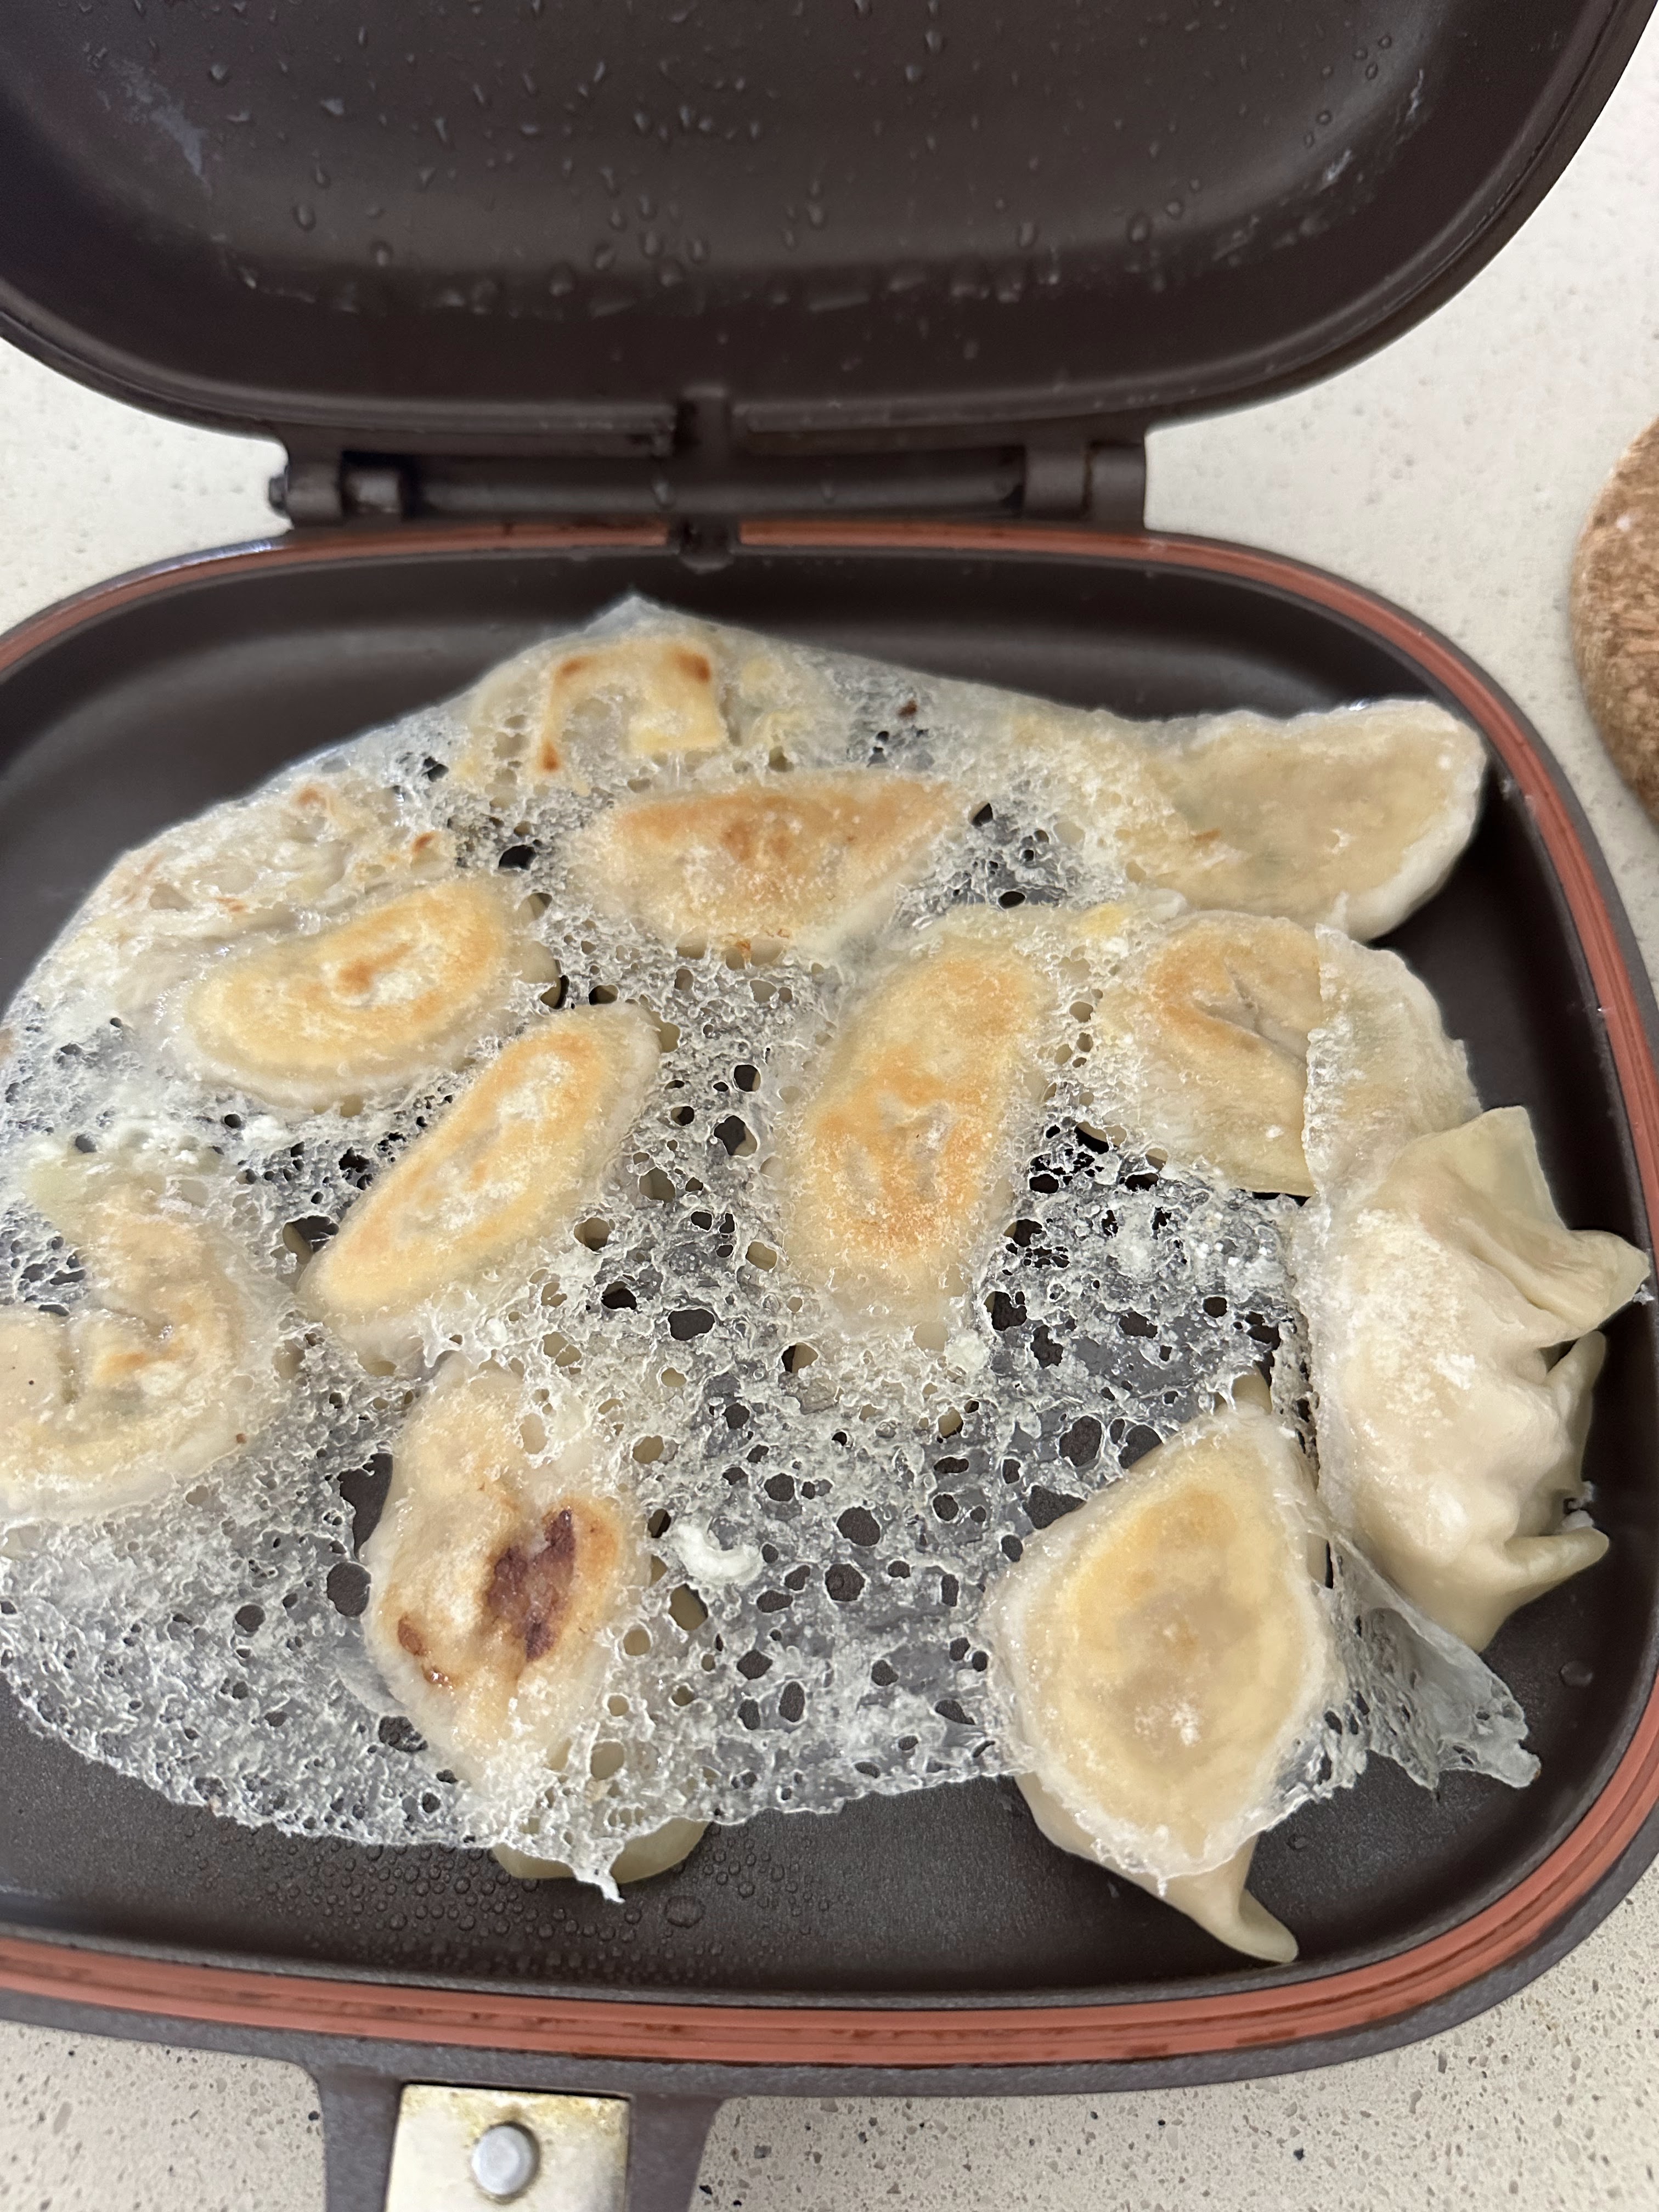
Lace skirt gyoza (potstickers), homemade wrappers and folding

This SBS recipe for has the best method (video). This Curious Nut recipe has the most standard ingredients but I've tried the method and it doesn't work for my equipment. However, it does say that the type of flour for the lace makes a difference - rice flour makes it most crispy but can mix rice, all purpose and cornstarch.

I won't go into the ingredients for dumpling and dumpling wrapper but focus on the lace-skirt/wing method. The trick is in adding the oil to the lace mixture.

Underside of dumplings with the lace skirt

Ingredients (updated for my HappyCall after testing SBS recipe)

1/3C water (approx 10 tbsp)

4 tbsp flour or cornstarch or mix of starches.

4 tbsp oil

1. Mix ingredients. Add to a squeezie bottle.

2. In a non-stick pan with a tight lid, pre-heat on medium heat. 

3. Once hot, squirt a thin later of dumpling lace. Arrange dumplings on top in a circular pattern.

(I put the dumplings directly onto the hot pan and then squirted the slurry in and around the dumplings. Seemed to work too)

4. Reduce heat to medium and clamp on the lid.

5. Cook for 6 minutes, checking every 2 to 3 minutes. 

6. Once the water has almost boiled away leaving the lace, remove the lid. 

7.  Turn down heat and cook until water has evaporated and bottom is even golden brown. Once cooked, turn off the heat, drain away the oil and invert onto a serving plate. Serve with dipping sauce.

Wrapping

1. Modern Pepper 16 styles: Includes 2 different styles of ingot and one cigar shape but otherwise all other shapes included in Souped Up Recipes. Very helpful spoken descriptions and not just demonstration.

2. Souped up recipes 24 styles: Best video ever! Includes simple pleats I've never seen before and complex pleating, also includes open-face dumplings with inserted veg (eg corn, peas, wood ear mushroom etc) that are more suitable for steaming.

2 different styles of ingots for CNY, and trying curry puff, round pasty, and leaf shapes

Homemade wrappers

Wrappers cut using third largest (left) and second largest cutters

This time I decided to cut circles so I don't have to bring out my weighing machine. It worked a treat! I had regular shaped dumplings and didn't need to leave wrapped dumplings standing for so long while I rolled out each wrapper (I usually roll and wrap, roll and wrap, roll and wrap). I am horrendous with rolling the wrappers and can never roll out into a regular round or oval shaped wrapper.

I did take extra time to roll out the dough really thinly before stamping out circles. I only rolled out half of the dough at a time and kept the unused dough and stamped out wrappers well wrapped in cling film. I dusted each wrapper with corn starch so they didn't stick to each other. I made sure not to use corn starch when rolling out the dough and stamping out the wrappers, otherwise any excess starch gets onto the dough and then it becomes impossible to recombine the dough again. 

So I had ended up with really thin skin wrappers (using the hot water dumpling recipe) compared to when I rolled out each wrapper individually. Total time taken to produce each wrapper would probably work out to be the same.

Homemade wrappers have a higher moisture content compared to store-bought wrappers, so can fold into more complicated shapes without tearing.

I used the 3 largest of my cookie dough cutters. Here's what I learnt:

- The 3rd largest cutter is tiny and difficult to work with so can only be used with shapes that start from a closed half-moon basis e.g., triangle, square, half-moon with no pleats, Chinese Ba Gwa coin, curry puff, round curry puff using 2 wrappers, ingots

- The 2nd largest cutter is slightly easier to work with without tearing so can fold shapes with simple pleats eg wavy crimp, up to 3-a-side pleats, buddha belly. Open faced shapes are possible but probably require tools (e.g. chopstick) to help make the folds.

- The largest cutter is a good size for complex pleats e.g. soup bun, 6-a-side pleats, leaf shape, and open face dumplings. The downside is that a lot of filling and dough is required.

- Note when preparing the filling: veg and other additions such as prawns need to be thoroughly drained and dried off (e.g. salting veg and squeezing out juices) and finely minced or diced. Otherwise wrapping becomes difficult and the cubed veg will tear the thin skin.

- Magic ratios: 2 cups of flour to 1 cup boiling water to 0.5 C room temp water (or less depending on how dry the flour is, stop when all the dry flour comes together. For ingredients, use 500g meat, 2 tbsp corn/potato flour, 1 egg, 1C packed prawn/seafood and 1C of packed chopped veg. Everything (both wrappers and filling) will be used up!

- Do not add oil to dough for fried dumplings. Adding oil to hot water dough means skin with oil isn't very stretchy and will tear easily. BUT if making dumpling for steaming, add about 1 to 2 tbsp of oil (to the 2C of flour) makes the skin super easy to roll very thin! On the contrary, dough for soup is just normal water and flour, do not use hot water.


Update: use oil:water:starch ratio of 1:5:2 and use a squeezee bottle.

  • Preheat pan on medium
  • Place dumplings on top (no oil!). Let sit for around 30 seconds.
  • Squeeze mixture onto and around the sides of the pan, not onto the dumplings. Use only as much as is necessary to cover the bottom of the pan with a thin layer, otherwise it becomes a corn starch flurry that will never dry up.
  • Turn down to medium low and let water evaporate, checking often
  • Whole process should take about 7 to 10 minutes. Don't clamp lid shut (use a wooden spoon to keep ajar) because water needs to evaporate.
  • Frozen dumplings from frozen work best because of extended cooking time needed to dry out and brown the lace

Monday, December 25, 2023

Apple & maple syrup glazed ham

Inspired by these two bloggers with Marion's 5-spice & blackberry ham and Nagi's ultimate glazed ham guide where she offers a simple sauce made from maple syrup and oranges, I decided to make my own based on what I had in the freezer - real chunky apple sauce and beer!

Ingredients

4 to 5 kg cooked ham (Nagi says 1 kg feeds about 5 - 6 people as a mains or 7-8 people as a side)

1 C (250ml) of water in the tray to catch the drippings (I used 1 can of beer)

Method

Prepare baking tray with rack and foil (see Nagi's instructions about how to prep the tray and how to lay the ham on top, as well as how to paste foil on extra burnt bits to prevent further burning. Also how to deco the ham and serving plate if required). I like to use parchment on top of the foil as well cos I want to use the pan juices and don't like the metallic taste of foil.

Bring ham to room temp at least 1 hour before. Prepare the glaze. 

For the maple glaze (adapted from Nagi's recipe and Marion's)

Ingredients

1C cooked apple sauce

½ C maple syrup (or honey as substitute)

½ C brown sugar

1 tsp Chinese 5-spice powder

½ tbsp mustard


Splash of Chinese rice wine

Method: Bring to a simmer in a small saucepan for 5 mins, stirring until smooth. Let cool.

Meanwhile, prepare the ham while the ham is sitting out and sauce is cooling. See either Nagi or Marion's video. If studding the ham, need about 30 cloves for deco.

To bake and glaze the ham, watch the videos.

1. In a prepared tray, pour the liquid (beer or water) into the bottom. Add the rack and ham, and adjust the level of the ham using foil underneath to prop up.

2. Baste with sauce, making sure to get into the crevices. Reserve the sauce/

3. Bake at 160 deg C in the centre of the oven (lower shelf) for 1.5 (for approx 5kg) - 2 (bigger hams) hrs, basting every 20 - 30 mins with remaining glaze and pan juices. 

4. If places are burning, gently paste on bits of foil.

5. Once out of the oven, allow to rest for 20 mins. CONTINUE TO BASTE as the sauce thickens.


Saturday, October 28, 2023

Earl grey cotton cheesecake (improved)

It's been a long time since I've made cotton cheesecakes. I went through through a whole series period in 2017 where I tried so many recipes and methods in an attempt to use my 9 inch pan. All kinds of problems occurred including cracks, undercooked or developing a waist. I read so many different blogs for troubleshooting. There were different temperatures used in a heroic blogpost where I tried 7 different methods, used double cream, higher temp baking which caused it to deflate, finally success using my small oven but with 8 inch pan but failure when I used the same oven with a 9 inch pan. I won't go into those cakes where I left out key ingredients like flour or milk which naturally, failed. This recipe is not very forgiving. In short, I haven't found a really reliable recipe or method.

Although I haven't had much success with my big oven due to poor temp control, I've realised that using the big oven is the only way to bake a 9 inch cake.

Kat Kwa's earl grey cotton cheesecake for 8 inch pan (video) - nothing spectacular aka the standard bain marie method with 5 eggs. She uses condensed milk which I don't have. She uses 3 bags of tea in 160ml hot water and steeps for 15 mins. She uses room temp water for the water bath and bakes 150 deg C for 90 mins. She uses a small oven where the cake sits in the centre but the top of the cake has at least 20cm clearance from the oven roof. The cake doesn't sit inside with the oven off. She unmoulds immediately and removes parchment after it comes out.

I am very brave in attempting to use my big oven again because I want a 9 inch cake using 6 eggs. I'm using MyKitchen 101 (video and written) standard cotton cheesecake adapted for earl grey. I'm also using Kat Kwa's cooking times of 90 to 95 min at 150 deg C instead of Kitchen101's 150 deg C for 40 mins then 140 deg C for 1 hr 20 mins and cooled in switch off oven for 40-50 mins with door ajar. My manual oven cannot change temps so fast.

Ingredients
250g cream cheese, room temp and cubed
50g butter
½ tsp salt
30g sugar (for yolks) and 120g sugar (for meringue)
3 bags of earl grey tea
150g milk (use 170g then extract out 150g milk tea)
70g plain flour + 20g cornstarch (aka 90g cake flour)
6 eggs, separated
2 tsp lemon juice

Method
1. Line a 9 inch baking pan with parchment. Prepare the tea: heat up the milk to 95 deg C and add the 3 tea bags. Steep the bags in the milk for 15 mins then extract out 150g of milk tea.
2. In a bain marie, combine cream cheese, salt, butter and first portion of the sugar and melt then blend until smooth. Remove from bain marie.
3. Sieve in flours and fold in. Set aside.
4. Add egg yolks one at a time and mix well each time.
5. In a very clean bowl, whisk up the egg whites at low speed. Once frothy, add the lemon juice.
6. Add the sugar in 3 batches and mix each time for 1 - 2 mins. Once all the sugar is in, turn up to high speed. Beat until nearly soft peaks then turn down and beat at least speed for 2 minutes to dispel the bubbles. Meringue is ready once shiny and peaks fold over.
7. Add first batch of meringue to batter and gently mix with hand whisk.
8. For the second and third batch of meringue, be more careful mixing in with the hand whisk so as not to knock out the air. 
9. For the fourth and final batch of meringue, pour the batter back into the meringue and use a spatula to fold in, turning the bowl as you fold. Tap the bowl on the counter top to burst the big bubbles.
10. Pour batter into the lined baking tin and tap on the counter top to break big bubbles. Use a skewer to trace out zig zags to dispel smaller bubbles.
11. Place a cloth in a bigger baking tray and place the cake tin on top of the cloth. Pour in room temp water till 1 inch up the side of the tin. (cake cracks if using hot water).
12. Place the cake in the lower third (but not at the very bottom) of the oven and bake for 150 deg C for 90 mins. Turn off oven and remove water bath. Leave cake inside with door ajar for another 30 mins to minimise shrinkage.

13. Remove from oven and unmold completely. Allow to cool on a rack at least 6 cm above the counter top until completely cool. Best to refrigerate overnight before slicing.

Recipe feedback
- A really short cake (2 inches tall) but at least no cracks! No waist! The brown isn't very golden but I think the cake is perfection as far as I'm concerned.
- When I peeled off the sides and bottom, the bottom was somewhat moist and soft so I had to be very careful not to tear a huge chunk out of the cake. However, with refrigeration, it should be firm up. At least the bottom is cooked!
- Based on the colour, in this big oven, 160 deg C for 85 minutes with 30 mins resting in the oven with door ajar would probably be ideal, except my big oven doesn't like keeping at 160 deg C for some reason and keeps going above or under.
- Compared to my black sesame cotton cheesecake previously, temp and timing were the same. The only real differences in method were:
1) I left the cake in the oven for further 30 minutes with door ajar instead of removing immediately and dropping it on the counter top. This prevented the waist. 
2) My water bath similarly started from room temp water so no crack (which Kitchen 101 suggests happens when using hot water). Water also only came to 1cm (instead of 1 inch as per black sesame cheesecake) up the side. With both recipes, I didn't wrap the outside of the tin in foil so there wasn't an eggy centre. The water had most evaporated by the time I removed it from the oven!
3) My top also didn't rise as high this time and the colour wasn't as nice because the oven was bigger and the top of the cake wasn't as close to the heating element. Updated: I've realised that I swapped the order of the flour and egg yolk. Looks like they do make a difference as the flour needs to slightly cook in the heated milk + melted cream cheese mixture.
4) I totally removed all parchment, even that at the bottom to prevent any condensation and thus wetness at the bottom. That led to heart stopping moments when I was afraid the cake would tear or split when I was peeling away the parchment from the side and flipping it over to remove the bottom and again when removing the parchment from the bottom.
Cake next day after overnight in fridge. Slight sag at the side because parchment and pan were removed

Beautiful Earl Grey color

Sunday, October 15, 2023

Milk bread with filling (sponge method)

From the comparison recipes, decided to try HappyGoKathy (video and write up) based on her sausage octopus buns. This recipe was highly recommended by Yanna. According to the blogger, the bread keeps moist even after a few days. The recipe uses fridge-cold yeast sponge which works best in summer when other breads can end up over-proofing in the heat.

Sponge

210g bread flour

135ml water, finger warm, around 35 deg C

Instant yeast 3g

1. The night before, combine the ingredients.

2. Knead for 5 minutes then store in a covered container overnight for at least 15-17 hrs.

Main dough

Ingredients

90g bread flour

12g milk powder

25g sugar

60-65ml milk

5g salt

25g butter, room temp and cubed.


Method

1. Put the dry ingredients with torn up sponge into the mixer. Add half the milk. Mix for 2 minutes on Speed 1 until mixed.

2. Add more milk slowly and continue to mix on Speed 2.

3. Once bowl is dry from milk (dough is formed), add salt. Mix for 2 minutes at Speed 2. 

4. Once incorporated, bowl is clean. Turn up to Speed 4 and mix for 8-10 mins. Check dough is elastic when finger poked through windowpane leaves ragged edges. (She encourages putting the bowl before mixing in the fridge to keep it cold!)

5. Add butter several cubes at a time at low speed and mix at Speed 2 briefly each time until butter is mixed in, around 2 mins total. When adding butter, the dough may break up again so use spatula to incorporate and scrape.

6. Once all mixed in, turn up speed for 5-8 mins until finger poked into windowpane leaves smooth edges. Dough is smooth and shiny, elastic and should not be sticky.

7. Form a ball. Dough should not be more than 26-27 degrees C otherwise the bread is coarse if exceeds 28 deg C. Cover and sprinkle the surface of the dough with water. Proof for 30 - 45 mins. When done, insert finger into the dough and the hole may spring back a bit shouldn't totally close up. If it doesn't spring back at all, it's over-proofed!

8. Beat down the air bubbles and cut 8 portions of 65g each (or depending on filling). Form balls. If dough becomes too taut to roll out with rolling pin, rest under damp tea towel for 15 to 20 mins to relax before continuing to shape dough for filling. 

9. Watch the rest of the video if using sausage otherwise use own filling. Dough should be really elastic and easy to seal seams.

10. After shaping bread, cover and allow to ferment for approx 1 hr.

11. Egg wash just a thin layer and sprinkle with sesame seeds if using and then bake at bottom rack at 180 deg C for 15 - 18 mins.

Recipe feedback

- It works! Quite happy that I've never gotten such 'Asian-like' bread before - soft and what anpan should taste like. The dough was elastic and a dream to work with when it came to crimping. 

- I followed my instincts rather than following the timings for mixing given in the recipe because she used a different beater to KA. I based my intuition based on feel and look developed from experience.

- I've also learnt the magic ratio of filling to dough: about 1: 1 is ideal.