Thursday, March 08, 2012

Kimchi

Made Mak (wombak) and oisobagi (cucumber) kimchi

Recipes from Maangchi:

Oisobagi kimchi

I had to improvise - couldn't find the Korean hot pepper flakes so used paprika. Gave it a smokey sweet flavour which I'm sure purists would yell at me for! Also, ran out of fish sauce so used just a bit of soya sauce for the salt.

Overall, given that I used about 1kg of wombak and 3 long cucumbers, the kimchi paste doesn't seem enough. I omitted the porridge, so I guess this is where the difference is. Next time (if there is a next time because this was uber tiring!) I will use original Korean ingredients!

Updated with photo on 28 Jan 15 with proper gochugaru. 1 wombak with 3 carrots and 2 pears makes 1.5 kg of kimchi.


Updated on 16 Dec 16: I came across another recipe from Kitchn which explains the kimchi making process from a foreigner's point of view. The thing about having a foreigner narrate is that she is able to explain things from a fresh pair of eyes compared to someone who is native and may have taken things for granted. 
- She doesn't use the 'porridge' that Maangchi does.
- Apparently putting in carrots are a no-no?
- I found out adding too much ginger makes it sticky but adding too much garlic makes the kimchi bitter. I've been experiencing the latter towards the end of the shelf life of my kimchi but could never explain! I've always attributed it to being over fermented.
- Salt matters! Use kosher rather than table or iodized because the latter 2 types have caking agents which may inhibit the salting process. I've noticed that my salted veg doesn't become pliable but snaps even after salting for 2 hours. Another recipe said to soak for 4 hours until the veg stems were bendy rather than snapped but who has time for that?
- Leaving space on top before capping it. I used to think that I should pack it tightly and to the brim to prevent air. One time I had kimchi juice just oozing out and out of my jars. Every day I would mop up the fridge (and it stank!) and next day, they'd be more. I didn't figure it out until much later when I realised that as it ferments, it creats gas so needs space to expand. So I shouldn't be packing it too tight!

Sunday, March 04, 2012

Squidy hard boiled eggs

Ingredients for this are pretty obvious - eggs. In this case, where everything is almost an scientific experiment, it has to be 4 eggs in my smallest AMC pot (which unlike normal pots, retains heat).

The method here is also specific as every factor affects cooking time and thus result:
1) Take 4 eggs out of the fridge (aka cold). Prick a hole in the air sac at the bottom.
2) Boil water. Put the eggs in the pot and fill with the boiling water, just enough to cover the top of the eggs.
3) Turn on the flame and let the temp rise to the middle (12 o'clock) position of the AMC pot. Turn off the heat and leave it to steep for exactly 6 minutes.
4) When time is up, place the eggs in cold water immediately. Once the eggs are cool enough to handle, deshell.


Wednesday, February 29, 2012

Green Tea Scones

http://www.maduratea.com/tea-recipes/breakfast-morning-tea/green-tea-scones.html


Ingredients

250g (8.8 oz) plain flour
1/3 tablespoon salt
1 tablespoon granulated sugar
1 tablespoon baking powder
1 teaspoon Madura Green Leaf Tea
70g (2.5 oz) butter
150mL (5 oz) milk
1 egg, separated into yolk and white

Method

Sift together the flour, baking powder, salt, green tea and sugar.

Cut the butter into small pieces. With your fingertips, mix the butter into the flour until it becomes dry and flaky.

Combine the milk and egg yolk, and pour the mixture into the flour a little at a time. Mix and knead into a moist dough, but not so moist that it becomes moist.

Preheat the oven to 180°C (350°C)

Place the dough on a floured board and knead slightly until smooth. Roll out to a thickness of 2cm and cut out shapes with a cookie cutter or the rim of a glass.

Brush the tops with a little egg white, place on a baking sheet, and bake for 12-15 minutes, until slightly brown.

Cut each scone in half and eat with jam and fresh cream.

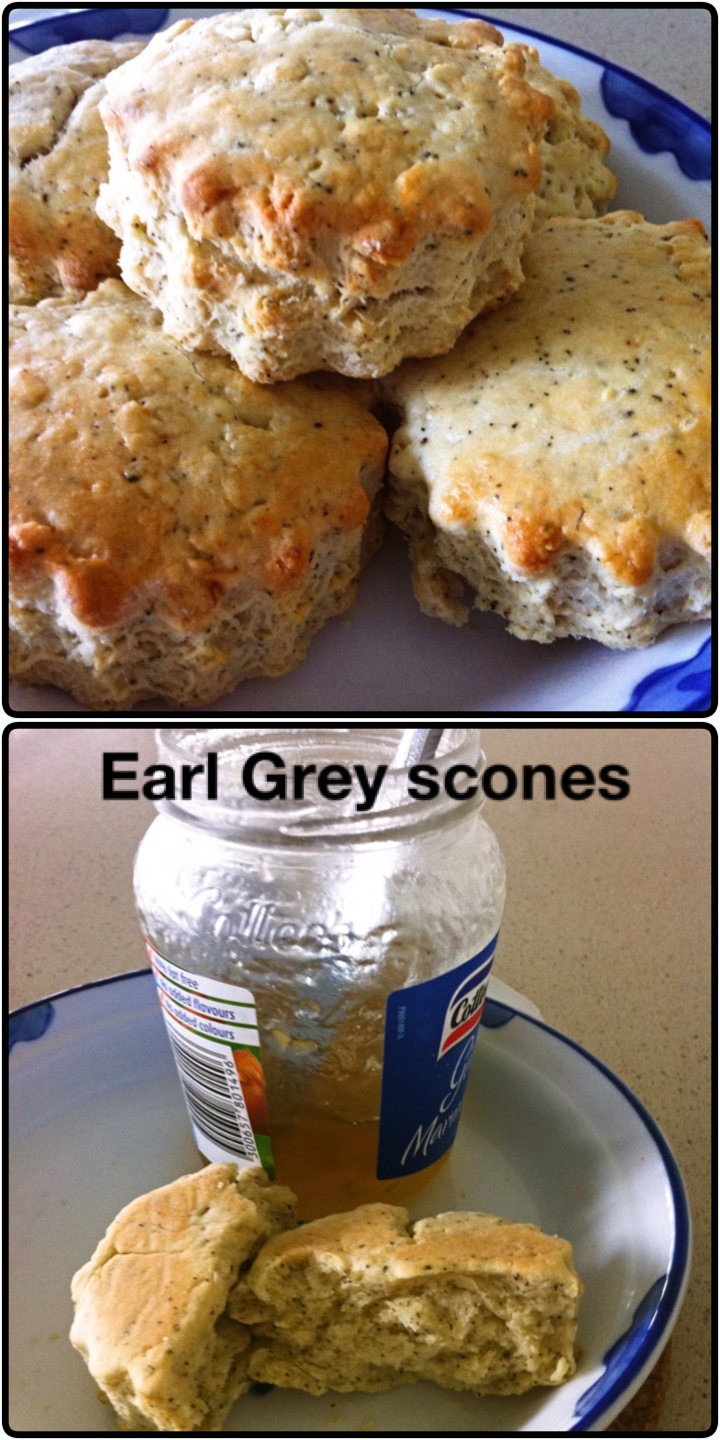
Notes: I replaced the green tea with earl grey, and it actually required 17 minutes cooking time but the inside was still a bit underdone. However too much more and the outside would be burnt.

Saturday, February 25, 2012

Cocktail recipes based on Tia Maria

Without knowing it, I have been drinking

Jamaican Yo-yo which comprises equal parts white rum and tia maria.

Based on my liquor cupboard, other things that I can do are a Black Russian which is 3 parts vodka to 2 parts coffee liquer, or add cream to get White Russian, or coke to get dirty black russian. Vodka can also be substituted for gin in some recipes.


Sunday, February 05, 2012

Everyday Brownies

From Nigella Kitchen

Recipe
Makes 16 brownies
Ingredients

  • 150g unsalted butter
  • 300g light brown muscovado sugar
  • 75g cocoa powder, sifted
  • 150g plain flour
  • 1 teaspoon bicarbonate of soda
  • Pinch of salt
  • 4 eggs
  • 1 teaspoon vanilla extract
  • Approx. 150g milk chocolate, chopped into small nuggety chunks
  • Icing sugar, to dust (optional)
  • 1 x 25cm square x 5cm deep foil- lined baking tin or 1 foil tray, approx. 30 x 20 x 5cm
(picture is my own)

Method

  1. 1Preheat the oven to 190°c/gas mark 5. Melt the butter over a gentle heat in a medium-sized saucepan.
  2. 2When it’s melted, add the sugar, stirring with a wooden spoon (still over a low heat) to help it blend with the melted butter.
  3. 3Sift together the cocoa powder, flour, bicarb and pinch of salt, and then stir into the pan; when mixed (this will be a very dry mixture, and not wholly blended at this stage), remove from the heat.
  4. 4In a bowl or jug, whisk the eggs with the vanilla extract and then mix into the brownie mixture in the pan.
  5. 5Stir in the chopped chocolate and quickly pour and scrape into a foil-lined baking tin or throwaway foil container, spreading the mixture with a spatula, and cook in the preheated oven for approx. 20–25 minutes. It will look set, dark and dry on top, but when you feel the surface, you will sense it is still wibbly underneath and a cake tester will come out gungy. This is desirable.
  6. 6Transfer the tin to a rack to cool a little before cutting into 16 and dusting with icing sugar. I love these gorgeously warm. But then again, I love them cold, too. Actually, when cold they are properly speaking more brownie-like: gooily tender within and moreishly chewy on top.


Alternate recipe with substitutions:
If you are out of light brown sugar and chocolate, then use 1 1/2 cups regular white sugar and up the butter to 1 1/2 cups, and cocoa to 1 cup.

Comments
1) The size of pan is very important! My pan was a bit smaller than recommended so after the full 25 minutes, the sides were perfect - crunchy outside and fudgey inside. But the middle of the pan was horrible. The top had set but inside was totally runny! I need a bigger pan so that the mix spreads thinner and thus dries out faster.

Friday, January 20, 2012

Home made bak kwa

http://sg.entertainment.yahoo.com/news/bak-kwa-kitchen-110056570.html


Ingredients (results in 10 rectangular pieces, each 5cmx7cm)
3tbsp of fish sauce
Half a tbsp of light soy sauce
Half a tbsp of oyster sauce
230g of minced pork 70g of sugar
1 drop of red food colouring
Mix all the sauces and sugar into a bowl and stir until the sugar dissolves. Add the minced pork into the bowl and marinate the meat well. Add the red food colouring. Leave the marinated meat for at least two hours. You can choose to leave it overnight in the fridge. Preheat the oven to 120C for 20 minutes. Grease the baking tray or wrap it with aluminum foil.

Use a tablespoon to spread the marinated minced pork thinly (no thicker than 0.5cm) over the tray. Place the tray into the oven set at 150C for one hour. Use the grilling function in your oven. After half an hour has passed, the meat would be semi-cooked. Take out the tray from the oven and using a tablespoon spoon, cut the meat into rectangles. Then flip the meat over to the other side and pop the tray back into the oven. Once the full hour passes, the bak kwa is done. You can eat it immediately, but we suggest, for extra crunch, put it into the toaster oven for 3 minutes before consumption.

Result
Not bad for a first attempt. I found that it was a bit on the salty side and surprisingly despite all that sugar, didn't seem sweet enough. Next time, I would
1) cut the salt
2) use brown sugar to bring out the taste
3) Add 1/2 tbsp of 5 spice powder
4) cut the cooking time by 5 minutes so that it's less dried out and burnt
5) Omit the red food colouring. It isn't necessary!

Updated recipe: http://simmetra.blogspot.com.au/2018/02/bak-kwa-take-2.html

Sunday, January 01, 2012

Nigella Kitchen's Choc Chip Bread Pudding

Can't find the recipe but a blogger posted this http://sistabrownie.blogspot.com/2011/06/chocolate-chip-bread-pudding.html

Frankly I don't dig B&B puddings either but it does sound so easy! Maybe next time.

And here's the corresponding You-tube video


Saturday, December 24, 2011

Pickled cucumber

Adapted from Maangchi's Sukjanamul which is actually beansprouts and cucumber but alas, I don't have beanspourts! :(

Photo of my attempt:

Chamchijeon (Tuna pancakes)

Recipe from Maangchi
http://www.maangchi.com/recipe/tuna-pancakes


Updated with CNY 2013 picture to represent 年年有余

Saturday, December 03, 2011

Ga Ban Kho Gung (Chicken in ginger)

I guess sino-asian cooking like Viet and Thai cooking all have roots in Chinese cooking, or it could also because with a climate similar to China, most of the basic ingredients are the same. In fact, if we were really to visit China, there are probably lots of dishes that we haven't tried, even if you broadly classify this as 'Chinese food', there are thousands if not millions of variations!

Saw this from Luke Nguyen's Vietnam season 2, and the ingredients aren't too unusual for our palate.

Here's the link: http://www.sbs.com.au/shows/lukenguyen/recipes/detail/recipe/11056

Looks like a great recipe! Will update with photo once I have cooked it!

Edit: here's the photo!


Reproduced here in case the link goes dead:

Ingredients

3 tbsp fish sauce
1 tsp oyster sauce
1 tbsp sugar
500g chicken, chopped into bite sized pieces
2 tbsp finely sliced ginger
2 tbsp vegetable oil
2 tbsp finely diced garlic
250ml chicken stock
4 spring onions (scallions), sliced into 4cm lengths
Pinch of cracked black pepper
1 long chilli, julienned, to garnish
Jasmine rice, to serve

Preparation

In a mixing bowl, combine fish sauce, oyster sauce, and sugar. Mix well, then add the chicken and ginger, massaging the marinade into the flesh.

Cover and place in the fridge to marinate for 20 minutes.

Bring a wok or saucepan to medium heat, then add oil and garlic, and cook until fragrant.

Turn the heat to high, then add the chicken, sealing all sides. Cover the chicken with the stock, pour in the remaining marinade and bring to the boil.

Skim off all impurities until clear and cover the pan. Reduce the heat to low and simmer for 15 minutes.

Add spring onions and cracked black pepper, stir and cook for a further minute.

Transfer to a serving bowl and garnish with chilli. Serve with jasmine rice.