Friday, December 25, 2020

No-knead foccacia

This seems to be a thing with foccacia, it needs a lot of proofing time but no kneading is required and you have a very floppy dough.

Sources: 

Marion Grasby: uses semolina as a starter: I used bread flour because she said it can be substituted and I have leftover bread flour. Bakes at 230 deg C.

SBS: proofing over several nights. Bakes at 200 deg C. Shorter resting time on the day of 10 minutes after shaping the dough.

Ingredients

¼ C semolina (I used bread flour)

½ tsp instant dry yeast

80 ml water

3 C flour (plain or bread; I used 2C bread + 1C plain)

1 tsp salt

320ml water

2 tbsp virgin olive oil

Optional toppings e.g., sea salt, herbs, chopped olives, sun dread tomatoes

1 tbsp water + 1 tbsp oil


Method

1. Prepare the yeast starter. Add the ¼C flour to the yeast and 80ml warn mater. Mix, then cover and allow to proof for 1 hour.

2. In a big bowl, add the flour and salt, and make a well in the centre. Pour in the starter, water, oil. Using a spatula to mix. The dough will be very sticky and sloppy but not like a batter.

3. Drizzle with oil. Cover and leave to proof overnight. (Fridge is not mentioned)

4. Tuck in the edges of the dough.

5. Prepare a 20 by 30 cm tin. Line with oil and then parchment. Pour out the dough and push the dough to the edges of the tin with your lightly oiled fingers. 

6. Leave to proof for 1 hour, covered. Once in a while, push the dough to the edges of the tin.

7. After proofing, prepare 1 tbsp water and 1 tbsp oil and mix well. Drizzle on top. Use fingers to leave indentations in the dough. Top with whatever topping used.

8. Bake in a pre-heated oven at 230 deg C for 15 to 20 minutes until golden on top.


Recipe feedback:
I now understand why Marion wrote 1 tbsp olive oil + 1 tbsp water and to drizzle that on top before adding the topping. I was overly generous by drizzling on 2 tbsp of the sundried tomato oil, and that made it hard to bake becauese the dough couldn't rise and 'dry' up to bake. Instead of spending up to 20 minutes in a 230 deg C oven, I spent close to 30 minutes and the centre (where the oil pooled) was still a bit doughey even though the toppings of sun dried tomatoes had dried to a crisp and the olives had burnt!

Saturday, December 19, 2020

Baked Cherry cheesecake

Preparing for a party, I thought about resurrecting my favourite Nigella's no bake blueberry cheesecake. It involves 2 packets of cream cheese, an 8" pan, and a bottle of Dalfour's blueberry jam. I came across RecipeTinEats' baked Strawberry Cheesecake which is very similar except that it's baked and uses sour cream rather than whipping cream. The most difficult part is probably making the berry sauce which is optional. I used a package of frozen cherries which I had in the freezer so presentation-wise, it'll be less pretty than using fresh fruit but the effect is the same.


Ingredients for base

200g sweet biscuits (I used malt biscuits which in a 220g packet; this includes enough crust to go up the side of the tin)

120g butter, melted (I used 150g because I had 220g biscuits)

Method for base

1. Prepare the 8" springform tin. Turn the base upside down so that there's no lip. Add the parchment and clip the base. Butter the sides of the tin and line with parchment.

2. Crush the biscuits in a food processor. Alternatively, use a ziplock and bash away.

3. Once there is a fine crumb, drizzle in the melted butter. It should resemble sand.

4. Pour into the prepared tin. Use a spatula to press down. Using a glass or measuring cup, press down firmly on the base and against the wall of the tin. The crumb mixture should go up ¾ of the wall of the tin.

5. Cover and leave the base in the fridge to harden slightly.

Ingredients for filling

500g cream cheese (2 packs of Philly), room temp

2 tbsp plain four

1 tsp vanilla extract

½C sour cream

1½C caster sugar

Zest of 1 lemon

Method for filling

1. Beat cream cheese until smooth, 20s on Speed 4. (Don't introduce air otherwise the surface will crack)

2. Add flour, beat for 5 seconds at Speed 4.

3. Add extract, sour cream, sugar, zest; 10s on Speed 5.

4. Add eggs one at a time, no more than 5s each on Speed 5. Beat until eggs are just blended.

5. Pour into prepared base. 

6. Bake in a pre-heated oven 150 deg C in fan forced (convection but no top and bottom grills) for 55 minutes until the top is just set. The sides will be set but the centre will have a slight wobble. 

7. Turn off the oven but leave it inside for another 10 minutes, then open the door 20 cm and let it cool down for 30 minutes in the oven with door ajar. Take it out to totally cool down.

8. Refrigerate at least 4 hours.


Method for berry sauce

500g of a berry (strawberries, blueberries, etc. I used cherries which are in season; fresh or frozen)

2 tbsp water or lemon juice (depending on the sweetness of the fruit)

½ C sugar (can reduce but a few tbsp depending on sweetness of the fruit)

2 tsbp water for slurry

1½ tsp corn starch for slurry

Method for sauce

1. Roughly cut up half the fruit and halve the other half of the fruit. If using frozen fruit, thaw them. It may be difficult to halve or cut the fruit without it falling apart so omit this step.

2. Pour the fruit and 2 tbsp of water into a saucepan. Pour in the sugar and mix.

3. Bring to a boil. Turn down and simmer for 10 minutes, stirring to prevent the mixture burning at the bottom.

4. Make the slurry by mixing corn starch and water. Continue stirring the slurry. Stir the mixture and drizzle in the slurry. Once thickened, turn off the fire. Set aside to cool and the refrigerate. It will thicken up slightly once chilled in the fridge.


Assembly

Take out the chilled cheesecake. Pour the sauce on top. If the sauce is not of a pouring consistency, add just add a touch of water (½ tsp at a time) just to loosen it. It should dribble down the side but not drench it.

Feedback

- Turning the bottom upside down was fine except the butter melted and seeped out! Was not expecting that! Perhaps using digestives might have helped as they are more 'absorbent' than the malt biscuits I used.

- I found the sugar in the cherry sauce way too sweet! It was good for entertaining as people tend to like sweet desserts but not for home consumption. Might have to add, taste, then add more if needed next time.

Thursday, December 17, 2020

HK Red Bean Bun

I have previously tried the tangzong red bean bun and also the an pan but neither were satisfactory. Both used a mix of bread and cake flour but felt really dense even though I used the dough hook on my food processor. This time I have my trusty KitchenAid and after my last dough disaster where the dough climbed up the hook, I decided I had to beat it!

This recipes uses full bread flour. Adapted from three different Christine's recipes because she writes things halfway and asks you to refer here and there. Making tangzong, ingredients from Matcha Green Bean Bun, and I adapted her method from Hokkaido Milk Toast Bread regarding proofing instructions and how to fold the bread.

Ingredients for tangzong (makes 240g tangzong which is enough for 2 loafs of 20.5*10.5cm loaf tin. However, I made the mistake of halving the proportions to get 120g tangzong as required but because a lot of the roux stuck to my non-stick pot, I got less than 120g roux in the end! Recommend to follow the full instructions and throw away the excess)

50g (⅓C) bread flour

250ml (½C) milk or water or 50-50

Tangzong method 

1. Add the milk to the flour slowly and use a wooden spoon to combine. Smooth out as many lumps as possible.

2. Put the mixture on the heat and bring slowly to a boil. The mixture will dry up. Continue cooking the roux until you see 'lines' in the roux when stirring.

3. Remove from heat. Set aside to cool slightly, the cover with cling film, ensuring the film touches the top to prevent a skin forming. Cool completely before using. Store the rest similarly covered in the fridge for up to 3 days. Throw once it turns grey.

Ingredients for Red bean bun

350g (2½C) bread flour

55g (3 tbsp + 2 tsp) caster sugar

5g salt (1 tsp)

1 large egg (more than 50g), beaten

7g milk powder (1 tbsp + 1 tsp, I omitted)

125ml milk (½C)

120 tangzong

6g yeast (2 tsp

30g butter, cubed and at room temp

1 tin (430g) red bean paste, refridgerated 

1 egg beaten, for glaze

2 to 3 tbsp sesame seeds (either black or white)

Method

1. In a KA mixer, pour in half of the flour and ⅓ of the milk. Add the salt and sugar, then beat at Speed 2.

2. Once these have come together, add more milk, half of the beaten egg, and a few tbsp of flour. Allow to mix. Continue alternating wet with dry until all used up and allow to beat for 5 minutes.

3. Once combined, add the yeast. Use your hand or a dough whisk to fold in the yeast. Use the KA at speed 3 and continue beating for 5 minutes.

4. Add the cubed butter, one cube at a time and allow each to beat into the dough before adding the next one. Once all are in, beat for 5 minutes at Speed 2.

5. Turn up to Speed 4 and beat until you reach the windowpane stage (approx another 15 to 20 minutes). Stop periodically to check because it can go from not yet ready to ready in a matter of minutes. The dough should be soft but not sticky and glossy on the outisde.

6. Remove from the beater and oil the bowl. Form the dough into a ball and cover the bowl with film and a tea towel. Allow to proof for 40 minutes (28 deg C and 75% humidity) until doubled in size.

7. Divide dough into 12 potions (approx 51g each). Cover half of the balls with a damp towel. With each portion, roll with the palm of your hand into a ball until the surface is smooth. Then using the Asian rolling pin, flatten out into a 5 cm diameter circle with the edges thinner than the centre.

8. Use the 2.5 tbsp scoop and spoon out 30 to 35g of filling.

9. Seal the filling tightly, be sure to scrimp all the folds and turn seam down. Gently roll back into a ball to flatten the folds. Using both hands and a cupping motion, form a dome shape, the taller the better as it will sink and flatten when proofing.

10. Cover with cling firm and a damp tea towel and proof for 45 to 60 minutes (38 deg C at 75% humidity) until doubled in size. 

11. Pre-heat oven. Glaze the tops of each bun with the beaten egg.

12. Using the rounded end of the Asian rolling pin, dip in the egg then into the sesame seeds. 'Stamp' the seeds onto the top of each bun by slightly and gently rotating the pin so that the edges of the stamped circle are properly formed.

13. Bake at 160 deg C for 30 minutes or until golden brown. I swapped and rotated the trays halfway.

Recipe feedback

So unusual! Because I used bread flour, it came out crusty straight from the oven (like crusty bread). It softened slightly the next day but was still not like normal white bread. More like French crusty loaf?

Saturday, December 12, 2020

Custard creamed corn bao

Quite disappointed with this recipe but am unsure cos there are too many new variables. First of all, the this is a new recipe and looks really simple - 7 minutes kneading, 7 minutes resting, and only proving 20 minutes. It was meant to solve all my past issues with ugly looking bao that are lop sided and have wrinkly skin. Second, my dough was a bit wetter than intended, which made handling the bao and sealing up the filling really difficult. Third, I follow the recipe and used the microwave to make the custard, but perhaps because I'm using a different brand and doubling the portions, it came out really lumpy. Next time I'll go back to using the stove even though it may be more work. Fourth, I used my new bamboo steamer so I'm wondering if that affected? I had my metal steamer side by side and also following the instructions, started steaming from cold so that affected all the timing and made it dry out yet uncooked inside. Comparing the bao from the metal to the bamboo steamer, the metal steamer seemed to keep the moisture in better and also there was more lift. Fifth, I doubled all the portions so perhaps it is still my fault in the end!

I might not try the recipe again for the bao dough but stick to the red bean bao dough recipe.

Recipe adapted from: https://mykitchen101en.com/steamed-corn-custard-pao-chinese-steamed-bun/

Ingredients for custard filling (makes 10) (makes 19)
170ml milk (240ml)
3 tbsp custard powder (6 tbsp)
2½ tbsp sugar (5 tbsp)
90g cream style corn (180g)
1 slice cheddar (2 slices)

Method 
1. Combine the sugar, milk, custard powder in a pot on the stove. Bring to a boil and stir until smooth. Remove from stove. (Original recipe uses microwave, 1min 30seconds at 1000w)
2. Pass through a sieve to get rid of lumps.
3. Add the cream corn and stir until combined.
4. Cut up the sliced cheddar and stir until combined.
5. Leave to cool for 10 minutes. Cover with cling film, ensuring that the film touches the surface of the custard so that it doesn't form a skin. Leave in the fridge to cool for 30 minutes.


Ingredients for bao (upsized to 500g)

280g (2¼ + 4 tbsp) bao flour (500g)

20g (2½ tbsp) cornstarch (5 tbsp)

1 tsp instant yeast (2 tsp)

65g (⅓C) fine sugar (less 2x at 120g)

200ml milk (350 to 400ml)

20g (1½ tbsp) veg oil (3 tbsp)

pinch of salt


Method

1. Combine the flour, cornstarch, salt, and sugar and stir well. Add the yeast and stir.

2. Gradually pour the milk until a dough is formed. Do not use up all of the milk but only until the dough just comes together with a few dry spots.

3. Pour in the oil and knead until blended. If there are still dry spots, add as much milk as needed to moisten the spots

4. Knead for 6 to 7 minutes until the dough is shiny and smooth and no longer sticky. 

5. Cover and rest for 6-7 minutes.

6. Roll out the dough into a rectangle and fold into thirds. Roll out again and then roll up into a cyclinder.

7. Cut into 10 portions. Cover half of the dough.

8. Roll into a circle with a thicker centre. Fill with 1½ tbsp filling. Seal proper so that the filling doesn't leak out. Put on prepared parchment (Original recipe uses flattened muffin cases)

9. Prove for 20 minutes. (Original recipe has a complicated method of bringing to a boil 500ml of water, then adding 1 l of water and putting the steaming basket on top). Try to prevent over-proofing otherwise the skin will wrinkle after steaming.

10. Steam on medium heat for 15 minutes, then turn off the flame and let it rest for 3 minutes before removing.

Recipe feedback

Comparing this recipe with my red bean bao which also used 500g of bao flour, this recipe used only 2 tsp of yeast (so only 1 proofing) compared to the 2 tbsp yeast (Edit: this sld be 2.5 tsp) and the nearly 1 hour of total proofing time for the red bean bao. While the red bean had a wrinkly skin, the bao was fluffier than my corn bao, but still not as fluffy as seen in the corn bao video.

Aside from being very dense, the dough still tastes a bit raw and the taste of the oil is very strong. This recipe didn't work probably mostly because of the short or negligible proofing time and insufficient kneading. 

I learnt from China Sichuan's char siu bao recipe that has more sugar, liquid, and yeast that uses a single proofing method (like Kitchen101 here) because it saves time and leads to more fluffy and less chewy buns. This differs from her red bean buns which proofs for 1 hour. 

Single proofing method

- Her mantou recipe says to obtain a smooth surface, buns have to be well kneaded, not over-proofed, and controlled fire which differs between steel and bamboo. 

- The second 'proofing' (after shaping) for 10 to 20 minutes until it slightly puffs up is actually just resting the gluten rather than proofing. The steaming water should start from cold and then rapidly brought to a boil on high heat. Start the count and turn down to medium flame only when you the steam escaping. The cooking time after from this point can take 20 to 25 minutes depending on the size of the buns and filling. 

- Bamboo steamer has to be on medium fire but steel has to be high fire all the time and cooking time for bamboo steamer has to be longer ie between 25 to 30 mins (including bringing to a boil). 

- The single proofing method requires a longer cooking time so that it can puff up. I made the mistake of turning down both steel and bamboo down to medium fire and assuming it's 15 mins for everybody. No wonder my buns from the steel steamer came out better cooked than the bamboo which was undercooked. I might also need to switch the steamer baskets around halfway. Kitchen101 used a bamboo steamer but her timings and single proofing method don't work for me! 

Sunday, October 25, 2020

Slow cooker best bolognese with sausages

I have cooked bolognese so many times over the years that it's hardly memorable. However, this particular time, something about the ingredients and proportions FINALLY made it right! The three secret magic ingredients are a full onion, anchovies in oil and curry powder, would you believe it!

Ingredients

2 to 3 tinned or bottled anchovies in oil

1 tbsp of the anchovy oil

1 large red union, chopped

2 cloves garlic, minced

500g beef mince

1 tsp thyme

1 tsp sage

2 tsp basil

1 tbsp curry powder

1 jar tomato passata

1 cup water

1 beef bullion cube (optional)

2 medium carrots, cubed

4 zuchinni, cubed

cooked 6 cumberland sausages, sliced

Salt and pepper to taste

500g cooked pasta

Method

1) In the anchovy oil (top up with regular oil if more oil is required), fry the onions until translucent. Add the garlic and fry for 20 seconds.

2) Add the beef mince and fry, chopping up the chunks with your spatula. When the meat has changed colour (but not necessarily cooked through), add all the herbs. Add the sausages.

3) Add the passata and fill up the jar halfway with water, then rinse the jar and tip out the contents into the pot. Add carrots.

4) Bring to a boil and skim off any scum that floats up. Add the curry powder and bullion cube and close the lid. Allow to slow cook for 1 to 2 hours.

5) Once ready, add the zucchini and stir through until cooked (approx 5 minutes).

6) Serve with pasta.


Monday, October 05, 2020

Custard cream puff

Retried the profiterole recipe from here with an improved custard using custard powder.

Ingredients (Makes 23 to 27 puffs, each one and a half inch wide by half inch tall cream puffs)

Cream puffs

½ C water

½ C whole milk

½ C (118g) butter or 8 tbsp

¼ tsp salt

1 C flour

4 large eggs, room temp, beaten

Splash of milk (for glaze)

Custard 

5 tbsp Foster Clark's custard powder 

500ml milk

2 to 3 tbsp sugar (to taste)

Method

Make the Choux pastry

1. Combine the water and milk in a pot with the butter. Melt the butter and bring to a gentle simmer (very small bubbles appear at the edge of the pot).

2. Remove from the stove and add the flour. Using a whisk if preferred (I found it helped but was really difficult to wash), add all the flour at once and stir until well combined.

3. Return to the stove and press down the batter onto the bottom of the pot to cook off the raw flour taste. Cook for about 2 to 3 minutes until a film forms at the bottom of the pot. Remove from the heat and allow to cool.

4. Beat the eggs in a Pyrex measuring jug. While the dough has cooled slightly, drizzle the egg a bit at a time into the dough and stir well with a wooden spoon. It will start off as a curd and split but continue beating. A KitchenAid can be used at this point but I didn't bother due to the washing up. Pour on as much egg as needed to make a thick ribbon when the spoon is lifted. Leave a few teaspoons behind to glaze the puffs.

5. Spoon into a piping bag and use a ½" round tip. 

6. I pre-prepared my parchment by drawing 1½" rounds on the wrong side of the parchment and then turned it right side up and placed it on the cookie sheet. Ensure there is space between each for them to grow.

7. Using the drawn guides, pipe 1½" wide by 1" tall. Use a moistened finger to pat down the tips of any piped batter and to smoothen the tops if necessary. Sprinkle the rest of the water onto the parchment around the puffs. This will give it the steam to give the puffs a sudden lift.

8. With the leftover beaten egg, add a splash of milk and brush the tops of the puffs.

9. Bake at 200 deg C for 10 minutes, then turn down to 170 deg C and bake for a further 20 to 22 minutes until golden brown. Do not open the oven door ever or the puffs will collapse.

10. Once it has finished baking, turn off the oven and open the door ajar. Leave the puffs inside for 10 to 15 minutes to cool slightly and dry out.

11. Remove from the oven and remove each puff to a cooling rack to cool completely. To test if completely cooked, break one apart and it should be dry and hollow inside, not cakey and spongey. It is better to over-bake than underbake.

12. Make the custard as per instructions on the box. Cool completely in the fridge. (Easier to make this the day before)

13. Assemble puff by cutting a hole at the side of each puff or cutting off the top. Then either pipe or fill the puff with a teaspoon. Serve immediately with strawberries and dusting of icing sugar if required.

Profiteroles

Topped with 1 bar of cooking chocolate, melted over a bain marie


Friday, September 04, 2020

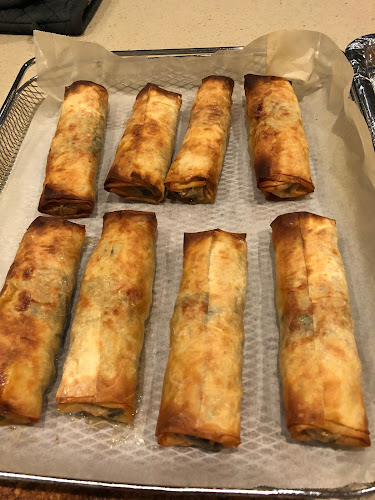
Airfried Taiwanese beancurd rolls

Been going back and forth with friends and family about the correct type of bean curd skin to use for wrapping ngor hiang/bak teow. While they insisted that the correct type is dried beancurd skin rehydrated with a wet cloth to make it pliable, I noticed that they always showed me Singaporean or Malaysian brands of beancurd skin.

All I have in my Taiwanese supermarket is refrigerated beancurd skin (yuba) which none of them seemed to understand. Here is my video of how the skin looks and feels.


Came across this Taiwanese video which exactly uses yuba in Taiwanese cuisine in place of dumpling skins, and even something cylindrical which looks like bak teow!

Also improved my previous recipe with the addition of beaten egg and cornstarch which helps the vegs to 'stick' to the mixture and not fall out, and also helps with a QQ texture. Learnt this from Spice N'Pans ngor hiang. Interesting how they flatten out the filling then roll and pull back into a cigar shape so that it helps to stick the skin to the filling. Following the Taiwanese video, I've also made the rolls shorter than traditional 6 to 8" bak teow because it's easier to cook.

Ingredients (makes 50*4 inch rolls)
1 kg minced pork
500g minced prawns
2 eggs, beaten
3 tbsp of corn flour
4 cloves of garlic, minced
1 thumb-sized ginger, grated or juiced
2 tbsp cooking wine
2 tbsp soya sauce
2 tsp five spice
1 small can of water chestnuts, drained
1 small can of sliced bamboo, drained
2 medium carrots, diced
Dash of pepper and salt
1 packet of yuba

Method
1. Combine the minced pork and prawns with the ginger, garlic, cooking wine, soya sauce and give spice. Mix in one direction until gluey. Add the beaten egg and corn flour. The mixture should be slightly wet but not overly sloppy. Set aside in the fridge to marinade.
2. Prepare the vegs but chopping and dicing into fine cubes. Salt each set of veg separately with a sprinkle of salt each.
4. Prepare the yuba skin but cutting into rectangles.
3. After the meat has had time to marinade for at least an hour, combine with the veg.
5. Place about 1 tbsp of mixture at the short end of the yuba skin and roll.
6. Place on an oiled tray and steam until cooked. Due to the need for a quick turnover, I steamed in the microwave for 3 minutes.


7. Place on a tray or in the fridge to cool, or I froze each roll separately for longer storage.
8. To airfry, spray a lined foil tray. Spray each roll. 

Try 1: Airfry at 160 deg C for 5 minutes, then 200 deg C for 5 minutes. If frozen, add another 2 minutes to the 160 deg C.

Try 2: Airfry 180 deg C for 8 minutes (from fridge) or 10 to 12 minutes from frozen.

Updated: See the correct beancurd skin and fried attempt.

Try 3: Steamed to cook then airfry 8 mins 200 deg C then 3 mins 220 deg C


Sunday, August 23, 2020

Chocolate ganache Profiteroles

I have been wanting to make this for a very long time. Based on the recipes and tips from here, essentially Natasha and Sally's whose recipe ingredients are identical, and the methods of all three Natasha, Sally, and Gemma (essential for NOT using the KitchenAid). I had made classic cream puffs with my mom during my childhood but we had always filled them with Bird's custard. Unfortunately, I have only seen it in the supermarkets here once and now can't find it when I need it. At a pinch, I used custard pouring cream but thickened with tapioca starch (because corn starch whilst used for desserts, also separates in the fridge). That proved to be a bad idea because it was gloopy and almost slimey rather than thick, creamy and luscious, and it flowed out everywhere. The texture does improve in the fridge so maybe that was the trick.

Ingredients (Makes 22 to 28 puffs, each one and a half inch wide by half inch tall cream puffs)

Cream puffs

½ C water (120ml)

½ C whole milk (120ml)

½ C (118g) butter or 8 tbsp

¼ tsp salt

1 C flour

4 large eggs, room temp, beaten

Splash of milk (for glaze)

Custard (used in this recipe but I wouldn't re-use this in the future)

300ml pouring custard from Paul's

4 tbsp tapioca starch

4 tbsp water or enough to create a slurry

Chocolate ganache

150ml double cream

150g baking chocolate bar or good quality chocolate chips (I used melting chips from Nestle)


Method

Make the Choux pastry

1. Combine the water and milk in a pot with the butter. Melt the butter and bring to a gentle simmer (very small bubbles appear at the edge of the pot).

2. Remove from the stove and add the flour. Using a whisk if preferred (I found it helped but was really difficult to wash), add all the flour at once and stir until well combined.

3. Return to the stove and press down the batter onto the bottom of the pot to cook off the raw flour taste. Cook for about 2 to 3 minutes until a film forms at the bottom of the pot. Remove from the heat and allow to cool.

4. Beat the eggs in a Pyrex measuring jug. While the dough has cooled slightly, drizzle the egg a bit at a time into the dough and stir well with a wooden spoon. It will start off as a curd and split but continue beating. A KitchenAid can be used at this point but I didn't bother due to the washing up. Pour on as much egg as needed to make a thick ribbon when the spoon is lifted. Leave a few teaspoons behind to glaze the puffs.

5. Spoon into a piping bag and use a ½" round tip. 

6. I pre-prepared my parchment by drawing 1½" rounds on the wrong side of the parchment and then turned it right side up and placed it on the cookie sheet. Ensure there is space between each for them to grow.

7. Using the drawn guides, pipe 1½" wide by 1" tall. Use a moistened finger to pat down the tips of any piped batter and to smoothen the tops if necessary. Sprinkle the rest of the water onto the parchment around the puffs. This will give it the steam to give the puffs a sudden lift.

8. With the leftover beaten egg, add a splash of milk and brush the tops of the puffs.

9. Bake at 200 deg C for 10 minutes, then turn down to 170 deg C and bake for a further 20 to 22 minutes until golden brown. Do not open the oven door ever or the puffs will collapse.

10. Remove from the oven and remove each puff to a cooling rack to cool completely. To test if completely cooked, break one apart and it should be dry and hollow inside, not cakey and spongey. It is better to over-bake than underbake.


Make the Custard (this can be made a day ahead and chilled)

1. Pour the pouring custard into a pot and bring to a gentle simmer (never a boil).

2. Turn off the heat and add the stir. Stir well until combined. If preferred, sieve to remove any lumpy batter.

3. Place a cling film directly onto the surface of the custard and allow to cool before eventually cooling in the fridge. It must cool in the fridge otherwise the custard is slimey and not even spoonable into the puff casings.

Updated: Using custard powder

Make the Ganache

1. While the puffs are cooling, prepare the ganache. Chop the chocolate into tiny pieces, the tinier the better. Place the chocolate pieces into a Pyrex or metal bowl (never plastic).

2. Warm up the double cream. Bring to a simmer (small bubbles at the edge of the pot). Never boil. 

3. Remove from the heat and immediately pour onto the chopped chocolate. Allow to stand for around to  2 to 5 minutes.

4. Using a metal spoon, start from the centre and stir, gently stirring outwards until well combined. It should be slightly runny. Allow to cool for 15 minutes and it should thicken up into a pouring consistency.

Assembling the profiterole

1. While the ganache is cooling, cut holes into the sides of the puffs with a small but sharp knife.

2. Pipe in the custard until the puff is full (you'll feel a bit of pressure on the piping tip). Use a butter knife to remove any excess. 

3. When all the profiteroles have been filled, invert each puff and drip the tops into the ganache. Set on the wire rack to drip off. You probably want something to catch all the drips under the wire rack, it will get VERY messy!

4. They can be eaten served with strawberries and whipped cream but are best chilled for at least 4 hours (for the custard and ganache to set) and eaten then. 

Saturday, August 22, 2020

Choux pastry: Comparison recipes

 I have shortlisted several bloggers with videos and who do the entire range of pastries associated with choux pastry using slightly different methods. I've found out that the difference between profiteroles, cream puffs, and eclairs is dependent on the shape, topping, and filling. 

1. Bigger Bolder Baking cream puffs (Christmas profiterole recipe) (Easy choux pastry)

- Starts with whisk to whisk the flour in, then changes to spoon. Leaves it on the stove while beating the flour in. 

- Beats up the egg. Doesn't use KitchenAid when incorporating batter and egg.

- Uses wettened finger to smooth down the tips after piping the cream puffs

- Sprinkles water on the baking parchment around the cream puffs (to create the steam to give them a poof)

- Garnish with chocolate ganache and strawberries, filled with fresh cream, dusted with sugar

- Bake at 200 deg C for 25-30mins or at 220deg C for 20 mins then 10 mins with heat turned off.

- Store in fridge with filling, or freeze.

2. Sally's Baking Addiction cream puffs

- Eclairs are filled with custard (Americans call it pastry cream) and topped with ganache, cream puffs are filled with whipped cream and dusted with icing sugar, profiteroles are filled with ice cream and topped with ganache

- Easiest recipe. Uses 1 cup cream for ganache and 1 cup cream for cream filling

- Uses KitchenAid. Doesn't pour in all the beaten egg (only till the point it's combined) but leaves some for egg wash.

- Also paints the parchment with water

- Bake at 204 deg C for 20 mins, reduce to 177 deg C for 10-15 mins until golden brown

- Store unfilled or freeze.

- For the ganache, advises against using buttons. Use equal portions of double cream and choc by weight. Chop the choc finely, use a stove to heat up the cream just to simmering (never boiling), and pour onto the choc. Use only a glass or metal bowl (never plastic), and let it sit for 5 minutes before stirring. Stir with a metal spoon or silicon spatula (never a whisk or worst, wooden spoon) from the centre working outwards. Leave to cool for 15 minutes before using. Store unused at room temp for up to a day as the fridge will harden it into a spoonable fudge.

3. Natasha's Kitchen cream puffs (Eclairs wh includes pastry cream recipe)

- Also mentions the differences between eclairs with ganache, profiteroles, and cream puffs.

- Takes milk mixture off the stove to add in the flour and then incorporates it off the stove before putting it back on the stove to cook for a few minutes (2 to 3 minutes) until a film forms at the bottom.

- Uses Kitchenaid hand beater to beat for a while to cool it down, then adds whole eggs.

- Bake at 218 deg C for 10 mins, reduce to 162 deg C for 20 to 22 mins until golden brown.

- Store unfilled or freeze but can also store and freeze them with filling following her tips.

- For the ganache, uses chocolate buttons

Choux pastry tested here.

4. Pretty Simple Sweet - Ganache tips

- Play around with ratios to get it as a glaze or spreadable consistency or hard like truffle. Only cream and chocolate. Other additions such as butter and corn syrup for added creaminess or shine.

Friday, August 21, 2020

Airfried har jeong gai

I have tried different ways of baking har jeong gai: using panko, using tapioca flour, and my original attempt that used baking flour and baking soda but it noting worked.

This time, I finally have the airfryer and decided to re-try the method from SpiceNPans. I had tried this recipe before and it was too salty but now that I have an airfryer, the method of using baking powder and corn starch in the marinade, then coating with tapioca flour before frying and spritizing with oil. The secret is cooking at 2 temps, works really well! The recipe is based on NoobCook (who only cooks at 180deg C for 15 mins, turning halfway) and Maria's recipe for deep frying, which are a lot simpler and thus less salty.


Ingredients

1.2 kg chicken wings, separated into wings and drumlets

1 tsp sesame seed oil

2 tsp spoon sugar

1 dessert spoon prawn paste

1 tsp cooking wine

2 tsp corn flour

1 egg

½ C tapioca flour for coating

Method

1. Lay parchment (rather than alum foil because the batter sticks to foil even after coating with oil) on the airfry tray and basket. I cooked the drumlets in the lined basket but the wings on a grill mesh on top of the tray so that the oil can drain away.

2. Combine the marinade ingredients (except egg and tapioca flour). Marinade the chicken wings in the marinade ingredients for at least 4 hours or best overnight in a bag for easy clean up.

3. Prepare a tray of tapioca starch and separate bowl of beaten egg. Coat each wing and drumlet with egg followed by tapioca starch. Shake off any excess.

4. Lay the drumlets and wings flat on the tray in a single layer. Lay them meat side up. Do not crowd. I had to separate the wings into 1 tray and drumlets onto a separate tray to ensure consistent cooking times. I also cooked them separately as I couldn't stuff two trays into the oven at the same time.

5. Bake at 160 deg C fo 15 minutes. Turn the drumlets and wings to the skin side up and crank up the oven to 200 deg C. Once done preheating, return to the oven. For the drumsticks, cook for 5-6 minutes and for the wings, cook for 6-7 minutes until it turns golden brown.

Recipe feedback:

- Colour has definitely improved compared to baking! No flour spots. 

- The baking soda really makes a difference to the crunch, as does the corn flour added to the marinade. I made the mistake for forgetting to start with the meat side on the lower temp and ending with the skin side up but otherwise, it was great. 

- Have to comprise on the crispness of the batter by using foil as all my batter stuck to the foil, but for clean up, parchment is the best compromise.


Sunday, August 16, 2020

Sticky cinnamon buns comparison recipes

Since this attempt by Bigger Bolder Baking where I first enjoyed success, I have been trying to find a less sweet and more foolproof recipe. BBB's recipe uses a round tin, which means the centre always comes out undercooked, and the sauce is all sucked into the buns so it becomes overly sweet and not drippy enough.

Here are newer recipes worth trying:

1. Joy of Baking

- Uses a muffin tin so that each bun is nicely formed and still saucy. Can be messy to invert.

- Makes 12 muffin-buns

2. Donna Hay

- Maple and brown sugar glaze

- Makes 12 buns in 20x30cm (8x11") tin

3. Brown Eyed Baker 

- Difference between sticky and cinnabuns

- Uses bread flour

- Pecan in corn syrup and brown sugar glaze

- Makes 12 buns in 9x13" tin

4. Bon Appetit

- Pecan, heavy cream, honey, and brown sugar glaze

- Makes 9 buns in 8x8" square tin

5. Sally's Baking Addiction

- Pecan, maple, brown sugar with milk glaze

- Makes 12 buns in 9x13" tin

Garlic dauphinois potatoes

 Basic recipe: https://www.bbc.co.uk/food/recipes/dauphinoisepotatoes_90205

Ingredients

2 floury potatoes, sliced thinly with a mandolin (I simply sliced them into thin battons) 

1 packet double cream, approx 120ml

4 cloves of garlic, smashed and minced

Milk (approx 50 to 75ml)

Favourite herbs

½ C hard shredded cheese e.g. mozzarella or cheddar or both

Chopped cooked bacon or shredded roast chicken

Salt and pepper to taste

Chives (to serve; optional)

Method

1. Cover a baking dish with parchment. Thinly lay a single lay of potato batons onto the bottom. Sprinkle with some garlic, herbs, and chopped cooked bacon (or shredded roast chicken).

2. Pour on about a third of the double cream. Sprinkle with salt and pepper.

3. Repeat in this order: potatoes, garlic and herbs, chopped bacon, double cream, salt and pepper. Continue until all the ingredients have been used up.

4. If it looks too dry, top up with a splash of milk. You want everything about ¾ submerged so that it doesn't bubble over and overflow. 

5. Cover the entire top with shredded cheese.

6. Bake at 200deg C for 40 minutes, checking to ensure that the potatoes are cooked by piercing through and breaking up with a fork. Turn the grill on high and grill until the cheese is golden brown.

7. Serve immediately with a scattering of chives if available.


Airfried Teochew meat rolls (Bak tiao)

There are different versions of this meat roll depending on the Chinese dialect group they come from, and while some use pork, fish can also be used, but there are even dedicated liver rolls. The more famous version is the Hokkien version that uses pork and five spice called gor hiong 五香 but I'm not particularly keen on the taste of the spice. It also comes fried or steamed, which is more common in Dim Sum. What's common however is the use of beancurd skin. I usually buy the refrigerated beancurd skin rather than the dried one, which needs to be rehydrated but ends up a lot more fragile and prone to tearing compared to the fridged one. Other than pork mince, the ingredients are entirely personal preference. I like adding everything I can get my hands on in my store cupboard, I use it as an excuse to clear out my dried and canned goods.

Ingredients (makes 16 rolls)
1 packet of refrigerated beancurd skins (*Avoid using dried beancurd skins)
500g minced pork
2 or 3 big pieces of wooden ear, soaked
15 water chestnuts, peeled and chopped
4 cloves of garlic, minced
Thumb sized ginger, grated
3 spring onions, chopped
300g prawns, roughly chopped
3 medium carrots, peeled and shredded finely
2 tbsp light soya sauce
1 tbsp five spice powder
Dash of pepper
2 eggs, beaten
Oil (for brushing)

Method
1. Mix all the ingredients except the water and tapioca starch, carrots, and water chestnuts. Mix well and then knead until it becomes a thick paste. Set aside in the fridge to marinade for 1 to 2 hours.
2. Prepare the beancurd skins. Cut to size (approx 25cm by 20cm). 
3. After marinading, add the water chestnuts and carrots and mix them in.
4. Prepare the starch solution by mixing the water and tapioca starch
5. Place 2 to 3 tbsp of the mixture near one of the short edges. Fashion it into a cigar shape. 
6. Apply the beaten egg to the edges of the bean curd skin. Fold the sides in over the meat and roll. Apply more egg wash as needed. Roll tightly and ensure that there are no trapped bubbles.
7. Lay flat on a steaming tray, do not stack on top of each other. 
8. Steam for 7 minutes until cooked. Remove from the steamer and let it cool down completely (e.g., stick it in the fridge overnight). They also freeze well.
9. Air fry at 220 deg C for 10 to 12 minutes, turning halfway. If airfrying from frozen, it will take 12 - 14 minutes.

Try 1: I tried airfrying without steaming and these were the results. I was told that it's because the meat and beancurd skin cook at different rates, so I cannot omit the steaming step!
Try 1: Airfry without prior steaming

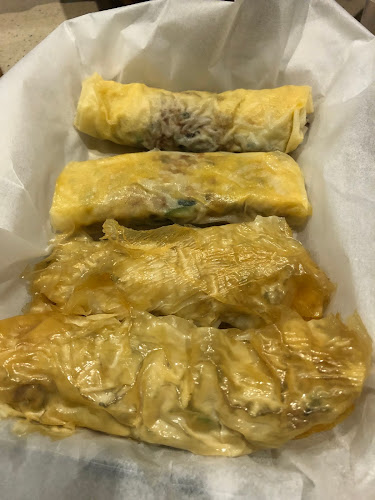
*Try 2: This time, I did steam, but cheated because I used the microwave and steamed for 4 minutes. This picture shows after steaming. It's a bad idea to use rehydrated dried bean curd skins (see bottom rolls in the second picture) as they're very brittle to begin with. After briefly dunking the dried beancurd skins in hot water to rehydrate, the skins then tore and fell apart when I tried to wrap and roll!

Try 2: Bottom 2 rolls used rehydrated beancurd skin. Top 2 rolls used refridgerated beancurd skins
After steaming for 4 mins in microwave: Fridged beancurd skin are the top 2 rolls and rehydrated beancurd skin are the bottom 2 rolls
After brushing with oil and airfrying for 12 mins: Bottom and left are fridged beancurd skins; cut open and the one under it are the rehydrated skin

Verdict: The fridged skins were very easy to work with and roll but after airfying, the skin became chewy rather than crispy. The dried beancurd skins were horrible to work with but perhaps I used the type meant for dessert! The texture however was correct, flakey, puffy and crispy!

Update: a good video recipe by Spice N' Pans of the Teochew prawn version with tips on how to get a qq texture and how to roll.


Red bean bao 豆沙包


I have been wanting to use proper bao flour for the longest time but never really bought it. After my investigation into the different types of flour for bao buns, I tracked down some bao flour, although the packet states 'wheat flour' (not the same as wheat starch), the picture is that of bao buns, so I think I'm in the right place. I am unsure if wheat flour is really the same as bao flour, because although the articles claim that the protein level of bao flour is about the same as cake flour, my KitchenAid had a really hard time trying to beat the flour. The dough continually climbed up the dough hook and it required far more liquid than the original recipe called for. In the end, after 10 minutes, I put my KM out of its misery and hand kneaded the dough for another 5 minutes. It certainly didn't reach the window pane stage nor was it smooth and shiny, so I think I've been undone. (Tip: Found out that to prevent the dough from climbing the hook, alternate wet with dry in 3 batches, instead of dumping everything (wet and dry) into the bowl at once. Source)

Recipe adapted from China Sichuan to upsize to 500g, which is the size of my wheat flour packet. I don't want leftover flour and then I have no idea what to do with it next!

Ingredients (makes 10 big or 14 small baos)

500g bao flour (wheat flour)

60g sugar

2½ tbp yeast

pinch of salt

250 - 280ml milk, warmed to the touch

2 tbsp oil

400g red bean paste

Method

1. Pour all the bao ingredients into a KitchenAid and with the dough hook incorporate at Speed 2.

2. Continue to beat for about 8 to 10 minutes, watching like a hawk to ensure that the dough doesn't climb up the hook and into the motor.

3. Check using the window pane for gluten development. If the dough is not yet shiny and smooth, hand knead for another 5 to 10 minutes. 

4. Form into a ball and put in a oiled bowl. Cover the bowl with cling film and allow to proof for 25 (in a 30 to 35 deg C room) to 45 minutes, depending on the temperature of the room.

5. While proofing, prepare the parchment papers, measure out the red bean paste. Use an ice cream scoop and put on a tray to freeze for a few minutes, and also the steamer. Wrap the cover of the steamer in a cloth so that the condensation doesn't drip on the buns.

6. Divide into 14 pieces. Cover half and put in the fridge to prevent them for proofing. Flatten each piece of dough, and using a rolling pin, roll the edges but leave the centre slightly thicker. 

7. Put approx 1 tbsp or the pre-measured red bean paste in the centre, gather and pinch the edges together. Gently reshape the ball and put the bun down on the parchment, seal side down.

8. Allow buns to re-proof for 15 to 20 minutes, while bring the steamer to a rolling boil. 

9. Steam for 12 to 15 minutes, and then turn off the flame and rest for 5 minutes before opening.

10. Serve hot or re-heat in a steamer to serve.

Recipe feedback

- Texture is finally correct!

- Despite using bao flour, it hasn't come out white. Maybe that's HK flour which is supposed to be bleached

- Dough was very easy to work with however, a bit dry. I have increased the oil by ½ tbsp to make it more pliable. I used the char siu bao pleating to properly seal the bao filling and turned it upside down to obtain the round face. However, the dough's dryness meant that the pleats stayed distinct (you can see the 'butt cracks' on the underside) instead of the rounder shape. It also made sealing the bun difficult, and there were a lot of wrinkles where I had gathered the dough.

- I learnt a little tip! Using a bit of leftover flour mixed with milk or water, I 'painted' the creases or holes and this helped to give it a smoother 'face'!

- How to wrap round bao buns: Use Maangchi's method to create rounder buns where the filling is centered in the middle.

Saturday, August 15, 2020

Taiwanese Castella and Japanese Kasutera comparison recipes

I've learnt that there are two main styles of Castella, the original or Japanese Kastera カステラ, and the colonised adaptation which is Taiwanese Castella. Both are unique in their own way. Japanese Kasutera usually uses honey as the main flavour. The focus is on the moistness yet bounce achieved from bread flour through the use of an insulated or wooden container. It needs to rest overnight wrapped in plastic. Taiwanese Castella uses cake flour and focuses on bouncy sponginess. It is like making a chiffon and baked in a water bath. There is also a Korean version but it's mostly based off the Japanese version, so I'm going to ignore that. Tips and uniqueness of each recipe highlighted:

Japanese kastutera

1. Bake for Happy Kids (In her other recipes, she references recipes from Roti and Rice and Just One Cookbook)

- Loaf tin (20 by 10 cm); Lining tin with aluminium foil and parchment

- 3 eggs, separated

- Cook milk, oil, and honey before adding yolk and flour.

- Sugar at the bottom as optional

- All her attempts (adding extra yolk, omit oil, etc)

2. Just One Cookbook

- Possibly one of the original recipes

- 2 loaf tins (22 by 11cm), lined with parchment

- 6 eggs

- Beat eggs until ribbon stage and add flour

- Focuses on correct beating of eggs and variation of baking time to prevent cracks and sinking

3. Cooking with Dog

- Square tin (19 by 19cm). Very hard core, baked in a square cardboard box lined with alum foil and parchment, then sprinkle bottom with sugar

- 6 eggs

- Beat eggs and sugar in water bath until ribbon stage

4. Roti and Rice

- Loaf tin (19*9cm), lined with al foil and parchment

- 2 eggs, separated. Beat whites until meringue then add yolks and flour.

5. Not quite Nigella

- Loaf tin (26.5*7.5 cm), lined with parchment

- 3 eggs

- Whisk eggs and caster sugar on water bath

- Mixing meringue and flour layers well and quickly

- Most wrinkly looking cake

6. Taste Asian

- details differences between Taiwanese and Japanese version

- Lists common mistakes (use slow mixer speed for meringue, sifted flour for smooth batter, collapsed cake)

- Square (20 by 20 cm) tin, lined with corrugated cardboard with al foil or square tin with old newspapers.

- 7 eggs, separated

- Compares cakes that separate vs beat eggs together. Meringue method has finer texture and smoother.

- After separating eggs, beat whites on low speed on bain marie at 40 deg C until meringue forms. Add egg yolks manually, followed by honey and bread flour, and lastly, milk.


Taiwanese castella

Using butter

1. Emojoie Cuisine - Attempted here.

- Square tin (various sizes listed including 20cm), lined with non-stick parchment. Sounds super bouncy and moist

- 7 eggs separated for 20cm square tin 

- Melt butter and milk to 50 deg C, add flour and yolks

- Very detailed recipe: beat the meringe at the end with hand whisk to stabilise meringue. Use hand whisk to incorporate first followed by spatula for final blending

2. Princess Bamboo

- 6" tin

- Uses flour and corn starch

- Uses butter but doesn't state the temperature to heat to

3. Gracious Treatz (very similar to Emojoie)

- 7" square tin, lined with parchment

- 6 eggs, separated

- Melt butter and milk to add to dough and yolks

- Re-usable non-stick parchment means no wrinkles

Using oil

4. Laura Kitchen

- 8" square tin, lined with parchment

- 5 eggs, separated

- Warm oil to between 70 to 85 deg C. Add flour, milk, eggs.

- Looks like very soft sponge that leaves fingerprints.

5. Mrs P's Kitchen

- 8" square tin, lined with parchment

- 6 eggs, separated

- Warm oil to 65 deg C. Add flour, egg yolks, and milk.

- Looks like a standard sponge and not super fluffy or bouncy

6. Kat Kwa

- 8" square tin

- 7 eggs separated

- Warm oil for 1 minute to 60 deg C.  Add flour and cornstarch followed by milk.

- Looks like standard sponge and not super fluffy or bouncy


Korean chocolate castella

1. Apron Chocolate castella Attempted here.

- Loaf tin 29x7x10cm

- 6 eggs, separated

- Warm oil to between 60 to 70 deg C. Add flour, yolks, followed by milk. 

- Looks like standard sponge and not super fluffy or bouncy

2. Korean Table Diary choc castella

- 16.5x16.5cm square tin

- 5 eggs, separated

- Heat oil for 1 minute on low (no temp given). Add flour, milk, yolks.

- Looks like a very bouncy soft sponge.

Saturday, August 08, 2020

Banana, walnut, raisin, and blueberry loaf

I've had this time and tested recipe for banana bread since the longest time. However, ever since I bought a bigger loaf tin (13x24cm or 5x9.5"), I've been wanting to find a recipe to suit the bigger tin. I found one by Rasa Malaysia but it uses yoghurt, which I don't normally have sitting around in my fridge. So I decided to go back to the old recipe and upsize it.

Ingredients

2C flour

1½ tsp baking soda

¾ C packed brown sugar

pinch salt

2 eggs, beaten

2 tsp vanilla extract

3 mashed bananas

¼ C raisins

¼ C frozen blueberries

¼ C walnuts, chopped; with or 5 4 whole walnuts for decorating

1 tsp cinnamon powder


Method

1. In a big bowl, mix the dry ingredients: flour, baking soda, salt, and cinnamon powder.

2. Add the frozen blueberries and raisins and toss in the flour to coat so that they don't sink.

3. Add the packed brown sugar and ensure that everything is well incorporated and no big chunks of brown sugar. Set aside.

4. In a smaller bowl, mash the bananas with a fork.

5. Add in the melted butter, beaten egg, and vanilla extract. 

6. Add the wet to the dry ingredients and gently fold in. Fold until the flour is just mixed in, there might still be some dry bits. Do not over mix. The batter will be quite thick and chunky.

7. Butter a loaf tin and line it with an overhanging piece of parchment to facilitate easy removal.

8. Pour in the batter and push it into the corners the the tin. Smooth out the top. Decorate with whole walnuts.

9. Bake at 175 deg C for 1 hour or until a skewer inserted comes out clean. At the 45 minute mark, I had to tent it to prevent the walnuts from burning.

10. Leave in the tin for 5 minutes to cool slightly, then remove and continue cooling on a wire rack. Serve slightly warm with butter or jam.

Recipe feedback: The bread had a nice rise but I could taste the baking soda. I wonder if reducing to ½ tsp baking soda would help. It also wasn't as moist as the original recipe but that could be because I had one less banana. Generally I'm happy with the outcome because and additional banana would have increased the baking time.

Bao buns: comparison recipes and tips

I have always made bao with filling but have never really bothered too much with the bread portion of the bao. There are many types of bao bun out there - mantou or the Chinese kong bak baos. The bao process itself is a lot more involved than I expected, such as over-proofing (which makes them dense), wrinkly or pock-marked skins, yellow-ness, and collapsing. These two sources discuss the problems and solutions in detail:

1. Red House Spice: https://redhousespice.com/steamed-bao-buns/

- Type of flour influences more fluffy and less chewy. Bao flour and cake flour have similar protein levels except bao flour is bleached.

- Extended kneading leads to a white colour and good kneading skills mean a smoother skin (ideally, 5 mins in mixer and rest by hand)

- proofing: double in size - timing depends on ambient temp so it can be anything from 40 to 90 mins. The second proofing should only take about 15 minutes.

- removing air, this affects the smooth skin: Beat down to remove the air and shape the dough. 

- Dough collapsing (has never happened to me). Apparently, turning the fire off and waiting, adding sugar or vinegar to the boiling water don't help. What does help is not rolling the dough too thin and having a drier filling (so the moisture doesn't seep into the dough). She even recommends starting from cold water, which I have never ever heard of before! All the blogs I've read all talk about steaming from water on a rolling boil as that gives the instant lift.

2. What to cook today (mantou): https://whattocooktoday.com/soft-fluffy-asian-steamed-buns-every-time.html Additional notes not covered in the previous link are:

- Sugar helps yeast but too much sugar can inhibit yeast growth

- If using KitchenAid, mix for 5 minutes after the dough comes together. Add salt and mix again until smooth. Rest for only 15 mins before shaping the dough. This is resting to make it easier to work with, not proofing as it shouldn't rise.

- Use room temp or cold milk so that the buns don't start proofing while being shaped. If they do, store the proofed buns in the fridge until everyone is ready.

- After the usual tucking of seams underneath and cup shaping with palms (to make the buns tall instead of spreading out after steaming), an additional step for mantou is to roll the dough balls on the table until you get a smooth ball. Dab the surface of each bao with milk to make I make it smooth. The surface is probably less important for me if I'm making bao

- Proofing after the shaping, allow to proof to about 50% of original size, approx 10 to 15 mins. Dough sld feel light and airy and not dense. Finger test: push gently and it should stay indented for a while but must spring back. If it springs back immediately, it's not proofed enough; if it doesn't, it's over proofed. Beat in and reshape and re-proof again. Steaming over-proofed dough will make them collapse and come out dense.

- Wrap the cover of the steam with a cloth

- For smooth surface of the buns, steam at low-medium heat and allow the steam to escape

- After steaming, turn off the flame and let the buns rest for 5 minutes (so buns don't wrinkle or collapse)

- Over-proofing can also cause the buns to collapse. So will too much filling inside.

- After shaping, skins hv to be smooth otherwise they will come out wrinkly.

Update: Tried out the bao skin tips here in the red bean bao.

Thursday, August 06, 2020

IP Cantonese scallop and chicken porridge

Method taken from Burning Kitchen's pork ball porridge. The main trick here is in putting oil and salt into the rice and freezing it for a few hours. This makes the porridge really silk as the rice grains break down very easily. The capacity of the IP is really small. I used to cook the chicken and rice together and it either took forever, or the porridge came out really stogy as I couldn't add that much water. So now I cook them separately and it works well because the chicken will not be over-cooked.

Ingredients
2 tbsp of dried scallops
7 - 8 chicken drumsticks or thighs
1 tbsp salted radish, washed and drained 3x to get rid of excess salt
1 thumb sized piece of ginger, sliced
1 cup rice
¼ tsp salt
2 tsp oil
2 tsp soya sauce, 1 tsp sesame seed oil
Salt and pepper to taste
3.5l water or chicken broth
2 chopped spring onions, optional
Eggs (room temperature), optional


Method
1. Prepare the rice by washing it. Add the oil and salt and stir through. Leave in the freezer for several hours before the start of cooking. Soak the scallop in hot water for at least 10 minutes.
2. Add the chicken pieces, scallop and scallop soaking water to the IP pot. Add the water and ginger slices. Lock and seal and cook using the Soup function for 20 minutes. 
3. Allow to depressurise for 5 minutes. It will squirt everywhere with an oil residue so you may want to put a dish cloth on top of the spout before depressurising.
4. Remove the chicken pieces and set aside. 
5. Add the frozen rice to the broth. Lock and seal and cook using the Porridge function for 20 minutes.
6. Once cool enough to handle, remove the meat from the bones. Marinade with the 1 tsp of soya sauce and 1 tsp of sesame seed oil.
6. Allow the porridge to depressurize for 10 to 20 minutes. It will squirt porridge everywhere because the rice grains swell, so best to throw a dish cloth on top of the spout before depressurising. Stir very well to break up the grains.
7. Add the salted radish and stir through. Add salt and pepper to taste.
8. In each serving bowl, crack the egg at the bottom. Top up with the hot porridge and then top up with shredded chicken. Garnish with spring onions if using.

Updated:
1. Here is a stove top recipe for Chicken Congee which uses a similar method of marinading the rice with oil and salt for 2 hours, except no freezing is involved. The chicken is poached.
- 3/4C rice, 1lb pork shank, 1lb pork bones, and 6.5C water all go into the pot together for 35 mins and 20mins natural release. Pork shank is shredded and then returned with century egg on saute function with constant stirring until the grains break down.

Hokkaido milk bread loaf