Saturday, October 28, 2023

Earl grey cotton cheesecake (improved)

It's been a long time since I've made cotton cheesecakes. I went through through a whole series period in 2017 where I tried so many recipes and methods in an attempt to use my 9 inch pan. All kinds of problems occurred including cracks, undercooked or developing a waist. I read so many different blogs for troubleshooting. There were different temperatures used in a heroic blogpost where I tried 7 different methods, used double cream, higher temp baking which caused it to deflate, finally success using my small oven but with 8 inch pan but failure when I used the same oven with a 9 inch pan. I won't go into those cakes where I left out key ingredients like flour or milk which naturally, failed. This recipe is not very forgiving. In short, I haven't found a really reliable recipe or method.

Although I haven't had much success with my big oven due to poor temp control, I've realised that using the big oven is the only way to bake a 9 inch cake.

Kat Kwa's earl grey cotton cheesecake for 8 inch pan (video) - nothing spectacular aka the standard bain marie method with 5 eggs. She uses condensed milk which I don't have. She uses 3 bags of tea in 160ml hot water and steeps for 15 mins. She uses room temp water for the water bath and bakes 150 deg C for 90 mins. She uses a small oven where the cake sits in the centre but the top of the cake has at least 20cm clearance from the oven roof. The cake doesn't sit inside with the oven off. She unmoulds immediately and removes parchment after it comes out.

I am very brave in attempting to use my big oven again because I want a 9 inch cake using 6 eggs. I'm using MyKitchen 101 (video and written) standard cotton cheesecake adapted for earl grey. I'm also using Kat Kwa's cooking times of 90 to 95 min at 150 deg C instead of Kitchen101's 150 deg C for 40 mins then 140 deg C for 1 hr 20 mins and cooled in switch off oven for 40-50 mins with door ajar. My manual oven cannot change temps so fast.

Ingredients
250g cream cheese, room temp and cubed
50g butter
½ tsp salt
30g sugar (for yolks) and 120g sugar (for meringue)
3 bags of earl grey tea
150g milk (use 170g then extract out 150g milk tea)
70g plain flour + 20g cornstarch (aka 90g cake flour)
6 eggs, separated
2 tsp lemon juice

Method
1. Line a 9 inch baking pan with parchment. Prepare the tea: heat up the milk to 95 deg C and add the 3 tea bags. Steep the bags in the milk for 15 mins then extract out 150g of milk tea.
2. In a bain marie, combine cream cheese, salt, butter and first portion of the sugar and melt then blend until smooth. Remove from bain marie.
3. Sieve in flours and fold in. Set aside.
4. Add egg yolks one at a time and mix well each time.
5. In a very clean bowl, whisk up the egg whites at low speed. Once frothy, add the lemon juice.
6. Add the sugar in 3 batches and mix each time for 1 - 2 mins. Once all the sugar is in, turn up to high speed. Beat until nearly soft peaks then turn down and beat at least speed for 2 minutes to dispel the bubbles. Meringue is ready once shiny and peaks fold over.
7. Add first batch of meringue to batter and gently mix with hand whisk.
8. For the second and third batch of meringue, be more careful mixing in with the hand whisk so as not to knock out the air. 
9. For the fourth and final batch of meringue, pour the batter back into the meringue and use a spatula to fold in, turning the bowl as you fold. Tap the bowl on the counter top to burst the big bubbles.
10. Pour batter into the lined baking tin and tap on the counter top to break big bubbles. Use a skewer to trace out zig zags to dispel smaller bubbles.
11. Place a cloth in a bigger baking tray and place the cake tin on top of the cloth. Pour in room temp water till 1 inch up the side of the tin. (cake cracks if using hot water).
12. Place the cake in the lower third (but not at the very bottom) of the oven and bake for 150 deg C for 90 mins. Turn off oven and remove water bath. Leave cake inside with door ajar for another 30 mins to minimise shrinkage.

13. Remove from oven and unmold completely. Allow to cool on a rack at least 6 cm above the counter top until completely cool. Best to refrigerate overnight before slicing.

Recipe feedback
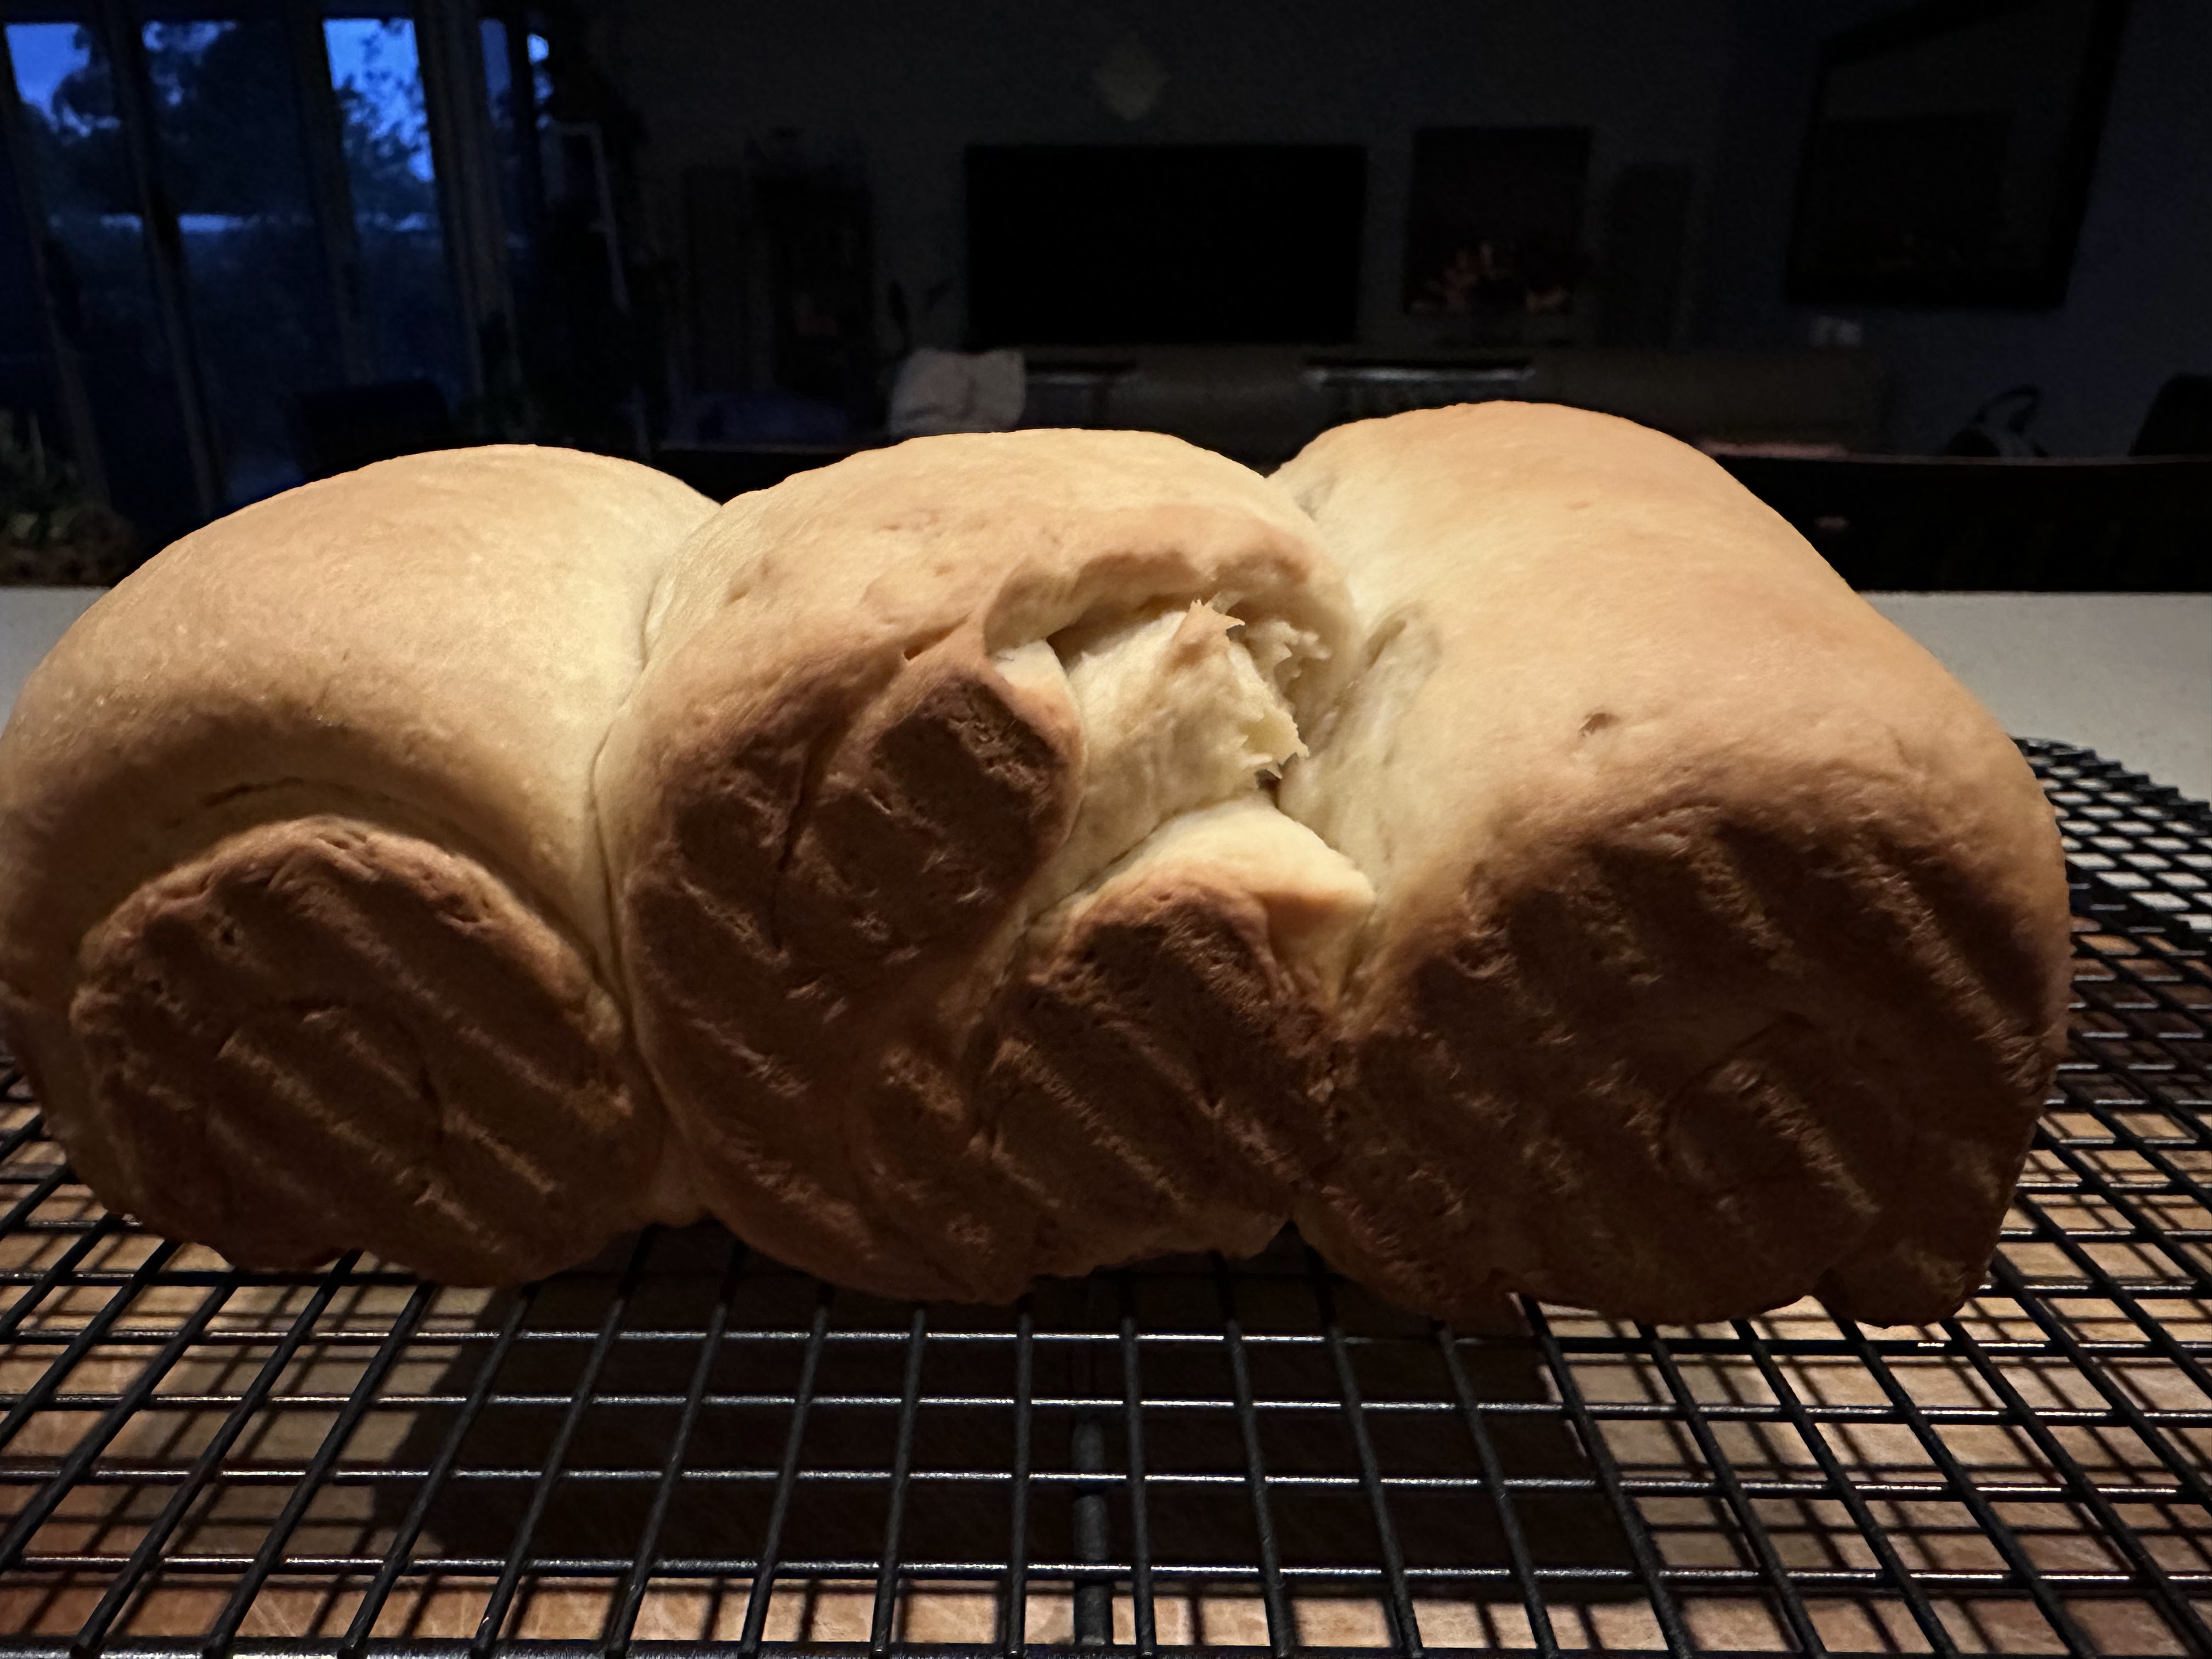
- A really short cake (2 inches tall) but at least no cracks! No waist! The brown isn't very golden but I think the cake is perfection as far as I'm concerned.
- When I peeled off the sides and bottom, the bottom was somewhat moist and soft so I had to be very careful not to tear a huge chunk out of the cake. However, with refrigeration, it should be firm up. At least the bottom is cooked!
- Based on the colour, in this big oven, 160 deg C for 85 minutes with 30 mins resting in the oven with door ajar would probably be ideal, except my big oven doesn't like keeping at 160 deg C for some reason and keeps going above or under.
- Compared to my black sesame cotton cheesecake previously, temp and timing were the same. The only real differences in method were:
1) I left the cake in the oven for further 30 minutes with door ajar instead of removing immediately and dropping it on the counter top. This prevented the waist. 
2) My water bath similarly started from room temp water so no crack (which Kitchen 101 suggests happens when using hot water). Water also only came to 1cm (instead of 1 inch as per black sesame cheesecake) up the side. With both recipes, I didn't wrap the outside of the tin in foil so there wasn't an eggy centre. The water had most evaporated by the time I removed it from the oven!
3) My top also didn't rise as high this time and the colour wasn't as nice because the oven was bigger and the top of the cake wasn't as close to the heating element. Updated: I've realised that I swapped the order of the flour and egg yolk. Looks like they do make a difference as the flour needs to slightly cook in the heated milk + melted cream cheese mixture.
4) I totally removed all parchment, even that at the bottom to prevent any condensation and thus wetness at the bottom. That led to heart stopping moments when I was afraid the cake would tear or split when I was peeling away the parchment from the side and flipping it over to remove the bottom and again when removing the parchment from the bottom.
Cake next day after overnight in fridge. Slight sag at the side because parchment and pan were removed

Beautiful Earl Grey color

Sunday, October 15, 2023

Milk bread with filling (sponge method)

From the comparison recipes, decided to try HappyGoKathy (video and write up) based on her sausage octopus buns. This recipe was highly recommended by Yanna. According to the blogger, the bread keeps moist even after a few days. The recipe uses fridge-cold yeast sponge which works best in summer when other breads can end up over-proofing in the heat.

Sponge

210g bread flour

135ml water, finger warm, around 35 deg C

Instant yeast 3g

1. The night before, combine the ingredients.

2. Knead for 5 minutes then store in a covered container overnight for at least 15-17 hrs.

Main dough

Ingredients

90g bread flour

12g milk powder

25g sugar

60-65ml milk

5g salt

25g butter, room temp and cubed.


Method

1. Put the dry ingredients with torn up sponge into the mixer. Add half the milk. Mix for 2 minutes on Speed 1 until mixed.

2. Add more milk slowly and continue to mix on Speed 2.

3. Once bowl is dry from milk (dough is formed), add salt. Mix for 2 minutes at Speed 2. 

4. Once incorporated, bowl is clean. Turn up to Speed 4 and mix for 8-10 mins. Check dough is elastic when finger poked through windowpane leaves ragged edges. (She encourages putting the bowl before mixing in the fridge to keep it cold!)

5. Add butter several cubes at a time at low speed and mix at Speed 2 briefly each time until butter is mixed in, around 2 mins total. When adding butter, the dough may break up again so use spatula to incorporate and scrape.

6. Once all mixed in, turn up speed for 5-8 mins until finger poked into windowpane leaves smooth edges. Dough is smooth and shiny, elastic and should not be sticky.

7. Form a ball. Dough should not be more than 26-27 degrees C otherwise the bread is coarse if exceeds 28 deg C. Cover and sprinkle the surface of the dough with water. Proof for 30 - 45 mins. When done, insert finger into the dough and the hole may spring back a bit shouldn't totally close up. If it doesn't spring back at all, it's over-proofed!

8. Beat down the air bubbles and cut 8 portions of 65g each (or depending on filling). Form balls. If dough becomes too taut to roll out with rolling pin, rest under damp tea towel for 15 to 20 mins to relax before continuing to shape dough for filling. 

9. Watch the rest of the video if using sausage otherwise use own filling. Dough should be really elastic and easy to seal seams.

10. After shaping bread, cover and allow to ferment for approx 1 hr.

11. Egg wash just a thin layer and sprinkle with sesame seeds if using and then bake at bottom rack at 180 deg C for 15 - 18 mins.

Recipe feedback

- It works! Quite happy that I've never gotten such 'Asian-like' bread before - soft and what anpan should taste like. The dough was elastic and a dream to work with when it came to crimping. 

- I followed my instincts rather than following the timings for mixing given in the recipe because she used a different beater to KA. I based my intuition based on feel and look developed from experience.

- I've also learnt the magic ratio of filling to dough: about 1: 1 is ideal.

Saturday, October 14, 2023

Preferment milk bread comparison recipes

 I have tried so many methods to make red bean bread from tangzong method with bread flour which for some reason turned crusty, tangzong method with bread and cake flour which came out super dry, to Japanese An-Pan with bread and cake flours which was still dry altho fluffy, and also An-Pan with plain flour which came out super dense although fluffy. I also tried making buns from bread flour and condensed milk which were sweetish and great for sweet fillings were a difficult to shape and not very fluffy.  My pan is L21*W12.5*11Hcm (aka 1.5 jin pan which fits 580g dough).

I am trying preferment (Poolish, Biga, Spong-dough methods) - see Jack for an explanation.

After the last failure with sponge method milk loaf, I decided to investigate sponge and gelatinsed dough recipes to try if using filling

1. Taiwanese style HappygoKathy (video and written recipe) octopus sausage buns recommended by YC - overnight preferment has yeast and needs kneading before leaving in fridge. 210g + water and yeast knaded for 5 minutes then storied in fridge for 15-17 hrs. Next day, tear up sponge and add 90g bread flour with milk powder, milk and butter. Prove 30 - 34 mins. Makes eight 65g dough balls. Shape and prove 1 hr. Bake 180 deg C for 15 -18 mins. (Tried here)

2. Kat Kwa's Jap milk bread (video): 500g bread flour in KA, 1hr proof, 3 dough balls in 1 pullman tin, 45 min proof, baked 190 deg C for 40 mins

3. Kat Kwa's earl grey milk bread (video): 100g bread flour with yeast for sponge, 48 hrs rest, scaled milk, 500g bread flour in KA with sponge, prove 45 mins, 2 pullman loaf, prove 45 mins

4. Kat Kwa's 2-styles sausage buns (video): 210g bread flour with yeast beat in KA, proof 2 hrs; 70g bread + 60g plain flour with yeast then beat in KA with proofed dough, condensed milk and egg. Proof 30 mins. Cut into 12. Form traditional coil sausage and also 'grapes-look' sausage with cheese. Proof 45 mins. Bake 180 deg C for 15 mins.

5. Kat Kwa's slitted red bean buns (video): Same method as above and same flour amounts:

6. Kat Kwa's Hokkaido-style milk bread (video): Called gelatinsed dough method, this is overnight preferment with no yeast and needs kneading before leaving in fridge. 100g bread flour + 80g boiling water kneaded for 5 mins and stored overnight in fridge. Next day, tear up gelatinsed dough and add to 400g bread flour with yeast, milk, egg, whipping cream, butter in KA. Prove 50 mins. Create 6 balls and put into 2 Pullmans. Prove 45 mins. Bake 180 deg C for 30 mins.

7. FlavourQuest using taro filling (video) recommended by Isabel - also gelatinsed dough method but slightly different. 200g bread flour with milk and sugar. Knead then overnight in fridge. Next day, already windowpane. Make a well in the dough and add yeast and milk and butter and knead in. Very hard and messy to knead in. If using KA, have to tear up the gelatinsed dough.


Friday, October 06, 2023

Shokupan milk bread (Sponge method)

After my success with using the sponge method to make bao buns, I decided to try this recipe for milk shokupan bread by WTT (video).

Update: This recipe turned out to be a FAIL possibly because I over-kneaded with KA. I read the recipe's commenters and I wasn't the only one based on her mixer's beating timings so I'm not keen to try again.

Ingredients (makes 587g dough)

Sponge

170g bread flour

200g water

23g honey

¼ tsp yeast

Method: Combine ingredients for sponge in a stand mixer and stir on Speed 2 for 2 minutes. Cover and leave in a warm place for 1 - 4 hours. If leaving longer, keep in the fridge for up to 24 hours and no longer.

Bread dough

Ingredients

160g bread flour

½ tsp yeast

20g dry milk powder (produces softer bread than liquid milk but if using liquid, replace all the water in the sponge with liquid milk instead and scald the milk ie simmer at 80 deg C to remove protease enzyme. This enzyme breaks down bread gluten and results in less rise. Let liquid milk completely cool first or it will kill the yeast)

5g salt

25g honey

50g unsalted butter, softened and cubed

Egg wash: 1 large egg + 1 tsp water

1 tsp sesame seeds (optional)

Method

1. Combine ingredients in KA except for butter. Stir at Speed 2 for 1 minute then increase to Speed 4 for 5 minutes. The dough should still be a bit sticky.

2. Add the butter slowly in 3 or 4 increments and beat for about 2 minutes in between. Finally, beat until the dough is shiny and smooth although may still be sticky. Continue to beat for another 7 -10 minutes until windowpane stage. This was very tough on the KA, I kept taking it out to scrape because the dough ball stuck stubbornly together. Once all the butter had been worked in and the bowl was clean, I took it out and hand kneaded for 20 mins and it still didn't reach windowpane.)

3. Gather into a ball and oil a bowl and put it in. Cover. Allow to prove until double it size, about 45-60 mins.

4. Deflate the dough and divide into 3 balls. The bread is very soft so it will collapse as one big loaf. Cover and allow to rest for 10 mins to relax the gluten.

5. Shape the dough accordingly (whether for filling or to fit a shokupan). Cover and prove for another hour until 90% full in the shokupan. 

6. Preheat oven to 180 deg C. Prepare the egg wash. Brush eggwash thinly and sprinkle sesame seeds if using. 

7. Bake in the middle of the oven for 40 mins. Bread may need tenting halfway if it gets too brown. Internal temperature of the bread (right in the centre of the loaf) at 35-40 mins should be 88 deg C. If not, continue baking 3-5 mins and check again. Temp needs to be checked because bread is so soft and airy so needs to be completely cooked otherwise it will collapse under the weight of the crust.

8. For shokupan, drop the tin on the counter to shock it and prevent shrinkage. Brush with melted butter if preferred. Let sit in the pan for 5 mins. Remove bread from pan and lie loaf sideways on a cooling rack for 15 mins. Totally remove bread and leave it to cool completely on the rack (about 2 hrs). Do not attempt to slice bread until completely cool or bread may collapse or turn gummy!

Recipe feedback

- This is a really long recipe even in summer because of the sponge dough development and then two provings, and then the bread takes another 40 minutes to bake. That's almost 7 hours (including preferment; even longer in winter) of inactive time. It will help reduce half the time if the preferment is done overnight.

- This bread isn't great for filling. The seams are hard to close as the dough seemed very dry right from the moment the main dough went into the KA - there is no liquid to bind other than the honey, I was almost tempted to add water because there were spots of dry flour. The Sponge isn't very wet either (when I used milk). Even if I had used water + milk powder separately in the sponge and main dough as the recipe wrote, it's hard to see how the bread would end up being moist.

- First attempt: not sure what happened but didn't rise. Was it the salt I accidentally added in the sponge?

- After some research, I think I have overkneaded because this is what happens - it became difficult to knead (stiff) and bakes as dense and hard because it can't rise. I had found it very difficult to knead in KA (dough kept balling and refused to be kneaded) cos I thought it was too little water. So after 20 mins in KA when it was already smooth and not tacky, I still took it out to knead by hand for 10 mins cos I could never achieve windowpane stage. 

- Different to over proofing which tight squat with gummy crumb as mine actually had a soft crumb. Overproofed dough can be saved by just punching out and proofing again. There is no way to save over-kneaded dough. Can try letting the dough relax/proof for double the amount of time but it doesn't always work.

- How to correctly proof dough by Perfect Loaf. Underproofed would suddenly 'over spring' with massive rise, dough ruptures, large hole pockets with dense spots. Properly proofed dough has even crumb and even dispersion of holes. Overproofed dough has no oven spring, squat, dense with tiny holes. Overproofed is better than under cos at least the dough will be delicious (taste). Make foccasia or crotons.

Sideway view when sitting on side to cool
Top of loaf when sitting on side to cool
View of loaf from side. No rise
Top view of loaf

Sunday, October 01, 2023

Mooncake mold pastries recipe comparison

I bought so many mooncake molds (long story involving a rouge eBay seller) that I don't know what to do with them. So here is a compilation of pastries that utilise the mooncake maker.

Hakka moonlight biscuits

These use leftover golden syrup and cooked glutinous rice flour and don't require baking, only airdrying which I find odd and honestly, I'm not comfortable with.

MyKitchen101 (video) - makes her own quick golden syrup and air dry overnight.

ArinFood (video) - uses golden syrup and butter. Air dry for 2 days

Kathrine Kwa (video) - uses golden syrup and oil. Steams 20 minutes to cook.

Anncoo Journal black sesame version - Adds black sesame and uses crisco. Air dry for 2 days.

Mung bean cake

Very basically this is just the standard recipe for mung bean paste without even a binding agent eg glutinous rice flour or any flour

Souped Up recipes (video) - 200g dried mung bean

Kathrine Kwa (video) - 500g dried mung bean

Macau almond cookies

Several variations, either using mung bean flour or making the flour from scratch, and adding almond meal.

Grace baking (video) - Almond flour and mung bean powder with butter

Dawn Kee (video) - Simple version using mung bean flour and almond powder, with butter.

Meizilooloo cook (video) - Two types of biscuits, crispy vs moist

Curious cuisine - Almond flour, mung bean flour, rice flour. Explains that both green mung bean flour an yellow mung bean flour can be used.

WTTC - Explains difference between mung bean flour and mung bean starch

- Suggests other variations e.g, salted egg yolk, black sesame, lard, floss instead of almonds.

- Ratio of mung bean flour to almond flour is 1:1 but can use all of one or the other.

- Bonus Kuih Bangkit recipe

Soya sauce Korean rice cakes