Tuesday, January 27, 2009

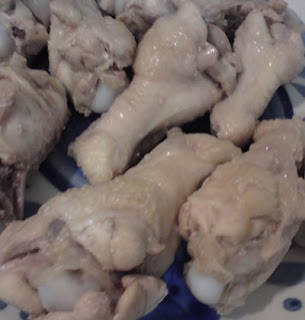
Foochow Ang Chow Chicken

Thanks to the 'goods' from my Aunt (kao mo), I finally got to make this beloved dish that my Gran used to make. Altho I can't remember exactly how it tasted when they made it (since she's left for almost 10 years now and wasn't able to make it for the last 8 years of her life), the smell of the frying chicken in ang chow was enough to invoke old memories and bring tears to my eyes (literally!) This recipe is taken off the Internet and I've added mushrooms and bamboo, because that's what Gran added, and further adapted to suit personal taste..one day I shall get the original recipe from my kao mo!

Ingredients
1 kg chicken or chicken parts (I prefer using wings and drumlets as I hate chopping chicken)
1 generous knob of ginger, sliced thinly in shreds
2 tbsp sesame seed oil
1 ltr chicken broth (this makes a very soupy dish, if you want the 'dry' gravy version, halve the liquid)
5 tbsp red rice residue (ang chow)
1/2 cup Foochow red rice wine (no other cooking wine will do, this makes all the difference!)
12 dried mushrooms (soaked in water until soft, and reserve the water), sliced into halves
1 can of bamboo shoot (I used the fresh packet type)

Method
1) With a bit of cooking oil, fry the ginger strips until fragrant.
2) Add the sesame seed oil and fry the chicken until browned.
3) Add the mushrooms and bamboo and incorporate.
4) Add the red rice residue and stir well.

5) Add the chicken broth (I also pour in the water used to soak the mushrooms, just ensuring that total liquid makes up to 1 litre)
6) Leave to simmer on gentle fire until cooked (about 20 minutes).
7) Add in the red rice wine, and bring back to a boil. Turn off the flame once you get a rolling boil. (I like a less 'wine-y' taste so I add the wine earlier on, around the 15 minute mark so that some of the alcohol will burn off)
The soup will have a slightly sourish taste, that's normal and it comes from the ang chow so don't be alarmed. I added about 1 tsp of sugar to offset the taste a bit and also 1 tsp of oyster sauce (which I read on some websites) but its also fine without these 2 additions. I didn't add salt but a bit of pepper, but you can always add salt and pepper to taste.

Sunday, January 25, 2009

Red rice wine chicken (红槽鸡)

SIL just gave birth and somehow DIL got the idea to make red rice wine. This brings back so many memories of granny so I did some surfing and got these 2 links. Will try them out some time!

My gran's version includes fresh bamboo but this comes close.
红槽鸡
Here's how to make the wine:
红槽

In the western world, it is called red yeast rice and is being used as a TCM cure for cholesterol. Amazing what our forefathers knew!

I've never actually ever eaten this in my life before, and I think its actually Hakka:
红槽鸡面线

Wish me luck!

Saturday, January 24, 2009

Andrea's Chicken Rice

Got this chicken recipe from Andrea.

Ingredients
1 whole chicken, cleaned
2 slices of ginger (1 slice whole and 1 slice shredded)
2 cloves garlic
2 chopped shallots
1 tbsp sesame seed oil
1 tbsp light soya sauce
1 cup rice
Pinch of salt

Method
1) Pop a cleaned chicken into boiling water which has a slice of ginger.
2) Remove scum and turn down flame to a simmer.
3) Simmer uncovered for 20 to 25 minutes. Check for doneness by piercing a chicken leg in the thickest part to see if blood still oozes out. Reserve the water for later.
4) Dunk into a ice bath for about 5 minutes.
5) Once cooled, pat dry with kitchen towels. Use a mix of light soya sauce and sesame seed oil and rub into the skin.
6) To make a serving sauce, take a bit of the leftover sesame seed oil and soya sauce (dripping from rubbing the skin), add a bit of the water used to make the chicken.
7) Fry the ginger shreds, shallots and garlic until fragrant. Add the garlic last because it tends to burn fastest. Add the washed rice and stir fry until the rice grains turn a bit translucent.
8) Pour the rice into a rice cooker and add enough of the reserved water (used to poach the chicken) to cook the rice. Add a pinch of salt.
9) Any leftover reserved water can be used as soup e.g. add veggies like cabbage and tomato, and a bit of salt.

Kuih Bangkit

I used to make this with my Grandma on CNY eves after coming home from school. Till now, my deepest memories are of her frying flour in the wok, and then me cutting out shapes with the kueh bangkit cutters and crumping them. But what type of flour always escaped me...until now. (I always knew it was this particular small roll of flour and if you bring me to the supermarket I would be able to pick it out (if it is still in production that is) but I never knew what flour it was.

Thanks to my new ladies' forum, I finally got my answer - the humble tapioca flour!

Kuih Bangkit

Sunday, January 18, 2009

Pineapple Tarts

This recipe came from today's Sunday Plus. Looks dead easy to make esp if u get the ready made pineapple jam from places like Phoon Huat. A work auntie once told me that the jam from Phoon Huat tends to be very sweet, so she'll dilute with her own unsweetened pineapple jam.
The words are probably too small to read so I've reproduced it here, but the pictures are useful.

FILLINGIngredients2 medium sized pineapples, skin removed and cut into quarters
150g sugar

Method1) Grate the pineapple finely.
2) Place the grated pineapple in a cheese cloth and squeeze to remove any excess juice.
3) Cook the grated pineapple in a saucepan over low heat, stirring continously to prevent the pineapple from burning.
4) After 5 minutes, add sugar to the pineapple gradually, stirring to ensure that it is well incorporated. Taste the mixture to determine if more sugar is required.
5) Continue stirring the mixture over low heat for about 1 hour until all the moisture has evaporated.
6) Cool the pineapple filling on a table top for about 30 minutes before placing it in the refridgerator for another 30 minutes.
7) Remove the pineapple jam from the refridgerator, scoop a teaspoon of it and roll between your palms to form a ball with a 2 cm diameter. Set the pineapple ball aside and repeat for the rest of the filling.

TART (Makes about 40 tarts)
Ingredients250g butter, room temperature
1 tsp vanilla essence
1 egg yolk
440g plain flour
1 tbs milk powder
pineapple filling (above)
1 egg, beaten

Method
1) Preheat the oven to 165 deg C.
2) Cream the butter and vanilla essence with an electric mixer on medium speed for about 10 minutes.
3) Add the egg yolk and continue mixing for about 2 minutes until well incorproate.
4) Sift the flour and then the milk powder into the mixture. Mix on low speed for 2 minutes before increasing it to medium speed for 3 minutes, until a coarse, crumbly texture forms. (photo A)
5) Place the mixture in a large bowl and knead it for about 5 minutes until a smooth ball of dough forms. (photo B)
6) Leave the dough in the bowl, seal it with clear plastic wrap and place it in the refrigerator for about 20 minutes.
7) Remove the dough from the refrigerator, pinch a small amount of it and roll between your palms to form a ball with a 2.5cm diameter.
8) Flatten the dough into a circle and wrap it around a ball of pineapple filling. Repeat steps 6 and 7 for the rest of the dough. (photo C)
9) Brush egg wash over the pineapple tarts and bake in the oven for about 15 minutes until the tarts turn golden.

Saturday, January 10, 2009

Bak Zhum Kai (White cut chicken)

Suddenly had a craving for bak chum kai. Did some research and found that its a Cantonese dish and in the old days, just like nonya women were judged for their cooking skills by how well they could turn out nonya dishes, similarly, Cantonese wives were tested on their cooking skills based on how well they could turn out a succulent and tender bak zhum kai where the breast is still moist but the thighs are cooked thru. There are apparently hundreds of methods for doing so, and every cook has their version. I found 3 that were most Singaporean/Malaysian and also easy enough to do without having to wait hours.

Here's my variation culled from these 2 sources:
1) Kitschow 2) Eating China

Method

1) Put a 1.5 to 2 kg chicken in a big pot, breast down first. Add a big piece of ginger.
2) Cover it with water. The water should cover the chicken by about an inch.
3) Bring to a boil. Cover and simmer for 15 minutes.
4) Turn off the flame and skim off any scum. Cover and let chicken steep for 30 - 40 mins (depending on size). To tell if the chicken is cooked, stick a meat thermometer into the thickest part of the thigh, it should read 170 deg C, or usually I just prick it with a fork in the thickest part of the thigh and press down. The juices running out should run clear. If its bloody, return chicken to steep some more.
5) Pour chicken in a colander and drain off the poaching water. Reserve the water for later use (e.g. to cook rice and voila, chicken rice! Or make soup by adding veg). Place chicken in an ice bath for a few minutes to seal in the juices.
6) Once the meat is cool, pat dry with kitchen towels. Rub the skin with sesame seed oil. Set the chicken aside until ready to chop up.

There are various sauces that can be served with this - ginger and scallion sauce (equal parts ginger and scallion finely minced, pour boil oil over it), ginger sauce (minced ginger and sesame seed oil) or chicken rice chilli sauce. Check out the links for the recipes.

There's also a far more complicated recipe by Grace Young, younger sister of Amy Tan of Joy Luck Club fame.

Soya sauce Korean rice cakes